CD Stereo System XR-X77 U OPERATING INSTRUCTIONS En (English) MANUAL DE INSTRUCCIONES E (Español) MODE D'EMPLOI F (Français) C Owner’s record For your convenience, record the model number and serial number (you will find them on the rear of your set) in the space provided below. Please refer to them when you contact your Aiwa dealer in case of difficulty. Model No. Serial No. (Lot No.
IMPORTANT SAFETY INSTRUCTIONS WARNING To reduce the risk of fire or electric shock, do not expose this appliance to rain or moisture. En Read the Operating Instructions carefully and completely before operating the unit. Be sure to keep the Operating Instructions for future reference. All warnings and cautions in the Operating Instructions and on the unit should be strictly followed, as well as the safety suggestions below.
TABLE OF CONTENTS Outdoor Antenna Lightning Power lines - An outside antenna system should not be located in the vicinity of overhead power lines or other electric light or power circuits, or where it can fall into such power lines or circuits. When installing an outside antenna system, extreme care should be taken to keep from touching such power lines or circuits as contact with them might be fatal.
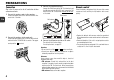
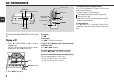
PREPARATIONS Connection Plug in the AC power cord to the AC outlet after all other connections are made. 1 Connect the speaker cords to the speakers. Connect the copper cords to the + terminals and the silver cords to the – terminals. En 3 Connect the supplied antennas. Connect the FM antenna to the FM 75 Ω terminals and the AM antenna to the AM LOOP jack. Connect the FM antenna to the FM 75 Ω terminals without the 2 mark, as illustrated.
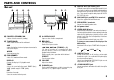
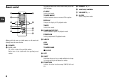
PARTS AND CONTROLS Main unit 1 2 3 4 9 8 0 8 DIGITAL OUT (OPTICAL) jack CD digital sound signals can be output through this jack. Use an optical cable to connect digital audio equipment. Remove the dust cap from the DIGITAL OUT (OPTICAL) jack. Then connect an optical cable plug to the DIGITAL OUT (OPTICAL) jack. 9 AM LOOP jack and FM 75 Ω terminal Plug in the supplied AM and FM antennas. En 0 SPEAKERS3 terminals Connect the supplied speaker cords.
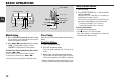
Remote control 1 7 En 4 5 6 8 PRESET +, - CLOCK Selects clock mode. 0 VOLUME +, - TUNER MODE Switches between stereo or monaural FM reception. 2 3 The numbered buttons take on these functions when pressed with SHIFT held down: 8 9 0 ! DISPLAY Changes the display in CD playback mode. TIMER Selects timer mode. 3 RANDOM/REPEAT Selects random or repeat CD playback mode. PROGRAM Selects programmed CD playback mode.
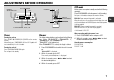
ADJUSTMENTS BEFORE OPERATION POWER 6STANDBY/ON ECO mode ECO/DIMMER SET Reduces power consumption in standby mode with the following operations. POWER Press ECO/DIMMER while the power is off (standby). Each press of the button changes the mode as follows; CD,AUX TUNER/BAND SET f,g f,g TUNER/BAND, AUX, CD ECO ON: Power economizing mode is activated. When the unit turns off, everything on the display clears and only the red indicator on POWER lights to show that the power is being supplied.
CD OPERATIONS 0–10, +10 DISPLAY E zOPEN/CLOSE DISPLAY RANDOM/ REPEAT En PROGRAM E s f,g SHIFT s f,g This unit plays back finalized CD-R/RW discs as well as audio CDs. To stop play Press s. Playing a CD To pause play Press E. Press again to resume play. 1 Press z OPEN/CLOSE to open the disc compartment. To skip to the beginning of the current/preceding/ succeeding track Press f or g repeatedly . Place a disc with the label side up. Then close the disc compartment by pressing z OPEN/CLOSE.
Random/Repeat play Programmed play In random play mode the unit plays all the tracks in random order. In repeat play mode it plays repeatedly all the tracks or the track being played. You can select random and repeat all play at the same time. Plays back up to 30 selected tracks in programmed order. 1 Press RANDOM/REPEAT repeatedly on the remote control. The mode changes as follows: "" 1": Plays one track repeatedly. Select the track with f or g. """: Plays all the tracks repeatedly.
RADIO OPERATIONS TUNER MODE Tuning in preset stations 1 Select the band. TUNER/BAND SET 0–10, +10 En s SET POWER s PRESET PRESET +,TUNER/BAND f,g SHIFT f,g Manual tuning Preset tuning 1 Press TUNER/BAND repeatedly to select a band. Preset up to 32 of your favorite stations and tune them in directly. The unit switches to the radio from any other function and alternates between FM and AM. 2 Press f or g repeatedly to tune in a station. "TUNE" is displayed when a station is tuned in.
SOUND ADJUSTMENTS Adjustments To switch to monaural FM reception Hold down SHIFT and press TUNER MODE on the remote control so that "MONO" is displayed. To cancel, repeat the above so that "STEREO" is displayed. TONE Tip: When FM stereo reception is poor, switching to monaural reduces noise. TONE VOLUME +,VOLUME To switch the AM tuning interval The default setting of the AM tuning interval is 10 kHz/step.
TIMER OPERATIONS TUNER/BAND, AUX, ECD POWER SET CLOCK Sleep timer Turns off the unit automatically after a specified time. 1 Press SLEEP on the remote control. TIMER TUNER/BAND, AUX, ECD, s En SET POWER 6STANDBY/ON s VOLUME f,g Setting the clock 1 Hold down SHIFT and press CLOCK on the remote control. When the unit is turned off, you can also press SET. 2 Within 6 seconds, press f or g to set the time. Each press changes the time in 1-minute steps.
7 Prepare the source. Timer playback Turns on the unit at a specified time for the specified duration. Make sure the clock is set correctly. 1 Hold down SHIFT and press TIMER on the remote control. "5" lights up and " PLAY" is displayed. 2 Within 12 seconds, press SET. 3 Press f or g to set the timer-on time, and press SET. Each press changes the time in 1-minute steps. Holding these buttons down will vary the time in 10-minute units.
REFERENCE En Care and maintenance Troubleshooting Occasional care and maintenance of the unit and the software are needed to optimize the performance of your unit. If your unit fails to perform properly, check the following guide and the relevant sections of the Operating Instructions. To clean the cabinet Use a soft and dry cloth. If the unit surfaces are extremely dirty, use a soft cloth lightly moistened with mild detergent solution. Do not use strong solvents such as alcohol, benzine or thinner.
GENERAL Specifications MAIN UNIT CX-LX77 TUNER FM tuning range FM usable sensitivity (IHF) FM antenna terminal AM tuning range AM usable sensitivity AM antenna 87.5 MHz to 108 MHz 13.2 dBf 75 ohms (unbalanced) 530 kHz to 1710 kHz (10 kHz step) 531 kHz to 1602 kHz (9 kHz step) 350 µV/m Loop antenna Total harmonic distortion Input Outputs COPYRIGHT Check copyright laws relevant to recordings from discs or radio for the country where the unit is to be used.
NOTE This equipment has been tested and found to comply with the limits for a Class B digital device, pursuant to Part 15 of the FCC Rules. These limits are designed to provide reasonable protection against harmful interference in a residential installation. This equipment generates, uses, and can radiate radio frequency energy and, if not installed and used in accordance with the instructions, may cause harmful interference to radio communications.