
User Manual


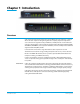


Table Of Contents
- Installation & Operation Guide
- Trademarks
- Copyright
- Contacting Support
- Overview
- System Requirements
- What’s In The Box?
- In This Manual
- Installation Overview
- Connecting to your Computer
- Installing Io XT/4K Software
- Using Io XT/4K with Professional Video /Audio Software
- AJA Control Panel Overview
- Control Panel Operation
- Using Io 4K for UHD/4K
- If You Run Into Problems
- Updating Software
- Support
- Io XT Specifications
- Io 4K Specifications
- Machine Control
- Appendix B: Safety and Compliance
- Federal Communications Commission (FCC) Compliance Notices
- Canadian ICES Statement
- European Union and European Free Trade Association (EFTA) Regulatory Compliance
- Korean Compliance Statement
- Taiwan Compliance Statement
- Japanese Compliance Statement
- Translated caution statements, warning conventions and warning messages
- Before operating your AJA unit, read the instructions in this document
- Limited Warranty
- Limitation of Liability

Io XT/4K v10.5r2 www.aja.com
10
Connecting to your Computer
1. With your computer off, connect a Thunderbolt cable between the computer and
the Io XT/4K.
2. Power the unit (AC supply or battery) and if it is Io XT, turn it on using the power
button on the front. Io 4K does not have a power button.
3. Cable the system audio and video sources, VTR, audio monitor, and video monitor.
4. When you run the AJA Control Panel, you’ll notice that the Io XT/4K is auto-
discovered as long as it is properly cabled and powered up.
5. Please read "Chapter 3: Operation on page 22". (The latest version of the manual can
be downloaded from the AJA support page provided above.)
Cable Connections Io XT and Io 4K connections are made directly to the unit’s rear connector plate. Both
have a Tascam-style DB25 connector providing 8 audio output channels.
Figure 2. Io XT Connectors
Figure 3. Io 4K Connectors