User Guide English Manual Version 1.
Table of Contents Introduction ................................................................3 Appendix ................................................................... 21 Support .................................................................... 3 Fingering Charts .................................................... 21 EWI ........................................................................... 22 Getting Started ........................................................ 3 Saxophone...........
Introduction Thank you for purchasing the EWI Solo. At Akai Professional, we know how serious music is to you. That’s why we design our equipment with only one thing in mind—to make your performance the best it can be. Support For the latest information about this product (documentation, technical specifications, system requirements, compatibility information, etc.) and product registration, visit akaipro.com. For additional product support, visit akaipro.com/support.
3. Connect Important: The scenarios below are not mutually exclusive. The EWI Solo can send out audio from its Line Out, from its Phones jack, and through the built-in speaker all at the same time. The exception is when the EWI Solo is connected to your computer and powered off (the third scenario in this section): it will send MIDI messages to your computer but not send any audio. To disable the built-in speaker, use the Global Menu.
4. Play! Hold the mouthpiece gently between your lips with your teeth, and exhale so your breath passes through both sides of your mouth. The EWI Solo detects this wind pressure with the breath sensor and expresses the change in sound volume and character, depending on how you blow. (It should not take much breath to activate the instrument.) Tips: • There is a bite sensor in the mouthpiece.
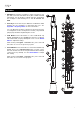
Features 1. Mouthpiece: Hold the mouthpiece gently in between your lips with your teeth and exhale into it (like a traditional wind instrument). You can produce a vibrato effect by gently biting the mouthpiece while blowing into it, but do not bite too hard. 1 6 8 2. Note Keys: Press these keys in different combinations while blowing into the mouthpiece to determine the note. See Appendix > Fingering Charts for more information.
5. Display: This screen allows you to view programs, browse menus and edit parameters. 5 6. Encoder: This encoder is used to navigate the display and select presets, depending on which mode is selected. When no mode is selected, turn the encoder to adjust the audio volume. 7. FX (Effects) Button: Press this button to view available effects and set their level. Use the encoder to select Reverb, Chorus, or Delay, and adjust the available parameters.
14. Grounding Plates: Always touch these plates while playing. 15. Octave Rollers: Move your thumb up or down over these rollers to shift the note keys' range. You can shift them up to four octaves higher or up to two octaves lower. Always touch these octave rollers while playing. When the rollers are not touched, EWI Solo will play the lowest octave. 14 15 16.
Operation The EWI Solo is a wind-instrument-type MIDI controller with an internal sound module and built-in effects. It allows you to perform with the articulation of an acoustic instrument but also with the character of an electronic instrument with a wide variety of sounds and tonal colorings. The EWI Solo is a musical instrument much like other acoustic instruments, so the more you practice, the better you'll play.
Edit Mode EWI Solo's Edit Mode allows you to adjust the internal programs to your preference. To use Edit Mode: 1. Press the Edit button to enter Edit Mode. 2. Use the encoder to scroll through the available edit options: Pitch Tuning, Filter, LFO 1 and LFO 2. • Pitch Tuning: This determines the coarse pitch tuning of the program, up to an octave lower or higher than the pitch played (-1200 – 0 – +1200 cents). • Filter: o Cutoff: This determines the center frequency of the filter (-100 – 0 – +100%).
Using FX You can use the EWI Solo's FX Menu to apply and edit three different effects to its audio output: Reverb, Chorus, and Delay. Important: Your EWI Solo's audio output must be enabled to edit its effects. If you are using it as a MIDI controller only (its Preset LED is flashing), enable its audio output by pressing and holding the Power Button until its Preset LED is lit solid. Tip: When FX are added to a Program, the Save LED will light to indicate changes have been made.
Delay The Delay effect produces an echo of the original signal for a specified period of time. To add Delay to the Program: 1. Press the FX button. 2. Use the encoder to select Delay, and then press it to select. 3. Use the encoder to select the Delay setting, and then press it to select: Off, Short, Mirror, Long or Custom. The Custom setting has the following parameters: • Level: This determines the amount of delay applied (0–100). • Time: This determines the rate of the delay (0.0–742.9 ms).
Global Menu The EWI Solo has been given optimal default settings, but we recommend adjusting them to your preference to get the most out of your performance. You can customize these settings in Global Mode. To enter the Global Menu, press the Global button. To navigate the Global Menu, turn the encoder. To select a submenu or option, press the encoder. To move backwards in the Global Menu or exit it, press the Global button.
Breath Sensor The mouthpiece's breath sensor translates the strength of your breath into the volume and character of the note you're playing. It's important to set the sensor's sensitivity so it suits your playing style. Tip: If this is your first time using the EWI Solo, you may want use a "lighter" breath sensor setting for easier blowing. With practice, you can set this control at a "heavier" setting for a more expressive performance.
Bite Sensor The bite sensor controls the character of the vibrato effect you generate when you bite the mouthpiece while playing a note. Note: The vibrato effect is obtained by biting the mouthpiece many times rather than a single steady bite. • Sensitivity: This determines how responsive the bite sensor is to the amount of pressure used (0–25). The higher the value, the less pressure required when biting the mouthpiece. • Filter: A high-pass filter will be applied to the bite sensor (Off, On).
Fingering The EWI Solo lets you select from different fingering modes to accommodate different styles of playing. • Standard EWI: This mode is the standard fingering for the EWI Solo, based on the fingering of conventional woodwind instruments. • Saxophone: This mode closely represents the fingerings of a standard saxophone. In this mode, EWI Solo will ignore fingers that are two notes below the highest note.
Pitch Bend Plate When you touch the pitch-bend plate, the EWI Solo will bend the pitch of the note you are playing, allowing you to be more expressive with your performance. Alternatively, you can set the pitch-bend plate to send messages for other individual MIDI Continuous Controllers (CCs). Important: The overall change in pitch varies by how much of the plate your thumb is touching as well how it is touching the plate. Experiment with these settings for the best results.
Interval Button When you press the Interval Button, the EWI Solo will enter Interval Mode, which will cause an additional note—at a particular interval—to sound above or below the fingered note, creating a harmonized sound. Important: While in Interval Mode, portamento messages from the glide plate will be disabled. • Off: Select this to disable the Interval button. • Fixed Interval: In this mode, pressing the Interval button will play a harmony at the interval set here (-24 – 0 – +24).
Other Functions Restoring Default Settings To return all of the EWI Solo's settings to its factory defaults: 1. Disconnect the EWI Solo from your computer. 2. Power off the EWI Solo by pressing and holding the Power button for a full second and then releasing it. 3. Press and hold the Program button, FX button, and Hold button. 4. Power on the EWI Solo by pressing and holding the Power button for a full second. 5. Release all buttons. 6.
Updating the Firmware The EWI Solo's firmware is easy to update. Follow these steps to update the firmware and take advantage of any new and improved features or functions. Tip: We recommend visiting akaipro.com occasionally to check for available updates to the EWI Solo firmware, EWI Solo Editor, and documentation. To update the EWI Solo's software: 1. Visit akaipro.com, find the webpage for EWI Solo, and download and install the latest EWI Solo Editor. 2.
Appendix Fingering Charts K1 K2 K3 K4 K5 K6 K7 K8 K9 K10 K11 K12 K13 K14 The above diagram shows how the note keys are referenced in the following charts for the various fingering modes: EWI Oboe Saxophone EVI Flute EVI Reversed Use your left hand to play K1–K6, and use your right hand to play K7–K14.
EWI 22
Saxophone 23
Flute * You can press K8, K9, or K11—or any combination of those note keys—to play this A#. ** This is the only non-flute fingering that flute players will need to learn. † For these alternate fingerings, repeatedly tap the half-filled key to trill between the two notes listed.
Oboe † For these alternate fingerings, repeatedly tap the half-filled key to trill between the two notes listed.
EVI EVI Reversed The EVI Reversed fingering is identical to the EVI fingering, but the octave rollers are reversed.
Menu Structure Global Menu Values Breath Sensor Offset Sens Learn Capture Delay Output Mode Breath CC Low, Hi Volume CC Low, Hi Expression CC Low, Hi Aftertouch Low, Hi Channel Pressure Low, Hi Custom CC Controller Number 0–127 No Breath 0–127 Breath 0–127 Lock Velocity Off, On Output Velocity 0–127 Constant Output Off, On Output Velocity 0–127 Bite Sensor Sensitivity Filter Off, On Output Mode Off Pitch Bend -63 – 0 - +63 Add to Breath -63 – 0 - +63 Custom CC Controller Number
Global Menu (continued) Values Glide Plate Portamento Time CC Enable On, Off Time CC Data-Up 0–127 Time CC Data-Press 0–127 Switch Enable Off, On Data-Up 0–127 Data-Press 0–127 Controller Number 0–127 Data-Up 0–127 Data-Press 0–127 Legato Time Custom CC Pitch Bend Plate Pitch Bend -63 – 0 – +63 Custom CC 0–127 Controller Number 0–127 Data-Up 0–127 Data-Press 0–127 Hold Button Off Legato Mode No Latch, Latch Non-legato Mode No Latch, Latch Custom-CC Controller Number 0–127
FX Menu Values Reverb Off Small Room Large Room Hall Custom Level 0–100 Damping 0–100 Room 0–100 Level 0–100 Rate 1–3 Hz Depth 0–100 Level 0–100 Time 0.0–742.
Program List Number 1 2 3 4 5 6 7 8 9 10 11 12 13 14 15 16 17 18 19 20 21 22 23 24 25 26 27 28 29 30 31 32 33 34 35 36 37 38 39 40 41 42 43 44 45 46 47 48 49 50 Name Alto Sax Tenor Sax Baritone Sax Soprano Sax Jazz Flute Jazz Clarinet Bass Clarinet Trumpet Dongxiao Erhu Retro Bass Truth Piccolo Trumpet Harmon Trumpet Cup Mute Trumpet Ballad Trombone Trombone Cup Trombone Pop Brass Section Trumpet n Mute Muted Brass Section Classy Brass Section Brass Section 1 Brass Section 2 Tuba Classical C Flute Classica
Number 101 102 103 104 105 106 107 108 109 110 111 112 113 114 115 116 117 118 119 120 121 122 123 124 125 126 127 128 129 130 131 132 133 134 135 136 137 138 139 140 141 142 143 144 145 146 147 148 149 150 Name B3 Organ Thin * B3 Pinball Wizard * B3 Hard Attack * B3 Classic * Rock Organ * Drawbar Organ * Classic Square Classic Triangle Reece Raunchy Lead 3 Raunchy Lead 1 Angry Organ Raunchy Lead 2 Triangle to Pulse Happy Organ Wide Square MW Growl Saw MW Growl Bubbler Partial to You Thick Octaves Mono Edg
Technical Specifications MIDI Output Channels Over USB 16 Note Keys 14 Octave Rollers 6 mobile, 2 fixed; 7-octave range Plates 1 pitch-bend, 2 ground Inputs / Outputs 1 USB port 1 1/4" (6.35mm) TRS line output 1 1/8" (3.5mm) TRS headphone output 1 1/8" (3.5mm) TRS auxiliary input Power Rechargeable lithium-ion battery (included; charges via USB) Dimensions 30.12" x 3.00" x 3.24" 76.5 cm x 7.6 cm x 8.2 cm (width x depth x height) Weight 1.79 lb. 0.