
Quick Start Guide


6
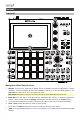
18. Track Mute / Pad Mute: Press this button to view Track Mute Mode where you can easily mute
tracks within a sequence or set mute groups for each track.
Press and hold Shift and press this button to view Pad Mute Mode where you can easily mute
pads within a program or set mute groups for each pad within a program.
19. Next Seq / XYFX: Press this button to view Next Sequence Mode where you can trigger different
sequences simply by playing the pads. This is useful for live performances, letting you change a
song’s structure in real time.
Press and hold Shift and press this button to view XYFX Mode, which turns the touchscreen into
an XY pad where each axis represents the range of an effect parameter. As you move touch or
move your finger on the touchscreen, the current position will determine the current value of the
two parameters. You can use this mode to create interesting effect automation on your tracks.
20. Step Seq / Automation: Press this button to view Step Sequencer Mode where you can create
or edit sequences by using the pads as "step buttons," simulating the experience of a traditional
step-sequencer-style drum machine.
Press and hold Shift and press this button to open Grid View Mode with the last used
automation parameter for the track selected.
21. TC / On/Off: Press this button to open the Timing Correct window, which contains various
settings to help quantize the events in your sequence.
Press and hold Shift and press this button to turn Timing Correct on and off.
22. Sampler / Looper: Press this button to view the Sampler where you can record audio samples to
use in your projects.
Press and hold Shift and press this button to view the Looper where you can record and
overdub audio in real time—a great tool for live performance as well as spontaneous moments in
the studio. You can export the loop as a sample to use in your project.
23. Sample Edit / Q-Link Edit: Press this button to view Sample Edit Mode where you can edit your
samples using various functions and processes.
Press and hold Shift and press this button to view Q-Link Edit Mode where you can assign other
parameters to the Q-Link knobs.
24. Program Edit / MIDI Control: Press this button to view Program Edit Mode, which contains all
parameters for editing your programs.
Press and hold Shift and press this button to view MIDI Control Mode where you can customize
what MIDI messages are sent from certain controls on your hardware.
Transport & Recording Controls
25. Rec: Press this button to record-arm the sequence. Press Play or Play Start to start recording.
Recording in this way (as opposed to using Overdub) erases the events of the current sequence.
After the sequence plays through once while recording, Overdub will be enabled.
26. Overdub: Press this button to enable Overdub. When enabled, you can record events in a
Sequence without overwriting any previously recorded events. You can enable Overdub before
or during recording.
27. Stop: Press this button to stop playback. You can double-press this button to silence audio that
is still sounding once a note stops playing. Press and hold Shift and press this button to return
the playhead to 1:1:0.
28. Play: Press this button to play the sequence from the playhead’s current position.
29. Play Start: Press this button to play the sequence from its start point.
30. Tap Tempo / Master: Press this button in time with the desired tempo to enter a new tempo (in
BPM).
Press and hold Shift and press this button to set whether the currently selected sequence
follows its own tempo (the button will be lit amber) or a master tempo (the button will be lit red).
31. Erase: As a Sequence is playing, press and hold this button and then press a pad to delete the
note event for that pad at the current playback position. This is a quick way to delete note events
from your sequence without having to stop playback. When playback is stopped, press this
button to open the Erase window where notes, automation and other sequence data can be
erased from the sequence. Download the full User Guide for more information.