
User Manual


193
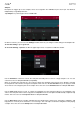
The green/S marker and red/E marker are the start point and end point (respectively). These two points define the
region of the sample that will be played.
To move the start point or end point, do any of the following:
• Tap and drag the S or E marker left or right.
• Use the Start or End fields shown below the waveform.
• Use the first bank of Q-Link knobs to adjust the start point or the second bank of Q-Link knobs to adjust
the end point. The top-most Q-Link knob provides coarse adjustment. The bottom-most Q-Link knob
provides fine adjustment.
Note: When Loop Lock is on, the loop position (as determined by the Loop field, if enabled) is the same as the
sample’s start point. When off, the loop position is independent from the start point.
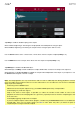
Use the Loop field to determine the position where the sample’s playback will repeat when Pad Loop is activated.
Alternatively, use the third bank of Q-Link knobs to adjust the loop point. The top-most Q-Link knob provides
coarse adjustment. The bottom-most Q-Link knob provides fine adjustment.
Note: When Loop Lock is on, the loop position is the same as the sample’s start point. When off, the loop position is
independent from the start point.
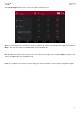
Use the Slice field to select what part/parts of the sample will play:
All: The entire sample will play.
Pad: The sample will play from the Pad Start position to the Pad End position, described earlier. This also lets
you activate Pad Loop (if the Sample Play field in the LFO Modulation tab is set to Note On).
Slice 1, 2, 3, etc.: If you have sliced the sample in Chop Mode, you can select which slice will play when you
trigger the pad.
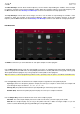
Semi lets you transpose the selected layer 36 up to semitones up or down. This will affect the length of the sample (if
Warp is off). This is the same as the Semi knob on the second Samples tab.
Fine provides fine-tuning of each layer by cents. This will affect the length of the sample (if Warp is off). This is the
same as the Fine knob on the second Samples tab.