
User Manual


21
MPC Touch
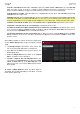
Top Panel
1
4
4
4
4
3
2
5
6
7777
8
9
1110
12 13 14 15 16 17
17191820
21 2223
1. Touchscreen: This full-color multi-touch display shows information relevant to MPC Touch’s current operation.
Touch the touchscreen (and use the hardware controls) to control the MPC interface. See the later Touchscreen
section to learn how to use some basic functions.
2. Display Brightness +/–: Use these buttons to increase/decrease the brightness of the touchscreen.
3. Data Dial: Use this dial to scroll through the available menu options or adjust the parameter values of the
selected field in the screen.
4. Q-Link Knobs: Use these touch-sensitive knobs to adjust various parameters and settings. The knobs can control
one group of parameters at a time. The lights below the Q-Link button indicate the currently selected column of Q-
Link knobs. Press the Q-Link button to change which parameter or group of parameters they currently control.
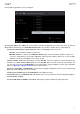
5. Q-Link Button: Press this button to change which parameter or group of parameters the Q-Link knobs currently
control (indicated by the lights above the Q-Link knobs). Each press will select the next column of Q-Link knobs.
Press and hold Shift and then press this button to select the previous column of Q-Link knobs instead.
Press and hold this button to show the QLink window over the touchscreen’s current contents. These are the same
parameters and settings as what is shown in Q-Link Edit Mode. You can tap Q-Link Edit at the bottom of the
window to enter Q-Link Edit Mode immediately (see Operation > Modes > Q-Link Edit Mode to learn about this).
6. Pads: Press these pads to trigger drum hits or other samples in your software. The pads are velocity-sensitive
and pressure-sensitive, which makes them very responsive and intuitive to play. The pads will light up different
colors, depending on how hard you play them (ranging from yellow at a low velocity to red at the highest
velocity). You can also customize their colors.
7. Pad Bank: Press any of these buttons to access Pad Banks A–D.
Press and hold Shift while pressing any of these buttons to access Pad Banks E–H. Alternatively, double-press
one of these buttons.
8. Note Repeat/Latch: Press and hold this button, and then press
a pad to trigger that pad’s sample repeatedly.
The rate is based on the current tempo and Time Correct settings.
Press and hold Shift and then press this button to “latch” the Note Repeat feature. When latched, you do not
have to hold the Note Repeat button for it to be activated. Press Note Repeat once more to unlatch it.