
User Guide


10
(* The small numbers in bracket is the key no. on panel / remote control information respectively unless specify)
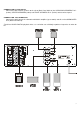
SWITCHING ON THE RECEIVER
Power On / Off
Press
POWER
(Front Panel label 1) to switch the unit on. The
STANDBY indicator LED
(2) will be lighted.
Standby
To start operating the unit, press STANDBY (Front Panel label1) or (Remote label 1). The Standby Indicator LED
will diminish. When switching on the amplifier, the volume will start at –50 dB.
PLAYING THE ANALOG PROGRAM SOURCE
1. Select the program source to be played before starting.
Source Selection (small no in bracket = key no. Front panel)
a. PHONO (Front Panel label 4)
It is for playing records from turntable
e. AUX (Front Panel label 25)
It is for any analog external source
b. CD (Front Panel label 5)
It is for compact disc playback
f. DVD (Front Panel label 26)
It is for analog DVD playback
c. TUNER (Front Panel label 6)
It is for radio listening
g. VIDEO 1 (Front Panel label 27)
It is for video playback
d. TAPE (Front Panel label 7)
It is for cassette recordings playback
h. VIDEO 2 (Front Panel label 28)
It is for video playback
2. To select analog input mode, press INPUT MODE (Front Panel label 9) until ANALOG IN is displayed
3. Start playing the selected component
4. Adjust the
MASTER VOLUME
by turning the round button (Front Panel label13) on front panel or the up /
down button (Remote label 31 or 32) on remote control
5. Press the BASS / TREBLE (Front Panel label 11) until you see TRB 0 dB for adjusting Treble or BAS 0 dB
for adjusting Bass.
Turn in clock-wise direction (Front Panel label 13) for increasing the bass or treble or vice versa
PLAYING THE DIGITAL PROGRAM SOURCE
1. Select the program source to be played before starting.
Source Selection (small no in bracket = key no. Front panel)
a. CD (Front Panel label 5)
It is for compact disc playback
d. VIDEO 1 (Front Panel label 27)
It is for video playback
c. DVD (Front Panel label 26)
It is for analog DVD playback
e. VIDEO 2 (Front Panel label 28)
It is for video playback
* Only 2 digital input can be used at every single time i.e. via the OPTICAL IN and COAXIAL IN
2. To select the digital input, press INPUT MODE (Front Panel label 9) until DIGITAL IN is displayed
3. Start playing the selected source
4. Adjust the MASTER VOLUME (Front Panel label 13) by turning the round button or press the up / down
button (Remote label 31 and 32)
OPERATION