DOCKING STATION 1 18 35 52 MANUEL D’UTILISATION USER MANUAL MANUAL DEL USUARIO MANUAL DE INSTRUÇÕES ADI-19K ADI-19K Lire attentivement la notice avant d’ utiliser l’ appareil Before operating this product, please read user manual completely Lea atentamente el manual del usuario antes de utilizar el aparato Lea atentamente o manual de instruções antes de utilizar o aparelho
« Made for iPod » y « Made for iPhone » indican que un accesorio electrónico ha sido diseñado específicamente para conectarse a un iPod® o iPhone® respectivamente, y sus desarrolladores certifican que dicho accesorio cumple con las normativas de rendimiento de Apple. Apple no se hace responsable del funcionamiento de este dispositivo o de su conformidad con las regulaciones y normas de seguridad. Tenga en cuenta que el uso de este accesorio con iPod® o iPhone® puede afectar al rendimiento inalámbrico.
INSTRUCCIONES IMPORTANTES DE SEGURIDAD CAUTION DO NOT OPEN El símbolo del rayo terminado en una cabeza de flecha y enmarcado en un triángulo equilátero se emplea para alertar al usuario sobre la presencia de tensión peligrosa sin aislamiento en el interior del cuerpo del producto, cuya magnitud puede resultar suficiente para constituir un riesgo de descarga eléctrica para las personas.
descarga de antena, la conexión a los electrodos de toma de tierra y los requisitos para el electrodo de toma de tierra. 15. RAYOS --- Para una mayor protección del aparato durante una tormenta, o en caso de que quede desatendido o en inactividad durante periodos de tiempo prolongados, desenchúfelo de la toma de corriente de pared y desconecte la antena o el sistema de conexión por cable. Con ello, evitará los daños ocasionados por rayos o subidas de tensión. 16.
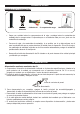
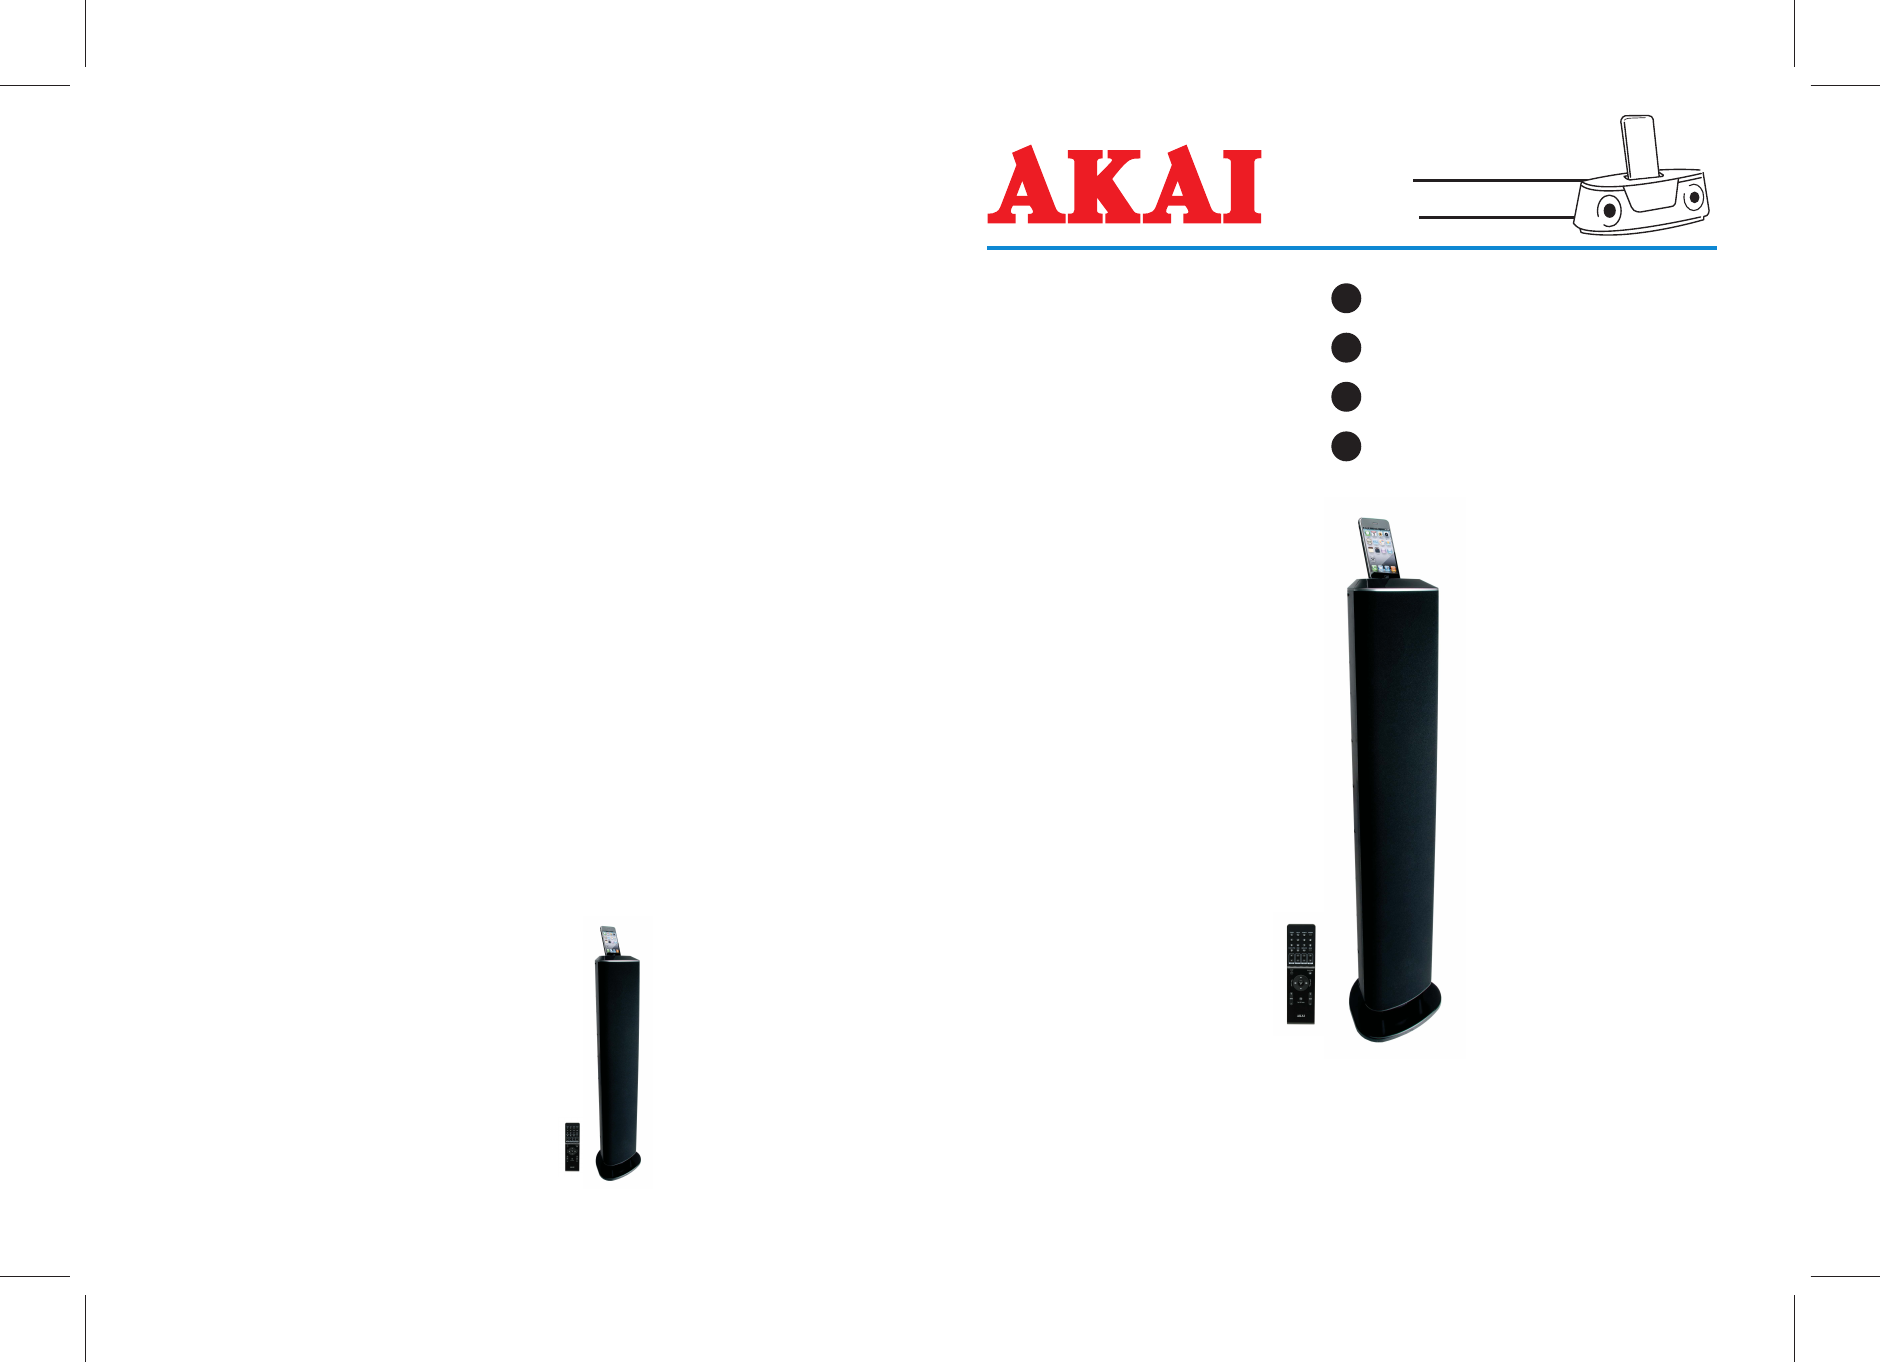
PRIMEROS PASOS DESEMBALAJE Y PREPARACIÓN La torre Mando a distancia Cable de AV 5 x soportes de carga Manual del usuario • Saque con cuidado todos los componentes de la caja y extraiga todos los materiales de embalaje de los componentes. Compruebe que no se desecha nada por error junto con los materiales de embalaje. • Conserve la caja y los materiales de embalaje, si es posible, por si se diera alguna vez el caso improbable de que se precise devolver la unidad para su reparación.
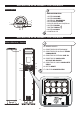
DESCRIPCIÓN DE LA UNIDAD Y LOS CONTROLES Vista superior UNIDAD PRINCIPAL 1. BOTÓN VOLUME 2. BOTÓN VOLUME + 3. BOTÓN DE ENCENDIDO 4. BOTÓN PLAY/PAUSE 5. PIN DE CARGA para iPod/iPhone 6. BOTÓN TUNING 7. BOTÓN TUNING 8. BOTÓN SOURCE 9. PANTALLA LCD 5 1 2 6 7 9 8 3 4 DESCRIPCIÓN DE LA UNIDAD Y LOS CONTROLES Vistas delantera y trasera 10. SENSOR REMOTO 11. CONECTORES DE ENTRADA A/V 10 12. CONECTORES DE SALIDA DE VÍDEO COMPONENTE 13. CONECTOR DE ENTRADA LINE IN 14.
DESCRIPCIÓN DEL MANDO A DISTANCIA 1 12 13 2 4 6 3 5 14 16 7 17 8 18 20 9 MANDO A DISTANCIA 1. 2. 3. 4. 5. BOTÓN SILENCIADOR BOTÓN POWER BOTONES NUMÉRICOS BOTÓN NUMÉRICO 0/VIDEO BOTÓN NUMÉRICO 9/ SINCRONIZACIÓN DE RELOJ 6. BOTONES PLAY LIST S/T 7. BOTONES ALBUM S/T 8. BOTÓN DE APAGADO AUTOMÁTICO 9. BOTÓN iPod-/TUN10. BOTÓN NAVIGATION ABAJO 11. BOTÓN DE CAPÍTULO +/12. BOTÓN SOURCE 13. BOTÓN DIMMER 14. BOTÓN DE REPETICIÓN/ESTÉREO 15. BOTÓN MENU 16. BOTÓN TREBLE S/T 17. BOTÓN GRAVES S/T 18.
DESCRIPCIÓN E INDICADORES DE LA PANTALLA LCD INDICADOR DE FM ESTÉREO INDICADOR DE TEMPORIZADOR DE APAGADO INDICADOR DE LECTURA ALEATORIA INDICADOR DE REPETICIÓN KHz MHz PANTALLA DE INFORMACIÓN (INCLUIDOS DÍGITOS Y PALABRAS) AJUSTES Y OPERACIONES BÁSICAS Modo de espera 1. Para encender el altavoz, pulse el botón distancia. en el panel superior de la unidad o en el mando a 2. Para apagar el altavoz, vuelva a pulsar el botón . BOTÓN SILENCIADOR (solo en el mando a distancia) 1.
BOTÓN RESET Durante el uso, pueden surgir problemas que provoquen que la unidad no funcione correctamente o se detenga de forma accidental. En estos casos, puede usar un objeto punzante para pulsar el botón RESET situado en la parte trasera del reproductor y la unidad se apagará automáticamente. A continuación, reiníciela para que recupere su rendimiento normal. AJUSTE DEL RELOJ Procedimiento para regular la hora: 1. La hora solo se puede ajustar en el modo de espera. A.
FUNCIONAMIENTO DE LA RADIO FM SINTONIZACIÓN DE LA RADIO FM 1. Encienda la unidad y pulse repetidamente el botón SOURCE para cambiar al modo TUNER (RADIO). 2. Pulse el botón TUNING / en la unidad o el botón TUN+/- en el mando a distancia para sintonizar una emisora de radio. Mantenga pulsado el botón TUNING / en la unidad o el botón TUN +/- en el mando a distancia para realizar una búsqueda de emisoras de radio hacia delante o hacia atrás, respectivamente.
Colocación de un adaptador de carga: 1. Consulte la tabla de compatibilidades (en la página 46) y seleccione el adaptador de carga adecuado para su iPod/iPhone. 2. Coloque el adaptador correspondiente en el área de carga y presiónelo hasta que encaje en la posición correcta. El adaptador solo se podrá colocar en una posición. El conector de carga del iPod deberá encajar a través de la abertura situada en la parte inferior del adaptador. 3.
MODELOS DE iPod® y iPhone® COMPATIBLES Compatible con iPod 1ª + 2ª generación 5GB 10GB 20GB Compatible con iPod 4ª generación 20GB Compatible con iPod 4ª generación 40GB Compatible con iPod 4ª generación (pantalla a color) 20GB 30GB Compatible con iPod classic 80GB 160GB (2007) Compatible con iPod classic 160GB (2009) Compatible con iPod nano 1ª generación 1GB 2GB 4GB Compatible con iPod nano 2ª generación (aluminio) 2GB 4GB 8GB Compatible con iPod touch 1ª generación 8GB 16GB 32GB Compatible con
COMPATIBILIDAD DEL ADAPTADOR DE CARGA MODELO CAPACIDAD REPRODUCCIÓN SALIDA DE Y CARGA VÍDEO SOPORTE iPad iPad 8GB 16GB 32GB iPhone iPhone 4 16GB 32GB y y iPhone 3GS 8GB 16GB 32GB y y 12 iPhone 3G 8GB 16GB y y 12 iPhone 4GB 8GB 16GB y y 12 iPod touch iPod touch 4ª generación 8GB 32GB 64GB y y iPod touch 3ª generación 32GB 64GB y y 14 iPod touch 2ª generación 8GB 16GB 32GB 64GB y y 14 iPod touch 1ª generación 8GB 16GB 32GB y y 14 iPod nano 6ª generación 8GB 16GB
CONEXIÓN CON OTROS APARATOS LINE IN Siga los pasos descritos a continuación para conectar la unidad a otro dispositivo de audio: 1. Conecte el dispositivo a la entrada LINE IN del reproductor por medio de los cables de salida de línea. 2. Pulse el botón POWER para encender la unidad. 3. Pulse repetidamente el botón SOURCE para cambiar la unidad al modo LINE IN. 4. Encienda el dispositivo e inicie la reproducción. Una vez completados estos pasos, podrá oír el sonido procedente del dispositivo conectado.
SALIDA DE VÍDEO COMPUESTO 1. Conecte un cable RCA a la salida de vídeo compuesto y a un televisor. 2. Encienda el equipo de televisión y la unidad. 3. Ajuste la configuración de entrada correcta en el televisor conectado. 4. Pulse repetidamente el botón VIDEO para cambiar entre los modos de salida de vídeo compuesto y vídeo componente. 5.
GUÍA DE SOLUCIÓN DE PROBLEMAS Problema Causa potencial El sonido de la radio está 1. La emisora no está distorsionado. sintonizada. No se oye la radio. Solución 1. Sintonice la emisora. 2. La señal de radio de la zona es débil. 2. Modifique la ubicación del altavoz. 1. No se ha seleccionado el modo de sintonizador para el altavoz. 1. Pulse el botón SOURCE hasta que quede seleccionado el modo Tuner. 2. Se ha silenciado el volumen o está ajustado al mínimo. 2. Ajuste el nivel de volumen.
ESPECIFICACIONES TÉCNICAS Número de modelo • ADI-19K Alimentación • CA 100 Дʳ 240 V Consumo eléctrico • 60 W Consumo eléctrico en espera •<2W Cobertura de frecuencia de radio • FM: 87,5MHz - 108 MHz Tamaño de altavoz • AGUDOS 2,5 PULGADAS; GRAVES 3,5 PULGADAS Salidas • YUV (RCA) • ALTAVOZ DE GRAVES (RCA) • VÍDEO (RCA) Entradas Salida de alimentación RMS • LINE IN • AV • 8 W x 2+24 W Salida de alimentación MAX • 2 x 32 W+96 W Peso neto • 4,3 Kg aprox.