
Operation Manual


10
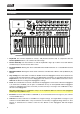
9. Pads: Use these pads to send MIDI Note messages to your software or external MIDI sound module.
The pads are pressure- and velocity-sensitive, which makes them very responsive and intuitive to play
when triggering drum hits or other samples.
10. Pad Bank: Use these buttons to select Pad Bank A, B, C, or D. Between these 4 banks with 8 pads per
bank, you can access up to 32 MIDI events.
11. Time Div: Use this button and the switches to select the current Time Division, which determines the
rate of the Note Repeat and Arpeggiator features. While Time Division is active, the switches will not
send any of their normal MIDI CC, Program Change, or Program Bank messages.
12. Full Level: Press this button to activate or deactivate Full Level. When Full Level is active, the pads
always play at their maximum velocity no matter how hard or soft you hit them.
13. Note Repeat / Config: Use this button to activate or deactivate Note Repeat. While Note Repeat is
active, striking a pad causes its note to retrigger at a rate based on the current Tempo and Time Division
settings. You can also sync Note Repeat to an internal or external MIDI Clock source. Press Shift and
this button to configure Note Repeat’s settings.
14. Tap Tempo: Tap this button at the desired rate to enter a new tempo.
Important: This feature does not work when the Advance 25 is set to External sync.
15. Display: Use this full-color display to view Advance 25’s menus, options, parameters, and settings.
16. Page Left/Right: Use these buttons to move between the available pages in the display.
17. Data Dial: Use this dial to change parameter values, settings, etc. in the display. Pressing the dial also
functions as an Enter button.
18. Cursors: Use these buttons to navigate through the menus and options in the current page in the
display.
19. Mode Buttons: Press one of these buttons to enter its primary mode (labeled above the button). Press
and hold Shift and then press one of these buttons to its secondary mode (labeled under the button).
See Operation > Modes for more information.
20. Shift: Press and hold this button to enable secondary functions of certain other buttons on Advance 25.
21. Transport Control Buttons: These three buttons are dedicated buttons for sending conventional
transport control commands: Stop, Play, and Record. These can be set to send MIDI (MIDI Start/Stop),
CC (pre-assigned MIDI CC values), MMC (MIDI Machine Control), and MMC/MIDI. The PTEX setting is
for use with Avid
®
Pro Tools
®
Express only.
22. Loop: Press and hold this button to activate the Loop or Repeat feature in your software. This button is
considered a transport control, so it can be set to send the same messages as the other transport
control buttons: MIDI (MIDI Start/Stop), CC (pre-assigned MIDI CC values), MMC (MIDI Machine
Control), and MMC/MIDI. The PTEX setting is for use with Avid
®
Pro Tools
®
Express only.
Important: Your software must be able to loop or repeat in order to use this feature. Also, configure the
Transport Format in Global Mode so it communicates properly with your software.