
Quick Start Guide


7
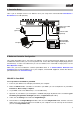
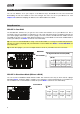
Rear Panel
1. Cable Restraint: You can secure a power adapter
cord to this restraint to help avoid disconnecting it
accidentally.
2. Power Button: Press this button to power the
Advance 25 on or off.
3. Power Input: Connect this power input to a power outlet using an optional power adapter (6V DC, 1A,
center-positive, sold separately). Alternatively, if you want to use Advance 25 to control an external MIDI
device and without a computer connection, you can connect Advance 25's USB Port to a power outlet
using a standard USB charger (sold separately).
Important: If you use a USB charger to power Advance 25, set any relevant controls to send their MIDI
messages out of the MIDI Out. Any controls set to transmit only over the USB Port will not be sent to a
device connected to the MIDI Out.
4. USB Port: Use a standard USB cable to connect this USB port to your computer. The computer's USB
port provides ample power to Advance 25. If you connect it to a USB hub, make sure it is a powered
hub. This connection is also used to send and receive MIDI data to and from your computer.
You can also power Advance 25 by connecting this USB port to a power outlet using a standard USB
charger (sold separately). If you do this, set any relevant controls to send their MIDI messages out of the
MIDI Out. Any controls set to transmit only over the USB Port will not be sent to a device connected to
the MIDI Out.
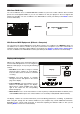
When using Advance 25 with external MIDI equipment:
• If an external device is connected to the MIDI Out, your computer can send MIDI messages out
along this path: Computer Advance 25 External Device.
• If an external device is connected to the MIDI In, the external device sends MIDI messages in along
this path: External Device Advance 25 Computer. MIDI messages can then be sent to an
external device via the MIDI Out, but they must pass through the computer first.
5. MIDI Out: Use a standard five-pin MIDI cable to connect this MIDI Out to the MIDI In of an external MIDI
device (e.g., a synthesizer, sequencer, drum machine, etc.). Please see the above USB Port description
for information about how MIDI messages are routed while using Advance 25.
6. MIDI In: Use a standard five-pin MIDI cable to connect this MIDI In to the MIDI Out of an external MIDI
device (e.g., another MIDI controller). The MIDI messages sent to this MIDI In will be sent to your
computer via the USB port. Please see the above USB Port description for information about how MIDI
messages are routed while using Advance 25.
7. Sustain Pedal Input: Connect an optional 1/4" (6.35 mm) TS sustain pedal to this input.
8. Expression Pedal Input: Connect an optional 1/4" (6.35 mm) TRS expression pedal to this input.
9. Kensington
®
Lock Slot: You may use this Kensington lock slot to secure the Advance 25 to a table or
other surface.
1
2
34
5
6
7
8
9