
Quick Start Guide


3
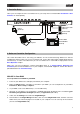
2. Controller Setup
Here is just an example of how to use Advance 61 to your setup. Items not listed under Introduction > Box
Contents are sold separately.
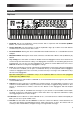
3. Software-Controller Configuration
This section describes how to start using your Advance 61. We recommend using Advance 61 with the
included VIP software which you can use to perform with, create, edit, and manage multiple plugin patches
simultaneously. To learn more about how you can use Advance 61 in each kind of setup, please see the
Basic Operation chapter.
Make sure you have installed the software (described earlier in 1. Software/Driver Download and
Installation) and connected Advance 61 to your computer, external MIDI equipment, and/or other devices
(described earlier in 2. Controller Setup).
With VIP in Your DAW
To set up Advance 61 with VIP in your DAW:
1. Power on your Advance 61, and open your DAW in your computer.
2. Make sure Advance 61 is selected as a controller in your DAW—you can usually do this in your DAW's
Preferences, Device Setup, or Options.
3. In your DAW, create a new MIDI track (i.e., not an audio track).
4. Open VIP in your DAW as you would open a standard VST plugin. By default, VIP is installed in [your
hard drive]
\ Program Files \ VstPlugins (Windows) or Applications (Mac OS X).
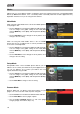
5. In VIP, click the Settings menu and select Plugin Manager.
6. At the bottom of the Plugin Manager window, click one of the Plugin Folder fields, and then select the
folder where your instrument plugins are located on your computer. You can select up to two locations
(one for each Plugin Folder field).
Powe
r
(optional)
Computer
Expression Pedal
(optional)
Sustain Pedal
(optional)
External MIDI
Sound Module
(optional)