
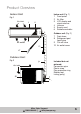
Installation Instructions


8
Installation
After Sales Support
1300 886 649 | info@tempo.org
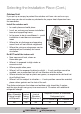
Installing the Indoor Unit
• First ensure the wall is strong and solid
enough to hold the unit safety.
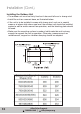
• Attach the installation board to the wall
using 4 (+) type screws. Use a spirit level
to ensure it is in a perfectly level position
vertically and horizontally, otherwise it
might cause water drops when the air
conditioner is running in cooling mode.
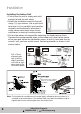
• Pull out the indoor unit pipes after detaching the fixed parts on them.
Connect the interconnected pipes to the indoor unit: point to the centre
of the pipe and fasten the connection screw, at first by hand and then by
wrench, until you hear a click sound. Fastening direction is shown in the
picture below.
Remove the base support
foam on one side before
installation.
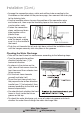
Note: The installed air conditioner will not be tightly affixed to the wall unless it is
installed as pictured above. The outflow tube must be at the bottom and its
highest point must not be higher than the water basin.
Drill a 70mm
diameter pipe
hole (slanting
slightly outward)
at the left or right
down side of the
installation board.