
Installation Instructions


9
Installation (Cont.)
After Sales Support
1300 886 649 | info@tempo.org
Checking the Water Discharge
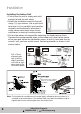
• Take off the front frame for maintenance according to the following steps:
• Turn the perpendicular airflow
direction handle from [ I ] to
horizontal direction.
• As shown in the picture on the
right, take off two covers from the
front frame and then unfasten two
fixture screws.
• Pull the front frame towards
yourself and take it off.
• To put the front frame back, turn
the perpendicular airflow direction
handle from [ I ] to horizontal, then
proceed according to the third and
second steps above.
• You should check whether the front
frame is firmly inside the fixture
groove on the top.
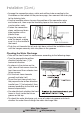
• To check the water discharge, put a cup of water into groove and check
whether the water flows through the water discharge hole.
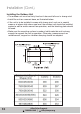
• Arrange the connection pipes, cable and outflow tube according to the
illustration on the bottom of the previous page, then connect the drain pipe
to the draining hole.
• Use the insulation sleeve to wrap the position of the connection pipe
and indoor unit, then wrap the insulating tape on the sleeve to avoid
condensation water.
• Fasten the connection
pipes, cables and drain
pipe together with a
plastic strap.
• Hang the indoor unit
onto the board, making
sure it is in the middle of
the board.
• Push the unit towards the left and right down side of the installation board
until the hangers securely click into place in the grooves.