Internetbrowser Om de internetbrowser te gebruiken, moet u het internetbrowser logo selecteren in de portaalsectie. Refresh Home Page Address Bar Add History Bookmarks Zoom Previous Next Settings Remote control shortcuts (Zoom in-out/Back/Home) • Gebruik de pijltoetsen op de afstandsbediening om te navigeren in de webbrowser. Druk op OK om door te gaan. • Na de Eerste installatie verschijnen vooraf gedefinieerde websites en logo's op de toegangspagina van de browser (zie bovenstaande afbeelding).
Contents Safety Information......................................... 24 Getting Started...................................................... 25 Notifications & Features & Accessories................. 25 Remote Control - 1................................................ 28 Connections.......................................................... 29 First Time Installation - USB Connections............. 30 TV Menu Features and Functions......................... 32 General TV Operation............................
Safety Information In extreme weather (storms, lightning) and long inactivity periods (going on holiday) disconnect the TV set from the mains. The mains plug is used to disconnect TV set from the mains and therefore it must remain readily operable. CAUTION RISK OF ELECTRIC SHOCK DO NOT OPEN CAUTION: TO REDUCE THE RISK OF ELECTRIC SHOCK DO NOT REMOVE COVER (OR BACK). NO USER-SERVICEABLE PARTS INSIDE. REFER SERVICING TO QUALIFIED SERVICE PERSONNEL.
Getting Started Notifications & Features & Accessories • Automatic programming system Environmental Information This television is designed to consume less energy to help save the environment. To reduce energy consumption, you should take the following steps: You can use the Power Save Mode setting, located in the Picture menu. If you set the Power Save Mode as Eco, the TV will switch to energy-saving mode and the luminance level of TV set will be decreased to the optimum level.
Input Selection Once you have connected external systems to your TV, you can switch to different input sources. Press the Source button on your remote control consecutively to select the different inputs. Changing Channels and Volume You can change the channel and adjust the volume by using the Volume +/- and Programme +/- buttons on the remote. TV Control Switch & Operation Inserting the Batteries into the Remote Lift the cover on the back of the remote gently. Insert two AAA batteries.
Notification Specification TRADEMARK ACKNOWLEDGMENT Manufactured under license from Dolby Laboratories. Dolby and the double-D symbol are trademarks of Dolby Laboratories. The terms HDMI and High-Definition Multimedia Interface, and the HDMI Logo are trademarks or registered trademarks of HDMI Licensing LLC in the United States and other countries. DLNA, the DLNA Logo and DLNA CERTIFIED are trademarks, service marks, or certification marks of the Digital Living Network Alliance.
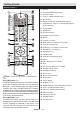
Getting Started Remote Control - 1 1. Source 2. Launches Netflix Application 3. Internet Portal 4. Play ( in media browser mode ) SOURCE 5. No function 6. Rapid reverse ( in media browser mode ) 7. Mono/Stereo - Dual I-II / Current language (in DVB channels) LANG. 1 2 3 8. Green button 4 5 6 10. Numeric buttons 7 8 9 .,/@ 9. Red button 11. Channel List/TV source 12. Menu 0 13. Volume up / down 14. Back (Return) / Index (in TXT mode) Q.MENU V+ 15. Favourite channel list 16.
Getting Started Connections Connector Type Cables Device Scart Connection (back) VGA Connection (back) SIDE AV PC/YPbPr Audio Connection (side) Side Audio/Video Connection Cable (Supplied) PC Audio Cable (Not supplied) HDMI Connection (back) SPDIFF (Coaxial Out) Connection (back) SIDE AV Side AV (Audio/Video) Connection (side) HEADPHONE Side AV Connection Cable (supplied) If you want to connect a device to the TV, make sure that both the TV and the device are turned off before making any connect
Getting Started First Time Installation - USB Connections (*) LCN is the Logical Channel Number system that organizes available broadcasts in accordance with a recognizable channel sequence (if available). Switching On/Off To Switch the TV On Connect the power cord to a power source such as a wall socket (220-240V AC, 50 Hz). Press Menu button to quit channel list and watch TV.
Media Browser Menu You can play photo, music and movie files stored on a USB disk by connecting it to your TV. Connect a USB disk to one of the USB inputs located on the side of the TV. Pressing the Menu button while in the Media Browser mode will access the Picture, Sound and Settings menu options. Pressing the Menu button again will exit from this screen. You can set your Media Browser preferences by using the Settings menu.
TV Menu Features and Functions Picture Menu Contents Mode You can change the picture mode to suit your preference or requirements. Picture mode can be set to one of these options: Cinema, Game, Sports, Dynamic and Natural. Contrast Adjusts the light and dark values on the screen. Brightness Adjusts the brightness values on the screen. Sharpness Sets the sharpness value for the objects displayed on the screen. Colour Sets the colour value, adjusting the colors.
Sound Menu Contents Volume Adjusts the volume level. Equalizer Selects the equalizer mode. Custom settings can be made only when in user mode. Balance Adjusts whether the sound comes from the left or right speaker. Headphone Sets headphone volume. Sound Mode You can select a sound mode (If the viewed channel supports). AVL (Automatic Volume Limiting) Function sets the sound to obtain fixed output level between programmes.
Audio Description A norration track will be played for the blind or visually impaired audience. This feature is available only if the broadcaster supports it. Auto TV Off Sets the desired time for the TV to automatically go into standby mode when not being operated. Standby Search (Optional) Your TV will search for new or missing channels while in standby. Any new found broadcasts will be shown. Store Mode Select this mode for store display purposes.
General TV Operation Using the Channel List The TV sorts all stored stations in the Channel List. You can edit this channel list, set favourites or set active stations to be listed by using the Channel List options. Configuring Parental Settings To prohibit viewing of certain programmes, channels and menus can be locked by using the parental control system. To display parental lock menu options, the PIN number should be entered. After coding the correct PIN number, parental settings menu will be displayed.
Troubleshooting & Tips Tv will not turn on Make sure the power cord is plugged in securely to wall outlet. Check if batteries are exhausted. Press the Power button on the TV. Poor picture • Check if you have selected the correct TV system. • Low signal level can cause picture distortion. Please check antenna access. • Check if you have entered the correct channel frequency if you have done manual tuning. • The picture quality may degrade when two devices are connected to the TV at the same time.
PC Input Typical Display Modes The following table is an illustration of some of the typical video display modes. Your TV may not support all resolutions.
Supported File Formats for USB Mode Media Extension Format Notes Video .dat, .mpg, .mpeg Mpeg1-2 1080P@30fps, 50Mbit/sec .ts, .trp, .tp, .m2ts MPEG2 , H.264, VC1, AVS, MVC H.264:1080Px2@25fps, 1080P@50fps MVC:1080P@ 24fps Other: 1080P@30fps 50Mbit/sec .vob MPEG2 1080P@30fps 50Mbit/sec .mkv MPEG1-2-4, H.264 H.264:1080Px2@25fps, 1080P@ 50fps, 1080P@30fps, 50Mbit/sec .mp4 MPEG4, XviD, H.264 H.264:1080Px2@25fps, 1080P@ 50fps, 1080P@30fps, 50Mbit/sec .avi MPEG2-4, Xvid, H.264 H.
Supported DVI Resolutions When connecting devices to your TV’s connectors by using DVI converter cable(DVI to HDMI cable - not supplied), you can refer to the following resolution information.
Configuring Wired Device Settings Connectivity Network Type Wired Connectivity To Connect to a Wired Network • You must have a modem/router connected to an active broadband connection. • Ensure that Nero Media Home software is installed to your PC (for DLNA function). See “Nero Media Home Installation” section. • Connect your PC to your modem/router. This can be a wired or wireless connection. • Connect your TV to your modem/router via an ethernet cable.
• Use a LAN connection for quicker file sharing between other devices like computers. • The frequency and channel differ depending on the area. • The transmission speed differs depending on the distance and number of obstructions between the transmission products, the configuration of these products, the radio wave conditions, the line traffic and the products that you use.
have a problem, check the internet connection of your modem. Connection is Slow See the instruction book of your wireless modem to get information on the internal service area, connection speed, signal quality and other settings. You need to have a high speed connection for your modem.
7. Click the Next button. On the next screen you can set your installation preferences. Note: Possible application dependent problems may be caused by the content service provider. 8. Click the Install button. The installation begins and finishes automatically. A progress bar will indicate the state of the installation process. Some applications might become disabled due to changes made in the Parental Settings. 9. Click the Finish button. The installation is completed.