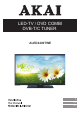
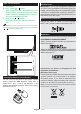
LED-TV / DVD COMBI DVB-T/C TUNER ALED2409TWE 1 21 41
Contents Safety Information................................................. 22 Getting Started...................................................... 23 Notifications & Features & Accessories................. 23 Environmental Information ................................... 23 Standby Notifications............................................. 23 Features................................................................ 23 Accessories Included............................................
Safety Information If there is lightning or storms, or if the TV is not going to be used for a while (e.g. if going away on holiday), disconnect the TV set from the mains. The mains plug is used to disconnect TV set from the mains and therefore it must remain readily operable. CAUTION RISK OF ELECTRIC SHOCK DO NOT OPEN CAUTION: TO REDUCE THE RISK OF ELECTRIC SHOCK DO NOT REMOVE COVER (OR BACK). NO USER-SERVICEABLE PARTS INSIDE. REFER SERVICING TO QUALIFIED SERVICE PERSONNEL.
Getting Started Notifications & Features & Accessories • AVL (Automatic Volume Limiting). Environmental Information This television is designed to consume less energy to help save the environment. To reduce energy consumption, you should take the following steps: If you set the Power Save Mode as Eco, the TV will switch to energy-saving mode. The Power Save Mode settings can be found in the ‘Picture’ section of the Main Menu. Note that some picture settings will be unavailable to be changed.
DVD - Control buttons Connect Power 3. Stop / Eject ( / ) button Stops the disc playing / Ejects or Loads the disc. NOTE: You cannot eject the disc via the remote control. To eject while playing a file; you should press the STOP button “ / ” (on the TV) three times. Antenna/Cable Connection Connect the “aerial” or “cable TV” plug to AERIAL INPUT (ANT) socket located on the back of the TV. HDMI 1 2. Play / Pause ( / ) button Plays / pauses the disc.
Specification TV Broadcasting PAL B/G D/K K Receiving Channels VHF (BAND I/III) - UHF (BAND U) - HYPERBAND Number of Preset Channels 1000 Channel Indicator On Screen Display RF Aerial Input 75 Ohm (unbalanced) Operating Voltage 110-240V AC, 50/60Hz (12V DC). Audio German + Nicam Stereo Audio Output Power (WRMS.
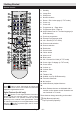
Getting Started Remote Control 1. Standby 2. Image Size INFO SLEEP SCREEN SOURCE 3. Sleep timer 4. Numeric buttons PRESETS 5. Return / Exit / Index page (in TXT mode) 6. Cursor up 7. Cursor left 8. Programme up / Page down 9. Programme down / Page up 10. Mono-Stereo Dual I-II / Current language (in DVB channels) MENU RETURN 11. Previous programme 12. Electronic programme guide 13. Info / Reveal (in TXT mode) 14. Picture mode selection 15. Source selection 16. Red button 17. Green button 29 18.
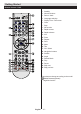
Getting Started Remote Control - DVD 1. Standby 2. Numeric buttons 3. Return / back INFO 4. Language selection SLEEP SCREEN SOURCE PRESETS 5. Display Time / DVD menu 6. Clear 7. Stop 8. No function 9. Rapid reverse 10. Rapid advance MENU RETURN 11. Info 12. Zoom 13. Repeat 14. Root 15. Menu 16. Title 17. OK / Select 18. Navigation buttons 19. Subtitle FAV LANG. EPG SUBTITLE 20. Angle 21. Search Mode 22. Play 23. Pause 24. Skip next 25.
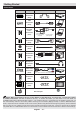
Getting Started Connections Connector Type Cables Device Scart Connection (back) VGA Connection (back) SIDE AV SIDE AV 5Vdc Max:500mA PC/YPbPr Audio Connection (side) Side Audio/Video Connection Cable (Supplied) PC Audio Cable (Not supplied) HDMI MODE o Connection (back) SPDIF Connection (back) SIDE AV SIDE AV 5Vdc Max:500mA SIDE AV 5Vdc Max:500mA MODE o HEADPHONE Side AV (Audio/Video) Connection (side) AV Connection Cable (supplied) Headphone Connection MODE o (side) PC to YPbPr YPb
Getting Started First Time Installation - USB Connections Switching On/Off To Switch the TV On Connect the power cord to the 110-240V AC, 50/60 Hz. To switch on the TV from standby mode either: Press the “ ” button, P+ / P- or a numeric button on the remote control. Press the side function switch until the TV comes on from standby. To Switch the TV Off Press the “ “ button on the remote control or press the side function switch until the TV switches into standby mode.
TV Menu Features and Functions Picture Menu Contents Mode You can change the picture mode to suit your preference or requirements. Picture mode can be set to one of these options: Cinema, Game, Sport, Dynamic and Natural. Contrast Sets the lightness and darkness values of the screen. Brightness Sets the brightness value for the screen. Sharpness Sets the sharpness value for the objects displayed on the screen. Colour Sets the colour value, adjusting the colors.
Sound Menu Contents Volume Adjusts the volume level. Equalizer Selects the equalizer mode. Custom settings can be made only when in user mode. Balance This setting is used for emphasizing left or right speaker balance. Headphone Sets headphone volume. Sound Mode You can select a sound mode. (If the selected channel supports). AVL (Automatic Volume Limiting) Function sets the sound to obtain fixed output level between programmes.
Other Settings: Displays other setting options of the TV set: Menu Timeout Changes timeout duration for menu screens. Scan Encrypted Channels When this setting is on, the search process will locate the encrypted channels as well. Blue Background Activates or deactivates the blue background system when the signal is weak or absent. Software Upgrade To ensure that your TV always has the most up to date firmware. Application Version Displays application version.
General TV Operation Using the Channel List The TV sorts all stored stations in the Channel List. You can edit this channel list, set favourites or set active stations to be listed by using the Channel List options. Configuring Parental Settings To prohibit viewing of certain programmes, channels and menus can be locked by using the parental control system. To display parental lock menu options, the PIN number should be entered. The factory default PIN number is 0000.
No sound If nothing works.. • Has the TV been set to mute? To cancel mute, press the “ ” button, or increase the volume level. If you have tried the above solutions and none seem to work, try switching your TV-DVD off and on again. If this does not work, contact your supplier or TV-DVD repair technician. Never attempt to repair a defective TV-DVD yourself. • Sound is coming from only one speaker. Is the balance set to one extreme? See Sound Menu section.
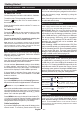
PC Input Typical Display Modes AV and HDMI Signal Compatibility The following table is an illustration of some of the typical video display modes. Your TV may not support all resolutions. Your TV supports up to 1920x1080.
DVD Mode Handling Discs • To keep the disc clean, only handle the disc by its edge. Do not touch the surface. • Do not stick paper or tape on the disc. • If the disc is contaminated with any substance like glue, remove before using it. 1. Switch on the TV. 2. Switch to DVD source using the “SOURCE” button on the remote control. 3. Insert a disc into the loader. The disc MUST be facing you when looking at the TV screen.
i. When the power is turned on or the disc is removed, the language heard will be the one selected at the initial settings. DEFAULT j. Some DVDs may not contain root and/or title menus. If you choose RESET and press OK, the factorypresets are loaded. Parental level and parental password does not change. k. Reverse stepping is not available. DOWNMIX l.
DVD Controls You can operate DVD, movie CD, music or picture CD’s content by using the correct buttons on your remote control. Below are main functions of commonly used remote control buttons. Buttons / DVD Playback Movie Playback Picture Playback Music Playback Play Play Play Play Pause Pause Pause Pause Stop Stop Stop Stop Skip backward/ forward Skip backward/forward Previous / Next Previous / Next Shifts the zoomed picture left or right (if available).
DVD Mode supported file formats Media Format File Extension .mpg/.dat/. vob Movie .avi Video Audio Supported (Maximum resolution/Bit rate etc.) MPEG1 MPEG Layer 1/2/3 MPEG2 MPEG2 XviD/3ivx PCM/MP3 MPEG4 PCM/MP3 MS ISO PCM/MP3 Support SP and ASP PCM Sample Rate: 8K ~ 48KHz MPEG 1/2 Sample Rate: 8K ~ 48KHz, Bit Rate: 64K ~ 320Kbps XviD Version up to:1.1.2 MPEG4 Music Photo - .
MOBIL TV INSTRUCTION MANUAL Switching the TV On Using 12 Volt 1. Connect the cigarette lighter plug cable to the cigarette lighter socket of your car or a cable with clips to the battery of car, making sure to observe the correct polarity. 2. Plug the other side of 12 volt cable to DC 12 socket at the back of the TV. Then the standby LED lights up. 3. Press the “ ” button, P+ / P- or a numeric button on the remote control or press the “ button on the TV. The TV will then switch on. ” button, - or + 4.