INSTRUCTION MANUAL PORTABLE CD STEREO SYSTEM APRTC100UW GEBRUIKERSHANDLEIDING 1-25 MANUEL DE L’UTILISATEUR 26-50 INSTRUCTION MANUAL 51-75
ENGLISH General Information Special notes WARNINGS: When the unit is set at STAND-BY mode, mains voltage is still present inside the unit. This unit contains no user serviceable parts. Never remove covers unless qualified to do so. This unit contains dangerous voltages, always remove mains plug from the socket before any service operation and when not in use for a long period. To prevent fire or shock hazard, do not expose this appliance todripping or splashing.
ENGLISH General Information Special Note Supply of this product does not convey a license nor imply any right to distribute content created with this product in revenue-generating broadcast systems (terrestrial, satellite, cable and/or other distribution channels), revenue-generating streaming applications (via Internet, intranets and/or other networks), other revenue-generating content distribution systems (pay-audio or audio-on-demand applications and the like) or on revenue-generating physical media (c
ENGLISH General Information Precautions General Use the unit on a firm, level surface free from vibration. Keep the unit away from direct sunlight, strong magnetic fields, excessive dust, humidity and electronic/electrical equipment (home computers, facsimiles, etc.) which generate electrical noise. Do not place anything on top of the unit. Do not expose the unit to moisture, to temperatures higher than 60 oC (140 oF) or to extremely low temperatures.
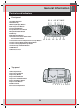
Controls and indicators Front panel 1.Standby Indicator 2.ON/Stand-by 3.Memory/Display Button 4.CD Play/Pause Button 5.Tuner Band Button 6.Tape Button/Pause Button 7.Repeat/Random Button 8.USB Play 9.CD/USB Stop Button 10.Fast Reverse/Track Down/Tuner Preset Down Button 11.Fast Forward/ Track Up/Tuner Preset Up Button 12.Tuner Tuning Down/Folder Down Button 13.Tuner Tuning Up/Folder Up Button 14.Volume Up and Down Button 15.EQ Button 16.
ENGLISH General Information Controls and indicators (continued) 1 4 3 6 8 2 3 4 56 1 16 Back panel 1.Battery Compartment 2.FM Stereo/Mono mode/Beat Cancel Selector 3.AC Input Socket 4.Headphone Socket 5.FM/AM Aerial 6.Power Switch 1 2 3 4 Remote Control MEMORY FOLDER 1P RANDOM TRACK WMA MP3 CD 1.Standby on Button 3.Tape Button 4.TUNER/BAND Button 5.USB ( ) Button 6.CD ( ) Button 7.Preset ( , ) Button 8.Stop Button 9.Tuning/Folder ( , ) Button 10.Sleep Button 11.Muting Button 12.
ENGLISH Preparation for Use Operation with AC power To wall socket AC 230 V To AC INPUT Connect the AC power lead to the AC power input socket, then connect the AC power lead plug to the wall socket. Notes: If the unit will not be used for a long period of time, remove the AC power lead from the wall socket. Connection of the AC power lead to the unit disconnects the batteries. Never use a power lead other than the one supplied. It may cause an electric shock or Þre.
ENGLISH Basic Operation General control To turn the power on Turn the power switch to ON position, this will bring the set to standby mode. Press the ON/STAND-BY button to turn the power on. After use: Press the ON/STAND-BY button to enter the power stand-by mode. At STANDBY mode, red led will lights up. Volume control Press the VOLUME (+ or -) button to increase or decrease the volume. 0 ..... 30 MAXIMUM Equaliser When the EQUALIZER button is pressed, the current mode setting will be displayed.
ENGLISH CD or MP3/WMA disc Playback Listening to a CD or MP3/WMA disc This system can play back a standard CD, CD-R/RW in the CD format and CD-R/RW with MP3 or WMA Þles, but cannot record on them. Some audio CD-R and CD-RW discs may not be playable due to the state of the disc or the device that was used for recording. MP3: MP3 is a form of compression. It is an acronym which standsfor MPEG Audio Layer 3.
ENGLISH CD or MP3/WMA disc Playback Listening to a CD or MP3/WMA disc (continued) Various disc functions Function Play Main unit Operation Press in the stop mode. /II Stop Press in the playback mode. Pause Press in the playback mode. Press the / button to resume playback from the paused point. /II Track up/ Track down Press in the playback or stop mode. If you press the button in the stop mode, press the / button to start the desired track.
ENGLISH CD or MP3/WMA disc Playback Advanced CD or MP3/WMA disc playback Repeat play and Random play All tracks or a programmed sequence can be continuously repeated. The track on the disc can be played in random order automatically. 1 Whilst a disc is stop or playing, press the REPEAT/RANDOM button to Repeat 1. 2 Each time the button is pressed, the repeat play mode changes in the following order. The repeat play mode changes as follows on CD.
ENGLISH CD or MP3/WMA disc Playback Advanced CD or MP3/WMA disc playback (continued) Programmed play You can choose up to 32 selections for playback in the order you like. 1 Whilst in the stop mode, press the MEMORY/DISP button to enter the programming save mode. MEMORY//DISP MEMORY CD 2 Select a track by pressing the or button. MEMORY CD Selected track number 3 Press the MEMORY/DISP button to save the track number.
Programmed play (Folder mode) 1 Whilst in the stop mode, press the MEMORY/DISP button to enter the programming save mode. MEMORY 2 Press the TUNING/FOLDER ( desired folder. or ) button to select the MEMORY 3 Press the MEMORY/DISP button to save the folder number. MEMORY 4 MEMORY Press the tracks. or button to select the desired MEMORY 5 Press the MEMORY/DISP button to save the track number. MEMORY MEMORY 6 Repeat steps 2 - 5 for other folder/tracks. Up to 32 tracks can be programmed.
ENGLISH CD or MP3/WMA disc Playback MP3/WMA folder mode (only for MP3/WMA files) To playback MP3/WMA (Windows Media Audio) file There are many music sites on the internet that you can download MP3/WMA (Windows Media Audio) music Files. Follow the instructions from the website on how to download the music files. You can then playback these downloaded music files by burning them to a CD-R/RW disc or by connecting a USB Memory Player device. Your downloaded song/files are for personal use only.
ENGLISH USB Memory Playback Listening to USB mass storage device / MP3 player ON/STAND-BY EQ Note: This product is not compatible with MTP and AAC file systems. 1 Press the USB button, and push down the USB door. Connect the USB Memory device that has MP3/WMA format files on the unit. When the USB memory is connected to the main unit, the device information will be displayed.
ENGLISH USB Memory Playback Listening to USB mass storage device/ MP3 player (continued) 3 Select desired file to be played back by pressing the / button. 4 Press the USB / button. Playback will be start and the MP3 or WMA indicator will be displayed. Title, Artist and Album name is displayed if it is recorded on the disc. Display content can be changed by pressing the MEMORY/ DISP button.
ENGLISH USB Memory Playback Advanced USB playback Repeat play and Random play All tracks or a programmed sequence can be continuously repeated. The track on the disc can be played in random order automatically. 1 Whilst a disc is stop or playing, press the REPEAT/RANDOM button to Repeat 1. 2 Each time the button is pressed, the repeat play mode changes in the following order. The repeat play mode changes as follows on USB without FOLDER.
ENGLISH USB Memory Playback Advanced USB playback (continued) Programmed play (Folder mode) 1 Whilst in the stop mode, press the MEMORY/DISP button to enter the programming save mode. MEMORY 2 Press the TUNING/FOLDER ( desired folder. or ) button to select the MEMORY 3 Press the MEMORY/DISP button to save the folder number. MEMORY 4 MEMORY Press the tracks. or button to select the desired MEMORY 5 Press the MEMORY/DISP button to save the track number.
ENGLISH Radio Listening to the radio TUNER/ ON/ STAND-BY BAND FOLDER/TUNING PRESET ON/STAND-BY EQ Note: This product can receive FM stereo/FM monaural and AM monaural broadcast. AM stereo broadcasts will not be played in stereo. Tuning 1 2 Press the ON/STAND-BY button to turn the power on. 3 Press the TUNING ( station. Press the TUNER/BAND button repeatedly to select the desired frequency band (FM or AM).
ENGLISH Radio Listening to the radio (continued) Aerial adjustment: FM AM ON/STAND-B Y EQ ON/STAND-BY EQ Beat cancel switch: If a whistling noise occurs when recording from an FM or AM station, set the BEAT CANCEL switch to 1 or 2, whichever gives the best reception. Memorising a station You can store 20 FM and 10 AM stations in memory and recall themat the push of a button. (Preset tuning) 1 Perform steps 1 - 3 in "Tuning" on page 18.
ENGLISH Tape Playback Listening to a cassette tape Cassette Tape Before playback: For playback, use normal or low-noise tapes for the best sound. (Metal or CrO tapes are not recommended.) Do not use C-120 tapes or poor-quality tapes, as they may cause malfunctions. Before loading a tape into the cassette compartment, tighten the slack with a pen or a pencil. TAPE RECORD PLAY REWIND F.
ENGLISH Tape Recording Recording to a cassette tape Before recording: When recording important selections, make a preliminary test to ensure that the desired material is properly recorded. AKAI is not liable for damage or loss of your recording arising from malfunction of this unit. The volume and sound controls can be adjusted with no effect on the recorded signal (Variable Sound Monitor). For recording, use only normal tapes. Do not use metal or CrO tapes.
Recording from CD/USB 1 2 Set the FUNCTION switch to CD or USB. 3 4 Press the RECORD 5 To stop the CD spinning press the Load a blank cassette into the cassette compartment with the side to be recorded on facing up. button, the recording will begin. When press the STOP/EJECT / button during recording, display will appear, but CD still spinning. button. Programmed track recording from CD/USB 1 2 Select the memories track you want to record.
ENGLISH References Troubleshooting chart Many potential problems can be resolved by the owner without calling a service technician. If something is wrong with this product, check the following before calling your authorised AKAI dealer or service centre. Cassette deck Symptom General Symptom When a button is pressed, the unit does not respond. No sound is heard. Possible cause Set the unit to the power stand-by mode and then turn it back on.
ENGLISH References Before transporting the unit Remove CD from the unit. Make sure there is no CD in the disc compartment. Then, set the unit to the power stand-by mode. Carrying the unit with disc left inside can damage the unit. Care of compact discs Compact discs are fairly resistant to damage, however mistracking can occur due to an accumulation of dirt on the disc surface. Follow the guidelines below for maximum enjoyment from your CD collection and player.
ENGLISH References Specifications Tape recorder As part of our policy of continuous improvement, AKAI reserves the right to make design and specification changes for product improvement without prior notice. The performance specification figures indicated are nominal values of production units. There may be some deviations from these values in individual units.