COLOUR TELEVISIONS TELEVISEUR COULEURS KLEURENTELEVIE Operating Instructions Manuel de L’utilisateur Gebruiksaanwijzing
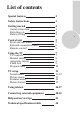
List of contents Special features 2 Safety instructions 3 Getting started Aerial connection Switching on Battery fitting 4 4 4 4 Control unit Front and rear panel External connections table Remote control 5 5 6 6 Using the TV TV controls Manual tuning Automatic tuning Child lock Program table 7 7 8 9 9 10 TV setup Sound menu Picture menu Features menu Picture format 11 11-12 13 14 15 Using teletext 16-17 Connecting external equipment 18-22 Help and service tips 23 Technical specifications
Television Thank you for buying this television which is designed to give you many years of satisfactory service. You may already be familiar with using a television but do please take time to read these instructions. They are designed to familiarise you with the unit’s many new features and to ensure you get the very best out of your purchase. Special features 2 • Your TV can receive stereo channels directly (NICAM optional). • Automatic tuning system with country selection.
Safety is Important Your safety and the safety of others is important. Please, therefore, ensure you read the Safety instructions before you operate this television. Safety instructions ! Read all the safety instructions before first use of your TV. • Position the television so that direct light does not fall on the screen. Excessive light will cause a washed out effect.
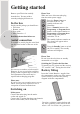
Getting started Remove your Television carefully from the box. You may wish to store the packaging for future use. In the box Inside your this package you should have: • Television • Remote control • User guide • AAA batteries x 2 4 Read these instructions before use. Please Note When not in use disconnect the plug from the mains power supply. Press the Power button on the front of the TV. The standby indicator will 7 illuminate.
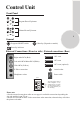
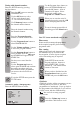
Control Unit Front Panel Program Down/Up button P- P+ Volume Down/Up button.
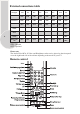
External connections table 6 26” 16:9 28” 4:3 STD. STD. STD. STD. STD. STD. AV3 Scart OPT. OPT. Headphone socket OPT. Audio/Video RCA Picture tube size/typee 24” 16:9 25” 4:3 AV1 Scart STD. AV2 Scart 28” 16:9 29” 4:3 32” 16:9 33” 4:3 STD. STD. STD. STD. STD. STD. STD. STD. STD. OPT. OPT. OPT. OPT. OPT. OPT. OPT. OPT. OPT. OPT. OPT. OPT. OPT. OPT. OPT. OPT. OPT. OPT. OPT. OPT. OPT. S-Video socket OPT. OPT. OPT. OPT. OPT. OPT. OPT. OPT.
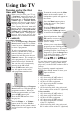
Using the TV Turning on for the first time and Tuning OK OK Mute To mute the sound press the Mute button on the remote control. A loudspeaker symbol will appear on the screen. When you first turn your TV on, “ Language” menu willl appear. To search on the languages, use the Program up or Program down. Volume up or Volume down butttons and choose your desired language and press “OK” button. Then “Country Selection” menu will appear. Choose your country using Program up or Program down.
AV In the Setup menu select PROG NO and change to P1 using the Program down button to select it and the Volume up button to change it. Press the AV button again to return to TV. Tuning the television There are two ways of tuning your television: Manual, where you control the tuning process or Autoprogram where the television does it all automatically. Please Note If the TV is set to a channel with no signal the TV will return to standby after 5 minutes.
Use the Program down button to select AUTOPROGRAM and press the OK button. A list of countries will appear. Select the desired country using Program and Volume buttons. Tuning with channel numbers Enter the SETUP menu by pressing the blue button. OK Press the OK button to enter the CHANNEL row. Use the OK button to select “S” for cable channels and “C” for terrestrial broadcast. OK Use Volume up button to select the channel number buttons. 7 ME Enter the channel number using the Numeric buttons.
Program Table Once you have tuned in all the channels you want, you can change their programme number, if required, and name them. ME To enter the PROGRAM TABLE NU menu press the Menu button and OK select PROGRAM TABLE and press the OK button or press directly the Yellow button. Please Note Some TV channels may send their names with teletext transmission. In this case their names will be automatically shown on the name line.
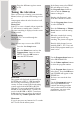
TV set up The TV set up is accessed through a menu system. Once you have stored your set up, this is the set up the TV will default to when you switch it on. ME NU OK To enter the MAIN menu press the Menu button. Once in the MAIN menu use the Program up and Program down buttons to select items in the menu and the OK to access sub menus or use the coloured fastext buttons for quick access.
Sound mode You can select NORMAL, SPATIAL or DOLBY VIRTUAL (optional)using the Volume up/down buttons or mix button. SPATIAL sound is an ‘expanded stereo’. It gives the impression that the two speakers in the TV are further apart than they really are. DOLBY VIRTUAL is based on Dolby Pro Logic decoding for production of the Left, Right, Centre and Virtual Surround Sound channels using two loudspeaker. 12 Manufactured under license from Dolby Laboratories.
Equalizer Picture menu (Green button) EQUALIZER MUSIC SPORTS CINEMA SPEECH USER 0.1 0.5 1.5 5 10 PICTURE BRIGHTNESS CONTRAST COLOUR SHARPNESS COLOUR TEMPERATURE STORE BACK In this menu are a series of preset equalizer settings for different types of sound output. There are five music settings - MUSIC, SPORTS, CINEMA, SPEECH and USER mode. USER allows you to set your own sound output as follows: OK OK Plase the OK button to enter the use EQUALIZER menu. Use the Program down button to select USER.
Select BRIGHTNESS, CONTRAST, COLOUR and SHARPNESS using the Program up/down buttons. Language There are many languages available for the On Screen Displays (OSD). OK Change the settings with the Volume up/down buttons. OK ME NU 14 To save your settings, select STORE and press the OK button. STORED will be displayed. Press the Menu button to go back to the previous menu. You can change the picture type whilst watching the TV using the picture Smart control.
Picture format This allows you to select the picture size on corresponding to the scren type widescreen of your TV: Avaible formats for widesereen TV sets are 16:9, 4:3, zoom, Letterbox and Subtitle. Avaible formats of 4:3 TV sets are 4:3 and 16:9. 4:3 Sets: 4:3, is the screen format of 25”, 28”, 29” and 33” TV sets But you can change the picture format to 16:9 to able to watch the inputs in 16:9 format, i.e. some broadcasts and DVD’s.
Using Teletext 16 Teletext is an information system that displays TV/text mix text on your TV screen. Using the teletext To view a page of text whilst control buttons you can view pages of watching a TV programme press MIX information that are listed in the teletext the Mix button. The text will be index. superimposed over the TV programme. Please Note No on screen display is available in text mode. MIX Press the Mix button again to return The contrast, brightness and colour cannot be to the text page.
Page hold If the page of text you have selected contains sub pages, these sub pages will automatically be displayed in order with a delay to allow you to read the page. HOLD HOLD To stop the move to the next sub page press the Hold button. STOP will appear in the top left hand corner. To continue moving through the sub pages press the Hold button again.
Connecting external equipment Headphones (optional) The headphones must have an impedance of between 8 and 32 ohms and have a 3.5 mm stereo jack plug. Plug the headphone jack into the headphone socket of the TV. 18 Connecting a video recorder Via SCART Make sure the TV and video recorder are both switched off. Plug one end of the SCART lead (not supplied) into the back of the video recorder and the other end into one of the SCART sockets on the back of the TV. Switch on the video recorder and the TV.
Via aerial socket Make sure the TV and video recorder are both switched off. Unplug the aerial lead from the TV and plug it into the aerial socket on the video recorder (if fitted). Plug a coaxial plug into the RF out socket on the rear of the video recorder and plug the other end into the aerial socket of the TV. Switch on the video recorder and the TV. S-Video Player If you have an S-Video player you can connect it to SCART socket 2 via an adaptor from scart to S-Video/RCA audio (not supplied).
Connecting a DVD player Via SCART Make sure the TV and DVD player are both switched off. Plug one end of the SCART lead (not supplied) into the back of the DVD player and the other end into one of the SCART sockets on the back of the TV. Via RCA lead (optional) Make sure the TV and DVD player are both switched off. Plug one end of the RCA lead into the video and audio out sockets on the back of the DVD player and plug the other end into the video and audio in sockets of the TV.
Connecting a decoder Via SCART Make sure the TV and decoder are both switched off. Plug one end of the SCART lead (not supplied) into the back of the decoder and the other end into the SCART1 on the back of the TV. Switch on the decoder and the TV. AV Press the AV button on the remote control to select AV1. Via RCA lead (optional) Make sure the TV and decoder are both switched off.
Connecting TV with video and satellite/digital receiver Scart 1 TV IN/OUT Scart 2 AUXIN Scart ANT IN Scart Socket ANT OUT Antenna socket DIGITAL SATALLITE RECEIVER VIDEO RECORDER BEHIND THE TELEVISION 22 Connecting TV with camcorder AV1/AV2/AV3 AV3 (3 scart models only) R L VIDEO S-Video In S-Video camcorder Camcorder Connecting TV games and computer AV1 R L VIDEO S-Video In S-Video TV Game Player
Help and service tips The TV does not work No sound Make sure it is plugged into the mains supply • Is the sound muted? Press the Mute button. and switched on. • Is the volume turned down? Poor picture • Are there headphones connected? • Is the aerial plugged in? Sound coming from only one • If you are using a set top aerial is it speaker properly aligned for the best signal. • Is the balance set to one side? See the • Make sure the aerial is not to close to sound menu. neon lights, loudspeakers etc.
Technical specifications table Picture tube 24” size/type 16:9 SF 26” 25” 4:3 16:9 PF 29” 29” 28” 32” 32” 28” 28” 4:3 16:9 SF 16:9 PF 4:3 SF 4:3 PF 16:9 SF 16:9 PF 33” 4:3 Screen size 61 cm 63 cm 68 cm 70 cm 70 cm 70 cm 72 cm 72 cm 82 cm 82 cm 84 cm Visible 56 cm 59 cm 65 cm 66 cm 66 cm 66 cm 68 cm 68 cm 77 cm 77 cm 80 cm screen size Sound Output 2x10 W 2x10 W 2x10 W 2x10 W 2x10 W 2x10 W 2x10 W 2x10 W 2x10 W 2x10 W 2x10 W (%10 THD) Power 85 W consumption Stand by 3W Power consumption Subwoofer 24 — 8