
User Guide


E - 12
Setup
(continued to next page)(continued to next page)
(continued to next page)(continued to next page)
(continued to next page)
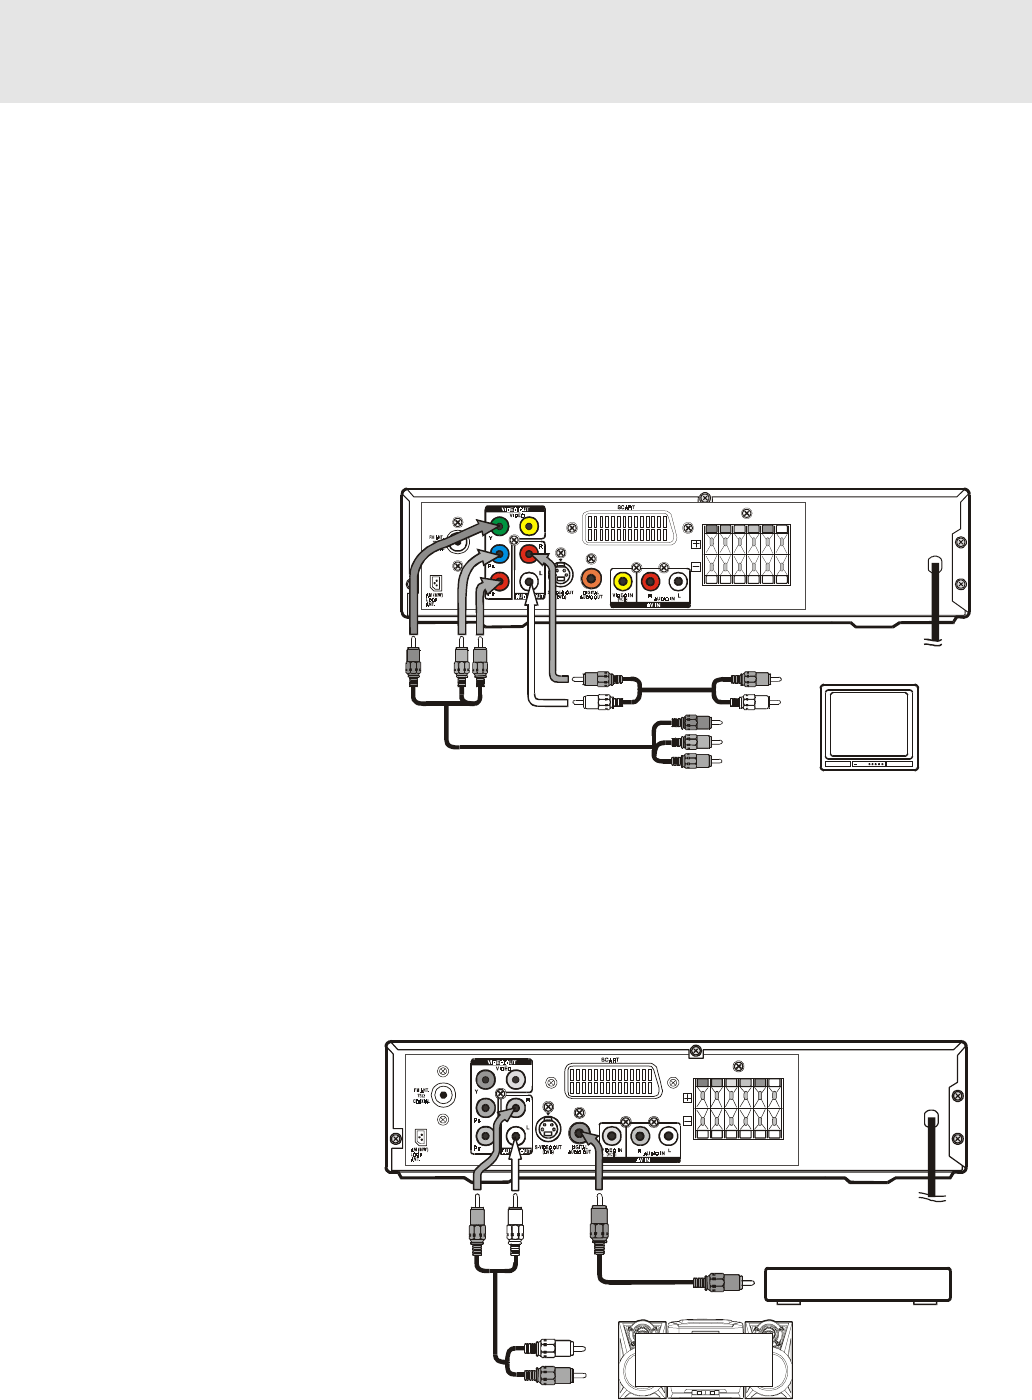
Analogue connection
Using the Audio cable (not supplied),
connect the left/right AUDIO OUT jack
on your Unit to the AUDIO IN jack.
Digital connection
Using the Coaxial Digital Audio cable
(not supplied), connect the DIGITAL
AUDIO OUT on your Unit to the
DIGITAL AUDIO IN jack on your another
equipment.
Listening to another audio
equipment
1. Turn on the Unit.
2. Turn on your audio equipment and
follow the instructions included with it
to select the AUDIO IN or DIGITAL IN
function.
B. Connecting another source
or
Component video outputs (DVD)
Some TVs or monitors are equipped with component video inputs.
Using the Audio cable (not supplied), connect the left/right AUDIO OUT jacks on your Unit to the left/right AUDIO IN jacks
on your TV and the Component video cable (not supplied), connect the Green plug Y VIDEO OUT jack on your Unit
to Y VIDEO IN jack on your TV, the Blue plug P
B/CB VIDEO OUT jack on your Unit to PB/CB VIDEO IN jack on your TV
and the Red plug PR/CR VIDEO OUT jack on your Unit to PR/CR VIDEO IN jack on your TV to view the higher quality
picture playback.
Progressive outputs (DVD)
Some TVs or monitors are equipped with component video inputs that are capable of reproducing a progressively
scanned video signal.
Using the Audio cable (not supplied), connect the left/right AUDIO OUT jacks on your Unit to the left/right AUDIO IN jacks
on your TV and the Component video cable (not supplied), connect the Green plug Y VIDEO OUT jack on your Unit
to Y VIDEO IN jack on your TV, the Blue plug P
B/CB VIDEO OUT jack on your Unit to PB/CB VIDEO IN jack on your TV
and the Red plug PR/CR VIDEO OUT jack on your Unit to PR/CR VIDEO IN jack on your TV to enjoy highest quality picture
with less flicker.
Press the SETUP button and select
Video Output to YUV (see page 29).
Connect the component video cable
to TV, press the P. SCAN button on
the remote control when DVD is
stopped. "P. SCAN" display. You can
select the output signal for better
picture quality.
Attention:
• When progressive output is
ctivated, no video signal output
from S-video and RCA (CVBS)
video jacks.
• Make sure your TV supports
progressive scan component video signal, press the P. SCAN button repeatedly until "CVBS" is displayed to go
back to CVBS video signal.
To wall outlet
Audio cable
(not supplied)
Coaxial digital audio cable
(not supplied)
(red) (white)
(red)
(white)
Audio equipment with digital
audio input jack
Amplifier of
stereo system, etc.
(not included)
Notes :
• Connect the Unit to your TV directly. If you connect the Unit through a VCR, the playback picture will be distorted
because DVD discs are copy protected.
• When you connect the Unit to other equipment, be sure to turn off the power and unplug all of the equipment from
the wall outlet before making any connection.
• Refer to the instruction manual of the connected equipment as well.
To wall outlet
Component video cable
(not supplied)
To Y VIDEO IN
To P VIDEO IN
R
/P
R
To
P/C
VIDEO
OUT
RR
To
P/C
VIDEO
OUT
BR
To Y
VIDEO
OUT
To P VIDEO IN
B
/C
B
Audio cable (not supplied)
(red)
(white)