
User guide


Table Of Contents
- warning_page.pdf
- MPC1000
- Table of contents
- Chapter 1 : Introduction
- Chapter 2 : Basic Operation
- Chapter 3 : Sequencer feature
- MAIN page
- Recording the performance
- Playing back a sequence
- Other useful features for recording sequences
- Detailed information on sequence feature
- Setting the length of a sequence
- Setting the time signature of the sequence
- Setting tempo
- Setting the loop for a sequence
- Changing the default settings
- Changing the sequence name
- Changing the default name for a sequence
- Copying a sequence
- Deleting a sequence
- Deleting all sequences
- Handling the duration (the length of a note) at the loop boundary
- Track features
- MIDI sequencer features
- Chapter 4 : Editing sequences
- Chapter 5 : Step editing
- Chapter 6 : Song mode
- Chapter 7 : Functions of a pad
- Chapter 8 : Q-Link slider
- Chapter 9 : Using the MPC1000 with external devices
- Chapter 10 : Recording a sample
- Chapter 11 : Editing a sample
- Chapter 12 : Program
- Creating a program
- Assigning/Reassigning samples to the pads
- Playing the sample while the pad is being hit
- Setting the volume and the tuning for a sample
- Changing the sample volume with velocity
- Playing several samples with one pad
- Switching between samples using velocity
- Setting the envelope for a pad
- The functions in the Program window
- Editing the sound of a sample
- Simulating the open/close hi-hat (setting the mute group)
- Setting the overlap of the sounds on the same pad (voice overlap)
- Delete all the unused samples at the same time (PURGE)
- Setting a MIDI note number to the pads
- Assigning MIDI note numbers to the pads (changing the default setting)
- Chapter 13 : Mixer
- Chapter 14 : Effect
- Chapter 15 : Save / Load
- Chapter 16 : Connecting the MPC1000 to your computer
- Chapter 17 : Other settings
- Appendix
MPC1000 v2 Operator’s Manual rev 1.0
101
Initialize to Factory Preset
Various Sample and Sequence settings can be saved to Com-
pact Flash when the file is saved. The global settings found
in the MPC1000 (listed below) are saved to the internal Flash
Memory and stored when the MPC1000 is turned off. You
can re-initialize the Factory Preset settings using the follow-
ing procedure.
01.
Turn the MPC1000 on while holding the [ERASE] key.
02. Release the [ERASE] key after the display shows [
MPC1000 (##MB installed)].
Now the MPC1000 is reset to the Factory Preset settings.
The following global settings are stored in the
MPC1000 :
Timing Correct (Note value, Swing%)
Click/Metronome (Count in, Rate, In play, In rec)
Step Edit Options (Auto step increment, Duration
of recorded notes)
Active track receive channel
Soft thru
Sync in
Sync out
Master level
Sustain pedal to duration
Truncate duration
Tap average
Footswitch 1
Footswitch 2
Autoload
LCD contrast
Adjustment of Pad Sensitivity
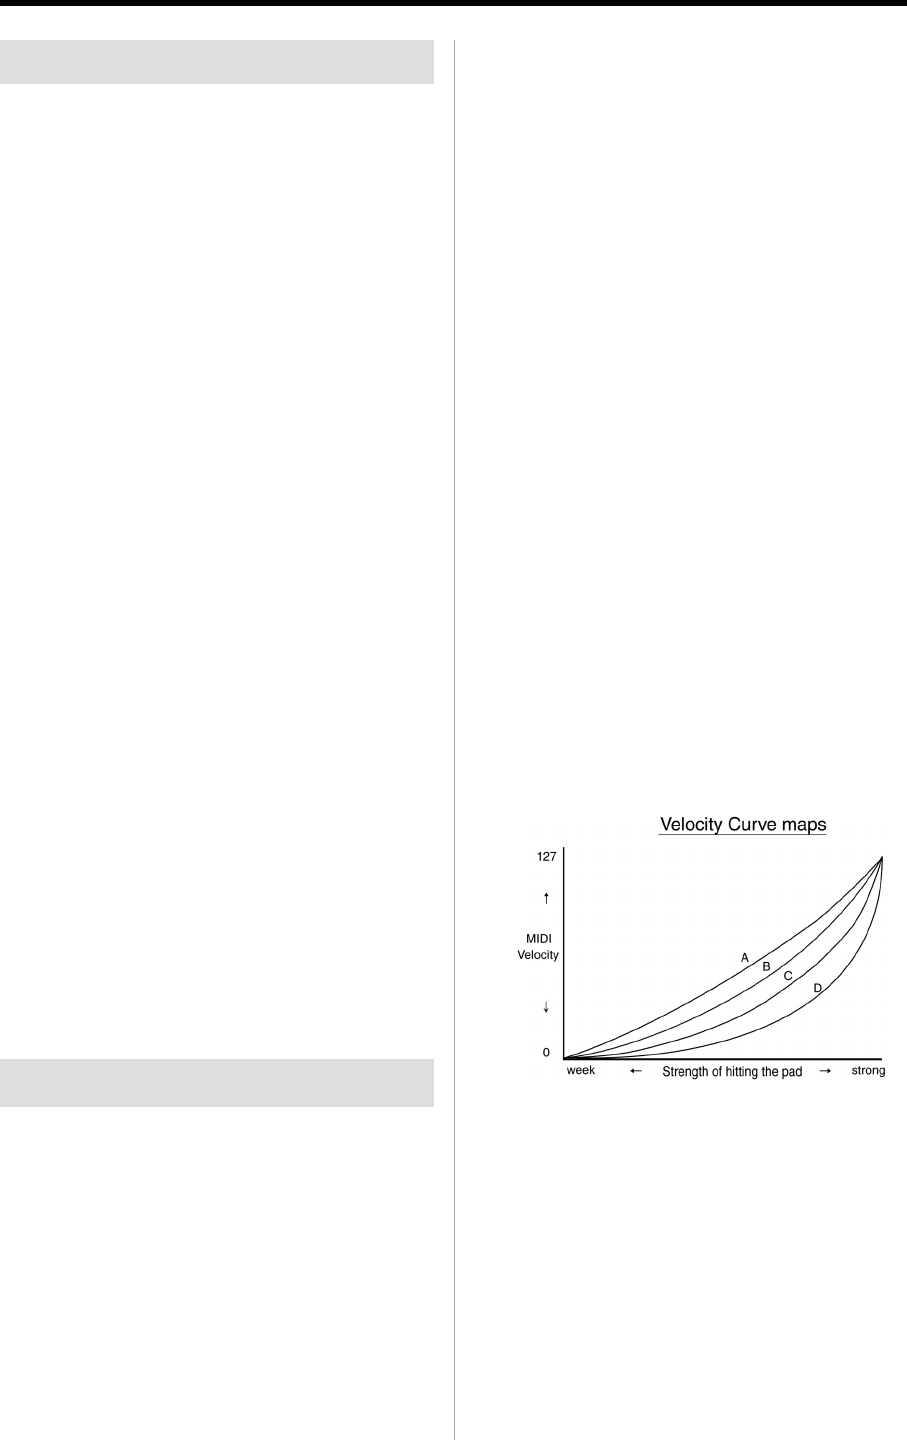
Each time you hit a pad, the MPC1000 determines how hard
you hit the pad, and converts this to a MIDI Velocity value.
This parameter is used to determine the strength/weakness
of the internal sound during playback.
If you find it difficult to achieve a comfortable velocity range
for your playing style, e.g. you can not get a velocity of 127
even you hit the Pad very hard, or vice versa, you get veloc-
ity 127 easily even you hit the Pad softly, you can adjust the
Pad Sensitivity and the velocity curve as desired.
* The Pad sensitivity and the Velocity curve can be adjusted
for each Pad separately.
01. Press the [MODE] key and then the [PAD 10]
(OTHER).
02. Press [F4] (PAD) key.
The Pad page will be displayed.
03. Select the Pad you wish to adjust the Pad Sensitivity
by hitting it.
The selected Pad Number will be displayed in the
upper left corner of the screen. The number of the
current Pad sensitivity and the current Velocity
curve will be displayed in Pad sensitivity field and
Velocity curve field. The velocity number will be
displayed in the right “Velocity” field depending
on how hard you hit the Pad. (The range of Veloc-
ity is between 1 and 127).
The bar meter will be displayed the strength of
pressing the Pad while pressing the Pad.
04 . Select the Pad Sensitivity field and Adjust the Pad
sensitivity number as you hit the Pad.
If the Pad sensitivity number is set to low number,
it’s harder to get a high velocity value even if you
hit the Pad hard. If the Pad sensitivity number is
set to high number, it may become too easy to get
high velocities even hitting the Pad softly.
You should set the Pad sensitivity number to 1
(Minimum), and increase the Pad sensitivity num-
ber while hitting the Pad until the velocity number
at the right displays 127 when you hit the Pad with
the strength you wish to use to get Velocity 127.
05. Select the Velocity curve field and adjust the Velocity
curve while hitting the Pad.
The velocity curve maps the strength of hitting the
Pad to MIDI velocity data. If the Velocity response
is not enough even with a range hard/soft Pad hits,
try switching the velocity curve from A-B-C- D.