
User guide
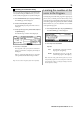
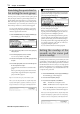
Table Of Contents
- warning_page.pdf
- MPC1000
- Table of contents
- Chapter 1 : Introduction
- Chapter 2 : Basic Operation
- Chapter 3 : Sequencer feature
- MAIN page
- Recording the performance
- Playing back a sequence
- Other useful features for recording sequences
- Detailed information on sequence feature
- Setting the length of a sequence
- Setting the time signature of the sequence
- Setting tempo
- Setting the loop for a sequence
- Changing the default settings
- Changing the sequence name
- Changing the default name for a sequence
- Copying a sequence
- Deleting a sequence
- Deleting all sequences
- Handling the duration (the length of a note) at the loop boundary
- Track features
- MIDI sequencer features
- Chapter 4 : Editing sequences
- Chapter 5 : Step editing
- Chapter 6 : Song mode
- Chapter 7 : Functions of a pad
- Chapter 8 : Q-Link slider
- Chapter 9 : Using the MPC1000 with external devices
- Chapter 10 : Recording a sample
- Chapter 11 : Editing a sample
- Chapter 12 : Program
- Creating a program
- Assigning/Reassigning samples to the pads
- Playing the sample while the pad is being hit
- Setting the volume and the tuning for a sample
- Changing the sample volume with velocity
- Playing several samples with one pad
- Switching between samples using velocity
- Setting the envelope for a pad
- The functions in the Program window
- Editing the sound of a sample
- Simulating the open/close hi-hat (setting the mute group)
- Setting the overlap of the sounds on the same pad (voice overlap)
- Delete all the unused samples at the same time (PURGE)
- Setting a MIDI note number to the pads
- Assigning MIDI note numbers to the pads (changing the default setting)
- Chapter 13 : Mixer
- Chapter 14 : Effect
- Chapter 15 : Save / Load
- Chapter 16 : Connecting the MPC1000 to your computer
- Chapter 17 : Other settings
- Appendix

MPC1000 v2 Operator’s Manual rev 1.0
75
Editing a pad sample
You can edit a pad sample without going to TRIM mode.
While editing a pad sample in Program mode, you can use
“Time stretch” edit and “Pitch Shift” edit.
Note : You can edit the pad sample assigned only in Layer 1 in
SAMPLE page.
Time Stretch (Changing the length of the sample)
The Time Stretch edit can lengthen or shorten the se-
lected sample without changing the pitch. This is use-
ful when you want to match one sample to another
(even though they have different tempos), to fit a
sample into a specific period of time or into a track.
01. In the Program mode, press the [F3] (PARAMS) key.
The PARAMS page will be displayed.
02. Select the desired pad by hitting it.
03. Press [F6] (EDIT) key.
The Pad Sample Edit key will be displayed.
04. In the Edit field, select the TIMESTRETCH.
In the Pad field, the selected pad for edit is dis-
played. This field displays only the selected pad
number in the Parameter page...
05. The Original tempo field will be displaying the tempo
of the currently selected sequence, so you will need
to set it to the original tempo of the selected sample.
If you do not know the tempo of the selected
sample, you can use the DETECT TEMPO page and
the MPC1000 will find out for you.
• Using the DETECT TEMPO
I. In the Pad Sample Edit window, press the [F2]
(TEMPO) key.
II. Press the [F5] (DO IT) key.
The Pad Sample Edit window will be displayed and
the calculated tempo in the DETECT TEMPO will
be set automatically in the Original Tempo field.
Note : Depending upon the sample (such as a single snare drum
sample), the DETECT TEMPO may not be able to detect the
correct tempo.
06. In the new field, set the desired new tempo.
Tips :
If you wish to change the sample length with %, you can use
the following method. For example, if you want to lengthen the
sample with 120%, simply set the original tempo to 100, and then
set the new tempo to 120. Now you can get the 120% longer sample.
07. Set the Preset field and Adjust field if necessary.
Preset :
The MPC1000 uses 18 preset algorithms to
carry out the timestretch process, so you
should select a preset that nearest resembles
your sample’s content. If you are not happy
with the result, try experimenting with differ-
ent presets.
Each preset is further divided into A, B or C:
A :
Standard quality timestretch with fast processing.
B :
Better quality timestretch with slower processing.
C :
Highest quality timestretch with slower processing.
Time stretch Presets :
01. FEM VOX (Female voice)
02. MALE VOX (male voice)
03. LOW MALE VOX (low male voice)
04. VOCAL
05. HFREQ RHYTHM (
High frequency Rhythm section
)
06. MFREQ RHYTHM (
Middle frequency Rhythm section
)
07. LFREQ RHYTHM (
Low frequency Rhythm section
)
08. PERCUSSION
09. LFREQ PERC. (Low frequency Percussion)
10. STACCATO
11. LFREQ SLOW (Low frequency Slow music )
12. MUSIC 1
13. MUSIC 2
14. MUSIC 3
15. SOFT PERC. (Soft percussion)