Text and Layout: Stan Steez Cover Design: Defect Proofreading: Don
Table of Contents Book I – JJ OS 1: Table of Contents Preface: Welcome to the Next Level .................................... 6 Introducing the JJ OS About JJ The New Features About this Manual How to use this Manual Shout Outs Chapter 1: Installing JJ OS 1 and 2..................................... 7 Switching from an AKAI OS to the JJ OS 1 Updating from earlier JJ OS 1 releases | Installing JJ OS 2 How to obtain a Password for OS 1 and 2 Chapter 2: Frequently asked Questions .....
Chapter 5: Updated Sample Editor (TRIM MODE) ........................ 23 Setting Loop Points Slicing Samples manually Auto-Chop Feature (Chop Shop) New Features in Sample Edit Insert Silence Convert Stereo to Mono Bit Depth and Sample Rate Converter Ring Modulation Chapter 6: Grid Edit Mode (DRUM/ MIDI/AUDIO) .........................
Table of Contents Chapter 9: The Rest . . . . . . . . . . . . . . . . . . . . . . . ......................................... 43 Settings Stored in Internal Memory AKAI / JJ OS Comparison Chart AKAI OS 1.07 vs. JJ OS Volume Curve Comparison Useful Links INDEX . . . . . . . . ....................................................................... . 49 MPC 1000 v4 Operator’s Manual rev 3.
Preface: Welcome to the Next Level Introducing the JJ OS Welcome to the third revision of the (officially) unofficial guide to the alternative and ultimate operating system for your MPC 1000: the JJ OS. Using this manual, you will be able to totally unleash the full potential of your MPC 1000. JJ – what does it mean? And what is this OS about? About JJ Well, JJ basically stands for Japanese Jenius, and was coined by Nym1 of mpc-forums.com.
Chapter 1: Installing JJ OS 1 and 2 Switching from an AKAI OS to the JJ OS 1 01. Download the latest version of JJ OS 1 from http://www7a.biglobe.ne.jp/~mpc1000/ 02. Put the binary file (.bin) on a Compact Flash (CF) Card. Required for upgrade! 03. Put the CF Card with the new OS data into your MPC 1000. 04. Fire it up while holding down the [WINDOW] button. 05. Press [REC] button – the software update starts. After that, the MPC reboots with JJ OS 1 running.
Chapter 2: Frequently asked Questions General MPC 1000 FAQ A great MPC 1000 can be found online at: http://stereoroid.com/music/mpc1000/faq/ How many characters can a sample name contain? 16 characters max, without the .wav suffix. Which Hard Drives can be used? HDDs with about 100 GB have been reported working at http://www.mpc-forums.com/viewtopic.
Is there a shortcut to 'INPUT THRU' Settings? Hold [SHIFT] in MAIN Screen and press [F6] to quick select Input Thru. After I chop, why do all my samples cut each other off? Your Drum program is set to 'MONO' by default after chopping. Change it to 'POLY'. How can I uninstall JJ OS 2? Basically, you've to install the AKAI OS again, then a JJ OS 1 version. But the JJ OS switcher screen remains, from what is known so far... update following. When I load samples I can't assign them directly to a program.
Chapter 3: The new MAIN screen (overview) Along with version 4.3x came an updated MAIN screen. This allows you to access some menus and settings quicker and easier; e.g. Program Edit, Sequence Settings and MIDI Program Change. Just highlight a column with the arrow keys and press [WINDOW] if the button lights up.
Options in MAIN screen: Name and Sequence Settings n Setting Names 01. Highlight the Sequence field (Sq:) and press [WINDOW] to enter the sequence’s preferences. 02. Turn the DATA wheel to bring up the name editor. F1 F2 F3 F4 F5 F6 03. Use DATA wheel or cursor buttons to navigate the alphabet and additional characters. Use t and u to move the cursor in the name field. 04. Select the letter / character of your choice and press u to enter it.
Options in MAIN screen: Tempo Change / Step Edit n Assigning Tempo Change to Q-Link S liders 01. Highlight the BPM counter and press [WINDOW] to enter the Tempo Change screen. ? 02. Turn Tempo Change 'ON' using the DATA wheel. 03. In the 'Q-Link' column, select Slider 1 or 2. 04. In 'Q-Link Range', set the width of the range in which the original tempo will vary.
Options in MAIN screen: Swing and Shift Timing Settings n Assigning Swing and Shift values to Q-Link Sliders 01. In the main screen, press F1 [T.C.] to enter the Time Correct screen. 02. Next, press [Q-Link] (F3) to assign swing and shift settings to Q-Link Sliders 1 and/or 2. 03. After you've configured the Slider setup, press [CLOSE] (F4). Done. F1 F2 F3 F4 F5 F6 J Now you can change the swing and shift in realtime, using the Q-Link Sliders during recording. J > > J n Changing T.C.
Options in MAIN screen: MIDI Program Change (PC) n To change presets on an external MIDI device, do the following: 01. From the main screen, highlight the MIDI field and select the appropriate MIDI output and channel. F1 02. Now, highlight the 'PC' (Program Change) field. Default for this field is 'OFF' – no program changes are sent. Use the DATA wheel to change the PC settings. F2 F3 F4 F5 F6 J 03. The first selection after 'OFF' is 'Seq'.
Options in MAIN screen: Audio Track Settings/Direct Recording n Hold [SHIFT] Preparations for recording an Audio Track 00. Connect the external audio source you want to record from to the analog or digital line in of your MPC 1000! F1 F2 F3 F4 J F5 F6 J 01. In MAIN screen, highlight the small field above the Track number to select the track type. Change it from 'DRUM' to 'AUDIO'. Alternatively, you can hold [SHIFT] and press [F4] to jump to track 57.
Chapter 4: Global Program Edit (GPE)2 JJ created a totally new Program Editor for the new OS, the so-called Global Program Editor, GPE. The GPE is superior to its predecessor in many ways. Inside, you find five pages, including different columns, containing all settings that can be applied to a program. A lot of these columns provide additional options which can be accessed via the [WINDOW] n Button.
n SAMPLE Page: MIDI Note Settings 01. Press [MODE] + Pad 11 to enter GLOBAL PROGRAM EDIT Mode. 02. Move the cursor to the 'NOTE' column. J J 04. Move the DATA wheel to change the MIDI key of the selected Pad. To change the MIDI notes of all Pads, press [WHOLE] (F6), then turn the DATA wheel. Done. NOTE: To reset the MIDI Notes to default press [WINDOW] and press [RESET] (F2) in the next screen (shown left).
n SAMPLE Page: Auto Chromatic Sample Assignment JJ incorporated this feature from the MPC 2500 into the MPC 1000. Samples can now be assigned chromatically to all pads (from A01 to D16). The n drum pads will correspond to a note range from 35 to 98 on a MIDI keyboard. To assign a sample chromatically in GPE, do the following: Auto Chromatic Sample Assignment 01. Press [MODE] + Pad 11 to enter GLOBAL PROGRAM EDIT Mode. 02. Move the cursor to the 'SAMPLE' column and press [WHOLE] (F6).
n Assigning multiple samples chromatically Assigning more than one sample chromatically to a specific range of pads requires a different approach. Usually, creating a program with various chromatically assigned samples across a specific range of pads would be very time consuming.
n FILTER Page: Amp Envelope 01. Press [MODE] + Pad 11 to enter GLOBAL PROGRAM EDIT Mode, then 'FILTER' (F2). 02. Set / change the following parameters... J ATK changes the Attack Time of a sample. DCY changes the Decay Time of a sample. MODE sets the way the Amp Envelope should be applied to a sample; from the beginning (START) or from the end of a sample (END). 03.
n LFO Page: LFO Controls 01. Press [MODE] + Pad 11 to enter GLOBAL PROGRAM EDIT Mode, then 'LFO' (F3). 02. Set/ change the following parameters... (for additional info about the Low Frequency Oscillator, please refer to page 77 of the AKAI manual v.2) WAVE FORM: select from TRIANGLE, SINE, SQUARE, SAW, SAW DOWN, or RANDOM. RATE: Sets the cycle time (speed) of the LFO (00.00 - 99.00). DELAY: Sets the delay time (time before the LFO starts).
n OUT Page: Mixer and Effect Settings 01. Press [MODE] + Pad 11 to enter GLOBAL PROGRAM EDIT Mode, then 'OUT' (F5). 02. Set/change the following parameters... (for additional info about the Mixer etc., please refer to chapters 13 and 14 of the AKAI manual v.2) J PAD: Use DATA wheel or Pad Bank Buttons to scroll/ jump through the pads. Press [WINDOW] to enter the Velocity Layer Editor LEVL: Adjust the output level of a pad (0-100).
Chapter 5: Updated Sample Editor (Trim Mode) JJ refined the Trim Mode with better controls, providing quicker and more intuitive ways to cut, slice, and edit loop points of samples. Below, setting loop points and dividing samples into regions manually is explained, as well as the newly added Auto-Chop feature.
n Slicing Samples manually 01. Load a Sample and Press [MODE] + Pad 6 to enter TRIM Mode. F1 F2 F3 F4 F5 02. Press [CHOP] (F5), to enable the Slice function. More options become available: [AUTO] (F3), [SLICE] (F4), [DIVIDE] (F5) and [COMBINE] (F6). For now, press [SLICE]. F6 J 03. The cursor jumps into the field 'St' and 16 regions of equal length are created (default). If you want to keep the 16 regions as is, continue from step 05.
n Auto Chop Function (Chop Shop) 01. Load a Sample and Press [MODE] + Pad 6 to enter TRIM Mode. F1 F2 F3 F4 F5 F6 J 02. Press [F5] (CHOP). The Display above the waveform changes. It shows the slice counter. 03. Press [F2] (AUTO). 04. In the 'Auto Slice' screen adjust the Recovery time and the Threshold (both set to 50 by default): Recovery time (0-100): This sets the minimum time between the attack and the next attack. If you set this time too long, continuous attacks may not be detected.
New Features in Sample Edit Besides the reworked chop functions of the MPC 1000, JJ also added four new editing features: the possibility to insert silence, a stereo to mono converter, a bit and sample frequency converter, and a ring modulator. n A lot of people have requested these features, and finally they've become reality. Below, you will find brief descriptions of the new options in Sample Edit. Insert Silence 01.
n Bit depth and Sample rate Converter 01. Enter Trim Edit via [MODE] and [Pad 6]. Select the sample whose bit depth or sample rate you want to change. F1 F2 F3 F4 F5 F6 02. Press [EDIT] (F6) and scroll to the end of the menu where you find BIT CONVERT. 03. Set the bit depth (4 to 12 bit) and sample rate (11 kHz to 44.1 kHz) that you want the sample to be converted to. Set the name for the new sample which will be created or just leave it as it is. This won’t overwrite the original sample! 04.
Chapter 6: Grid Edit Mode (DRUM/ MIDI/ AUDIO) One of JJ’s biggest accomplishments for the new OS was to bring the Grid Edit Mode feature from the MPC 2500 to the 1000. With Grid Edit, you can enter pad events into a graphic matrix representing a track. Each track in the MPC 1000 stores the performance data you entered with the pads or a MIDI Controller: Drum pad events, MIDI note information from external MIDI devices and Audio data from direct recordings.
GENERAL GRID EDIT CONTROLS (DRUM/ MIDI/ AUDIO) t or u or p or q Moves the cursor left, right, up, or down step by step. [SHIFT] + t or u or p or q Move the cursor outside of the Grid. DATA wheel Inside the Grid, turn the DATA wheel to move the locator forwards or backwards along the time line. Outside the Grid, use it to change various parameters.
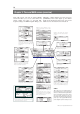
n DRUM Grid Edit (DGE) Pad number Bar Counter To enter, edit, or record Events inside Grid Edit, do the following: Sequence Name Loop Settings Tempo Location Track type Track number MIDI Channel DRUM Grid (6PAD) F1 F2 Horizontal Cursor F3 F4 F5 F6 Vertical Cursor Selected Event Press [REC]... ...hit a PAD. J 01. Enter Grid Edit via [MODE] and [Pad 15]. 02.
n Copying and Pasting Events in Grid Edit (DRUM/ MIDI) In Grid Edit, you can copy and paste events horizontally as well as vertically. Since this works identically for both Drum and MIDI Grid, it's only explained once here using Drum Grid. To copy and paste events, do the following: 01. Enter Grid Edit via [MODE] and [Pad 15]. Select Track 02. Select the Track you want to edit.
n Using Q-Link Sliders in Grid Edit (DRUM) In Grid Edit, you can use the Q-Link Sliders to add certain parameters to a track or pad event in realtime, if the track type is set to Drum. To edit Q-Link p arameters along the timeline, do the following: 01. Press Mode + [Pad 15]. Set track type to DRUM and press [Q-REAL] (F2). The display changes. Above the grid you’ll notice three fields: 'TR', 'TUNE', and 'Q1, 2'. F1 F2 F3 F4 F5 J Press [F2] Select Parameter 02.
07. You can record the effect created with the Q-Link sliders as usual. Also, you can manually apply/ edit it inside the grid: press [REC] or [OVER DUB]. Move the locator along the timeline with the DATA wheel while using the Q-Link sliders to create a curve or whatever. In this example – tune set as parameter – Q2 controls the tune beneath the 0-Line and Q1 controls everything above it. To fine tune your settings, highlight the 'EVENT' field with p and turn the DATA wheel to change the value. 08.
n MIDI Grid Edit (MGE) With the JJ OS, you can now enter and edit MIDI Events in Grid Edit, using the Drum Pads or an external MIDI controller. If you want to use the Drum Pads to enter MIDI events in the Grid, check the 'MIDI Note Settings' (p. 16) first, before you start working with Grid Edit. Although you can use the MPC's Drum Pads, connecting an external MIDI controller is recommended. To setup and prepare your controller, read the section 'MIDI, MTC and MMC Sync Settings' on page 40.
n AUDIO Grid Edit (AGE): Applying Fades In the AUDIO section of Grid Edit, you can see the waveform of the recorded material/sample. Also, you can use the DATA Wheel to move the locator to any position of the wave file and press any Pad to audition the sample from the selected position on. But the coolest thing about the Audio Grid is that the Select Sample isplayed waveform is referencing to the actual tempo d selected for the sequence.
Chapter 7: Other new or improved features n Improved Q-Link Slider Support JJ redesigned the Q-Link Slider Menu to make it look nice and clean, providing a good overview of effects that can be assigned to the Q-Links. Also, he added some features to the 'NOTE ON' function, like: 'Sample Start', 'Sample End' and 'Velocity'. Also, MIDI n Assigning Effects to Q-Link Sliders Control Change was added to the sliders. So now you can use the Q-Links in three modes: Note On, Realtime and MIDI CC.
n Reworked File Browser F1 F2 F3 J F4 F5 F6 For the new OS, JJ reworked the file browser of the LOAD/ SAVE section, providing a better overview of the folder structure on your HDD or CF Card. Also, a few nice additions were made. For example, the USB functionality was improved by adding a mount feature, so you don’t have to remove and re-insert the USB cable again to mount the device.
n Improved Pad Sensitivity Editor With the improved Pad Sensitivity Editor, you can now set the sensitivity level of all 16 pads individually, which gives you even more freedom to perfectly PAD Sensitivity Level PAD Velocity/Peak 01. Press [MODE] + [Pad 10] (Other), then [F4] (PAD). PAD Pressure Level Sensitivity Curve Threshold PAD # F1 F2 F3 F4 F5 a djust the machine for your needs. This might be very useful for live performances for example.
n Polyphony Voice Monitor/ Master Level To check how many voices are in use simultaneously, do the following: 01. Press [MODE] and [Pad 10] (Other). 02. Press [GLOBAL] (F1). F1 n F2 F3 F4 F5 Using custom Metronome Sounds F6 In the 'GLOBAL' window, you can see the current O S version installed on your MPC 1000. Also, you can set the Master output level (from -42 to 0 dB). Check how many voices are played back while the MPC is running on the voice monitor bar.
n Recordable Track Mutes One of the simple but great additions to the MPC 1000 features is the possiblility to easily record and delete Track Mutes with the JJ OS! To make use of recordable Track Mutes, do the following: 00. Finish your arrangement and convert it into a long SONG Sequence in Song Mode. Turn Loop OFF F1 F2 F3 F4 F5 F6 01. In MAIN screen, turn 'OFF' Loop to prevent the sequence from starting all over again after recording mutes! 03.
Chapter 8: MIDI, MTC and MMC Sync Settings Besides MIDI Clock, the new OS also supports MTC (MIDI Time Code) and MMC (MIDI Machine Control) to interact with other devices and software. The following sections show how to utilize these features and also include some tutorials on how to sync the MPC 1000 with some of the most prominent Digital Audio Workstations (DAWs) around.
n MIDI Machine Control (MMC) The MPC 1000 can now send and receive MIDI Machine Control, or MMC. MIDI Machine control is a standard protocol for transport controls.
Chapter 9: The Rest n Settings stored in internal memory (press MAIN to save a setting) LCD Contrast USB default Device: MEMORY CARD, HDD Auto Load Device: Internal, Memory Card, Hard Disk Auto Load Folder Name LOAD Assign to pad : ON,OFF GRID Step Sound : ON, OFF GRID Display Pad: Track1-8 only (each 6pad) SEQUENCE Default Tempo : 30.0-300.
-/- Improved Q-Link Slider Support MIDI Program Change MIDI Bend In Custom Splash Screen Support Improved Trim Mode / Auto Chop Bit and Sample Rate Converter Ring Modulator -/•/•/• •/-/-/-/-/- - Improved Name Edit Time Stretch / Pitch Shift Real-Time Pitch Shift Delay Effect / Delay on FX 2 Sliced Samples (mono / stereo) Patched Phrase (mono / stereo) Improved USB Mount Feature Auto-Chromatic Sample Assignment Old Program (OPE) / Global Program Edit (GPE) Alternate Loop Playback (Ping Pong Loop) M
MPC 1000 v4 Operator’s Manual rev 3.5 -/-/•/0 •/-/4 •/•/•/• 24 100.000 -/-/•/• 0 •/-/4 •/•/•/• 128 100.000 -/• •/• •/• 4 •/•/4 •/•/•/• 24 100.000 •/• •/• •/• • 8 • • • •/•/• 4 •/•/•/• • 99 300.000 * A Serial for OS2 actually costs 49 US$. But since a registered version of JJ OS 1 is needed to run OS 2, you need a serial for that too, which costs 30 US$. This totals a sum of 79 US$. ** The Jessiah Glitch actually is an infamous bug in the early AKAI OS.
n AKAI OS 1.
n Useful Links... MPC 1000 Support and Resources http://www7a.biglobe.ne.jp/~mpc1000/ Home of JJ – The Basement! http://jjmanual.wordpress.com/ Home of the JJ OS Manual http://www.akaipro.com/support.php AKAI Support Site (english) http://www.akai-pro.de/downloads/index.html AKAI Support Site (german) http://www.akaipro.com/software/OS/MPC1000/ List of all AKAI OS versions http://stereoroid.
Software, Drivers and Research http://webpages.charter.net/dereese/gary/akai.html http://www.mybunnyhug.org/software/ http://www.wavosaur.com/ Bluebox – A tool to create and edit Akai MPC 1000 programs on your PC. MPC Pad 187 – Same as Bluebox, for MAC. Waveosaur – Free Audio Editor w/ VST support. Looks and feels like SoundForge. http://audacity.sourceforge.net/ Audacity – Another Audio Editor. http://www.cockos.com/reaper/ REAPER – Great shareware DAW. Get it if you haven’t already! http://www.
INDEX [A] [P] Amp Envelope 19 Audio Track Recording 14 Auto Chromatic Sample Assignment 17 Playback Mode Settings 10 Program List 15 [C] [R] Channel Conversion 25 Recovery Time 24 Ring Modulation 26, 27 [D] Direct Recording 14 [E] Effect Settings 21 [F] Filter Envelope 19 Framerate 4, 40 [G] Global Program Edit 15 Grid Edit Mode 4, 27, 29, 33, 34 [I] Insert Silence 25 [L] LFO Controls 20 Links 46 Loop Points 22 [M] MIDI 40 MIDI Note Settings 16 MIDI Program Change 14 Mixer 21 MMC 4, 41 MTC 40 Mu