
User Guide

Page 123
Chapter 8: Creating and Editing Sounds
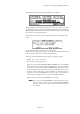
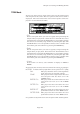
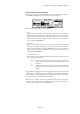
TRIM Mode
To play only the necessary parts of the sound, set the starting point
and end point of the sound. The wave pattern of the entire sound is
displayed. The area between the start and end points will be dis-
played in reversed black and white.
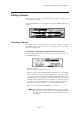
• St:
Set the start point where you want to actually start generating the
sample when you play back. Select the St: field with the cursor
and change the value with the DATA wheel. It is possible to change
the value to an extremely large number by selecting the digit with
the DIGIT wheel. It is also possible to directly enter a number with
the numeric pad and confirm it by pressing the ENTER key.
• End:
Set the end point where you want to actually end generating the
sample when you play back. Select the End: field with the cursor
and change the value with the DATA wheel. It is possible to change
the value to an extremely large number by selecting the digit with
the DIGIT wheel. It is also possible to directly enter a number with
the numeric pad and confirm it by pressing the ENTER key.
• View:
If the sound is in stereo, select whether to display on LEFT or
RIGHT.
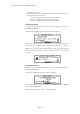
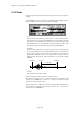
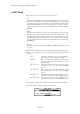
To play back the currently selected sound at full velocity according to
the PLAY X: field on the top right of the screen, press PLAY X[F6].
ALL This plays back the entire sound regardless
of the start point or end point settings.
ZONE This plays back the range between the start
and end point that has been set in the
znEDIT screen.
BEFOR Zn This plays back the sound before the start
point that has been set in the znEDIT
screen.
AFTER Zn This plays back the sound after the start
point that has been set in the znEDIT
screen.
BEFOR ST This plays back the sound before the start
point that has been set in the TRIM screen.
AFTER END This plays back the sound after the start
point that has been set in the TRIM screen.
It is possible to adjust the start and end points while checking them.