
User Guide


Page 5
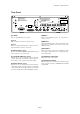
Chapter 1: Introduction
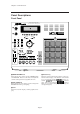
A NOTE VARIATION slider
This enables you to change the parameter of the
preset internal sound source in real time. Assign
the parameters in the screen that appears by
pressing the AFTER key while holding down the
SHIFT key.
B TAP TEMPO / NOTE REPEAT key
This allows a sequence to play at the tempo set
by hitting the key.
Hold this key and press DRUMS PAD to succes-
sively play to the beat set at Timing on the MAIN
screen. For example, if the Timing is set at 1/8,
you can play the hi-hat at an eight beat by hold-
ing this key and pressing the DRUMS PAD as-
signed to the hi-hat. You can also press the
DRUMS PAD harder for louder sounds or softer
for softer sounds.
C UNDO SEQ key
When you record and stop a sequence the
light above this key will turn on. It is pos-
sible to return to sequence back to the state
before recording by pressing the key and
turning off the light. If the key is pressed
again, the light will turn on and the state
will return to the condition after the last re-
cording. This is convenient to compare the
recording with the previous, or to undo a
poor recording. You can only use the UNDO
SEQ key when you are recording or editing
a sequence. You cannot use this key when
you are editing a program or sound. The
usage of the UNDO SEQ is also limited to
the time just after a recording or edit. If you
move to another mode or function screen,
the UNDO SEQ will be disabled.
D ERASE key
This is used to erase data on the selected track.
By holding this key and pressing the DRUMS
PAD of the sound you want to erase while dub-
bing over a sequence, you can erase the data as
long as the PAD is pressed. In addition to drum
tracks, you can erase the notes on a track of an
external MIDI device by holding this key and
pressing the note that needs to be erased on the
MIDI keyboard.
The ERASE page will appear if you press this
key while the sequence is not playing. This al-
lows you to erase specific notes or lengths of data.
5 Numeric Pad / Mode key
This allows you to directly enter numeric data.
Enter numbers with this key to a selected nu-
meric field and press the ENTER key. If you are
entering numbers with decimal value, enter the
number ignoring the decimal point. (In the case
of 120.5, enter 1205.) If you have made a mis-
take, it is possible to cancel by pressing the
SHIFT key before the ENTER key. If you oper-
ate the CURSOR key, DATA wheel, or MAIN
SCREEN key while you are entering with the nu-
meric pad, the input is canceled and the data re-
turns to the status before entry has been made.
By pressing the numeric pad while holding the
SHIFT key, the key functions as a Mode key and
allows you to enter the mode indicated under the
numeric pad key.
6 MAIN SCREEN key
This allows you to return from any page to the
MAIN screen (initial screen). The MAIN screen
is the basic screen used to record or play back a
sequence.
7 OPEN WINDOW key
This displays the pages which allow you to set
the details of the selected field.
8 DATA wheel
This allows you to change the numbers or data of
the selected field. The data variably increases by
rotating the wheel quickly. Also,
rotate the
DATA wheel while holding down the SHIFT
key to set the contrast of the LCD. It is pos-
sible to change this regardless of the dis-
played mode.
9 DIGIT wheel
This allows you to select the digit you want to
change when you are changing long digit num-
bers such as in the case of sample editing.
0 AFTER key
Normally, the NOTE VARIATION slider effect is
valid when the drum pad is played or when the
drum pad performance is recorded to a sequence.
However, by turning this key on, it is possible to
execute the NOTE VARIATION slider effect
while the sequence is playing. This key also
needs to be on when you are over dubbing only
the NOTE VARIATION slider effect.
Press this key while holding down the SHIFT
key to display the screen and set the parameter
you want to change.