
User Guide


Chapter 11—Using Q-LINK
102
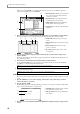
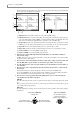
3. Move the cursor to the Step field, and turn the [JOG] dial to specify the length of each step.
For example, setting this to 1/64 will produce extremely rapid change with four steps per 16th note. If you
set this to 1/16, each step will correspond to a 16th note.
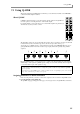
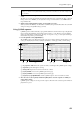
4. In the setting field, move the cursor to the step of the knob or slider that you want to set, and
move the knob or slider to specify the value for that step.
The display will indicate the position of the knob or slider.
5. When you have finished making settings, save the sequence as necessary.
6. To reproduce the Q-LINK sequence, press the [Q-LINK SEQUENCE] key.
The [Q-LINK SEQUENCE] LED will light, and the Q-LINK sequence will be enabled.
7. To turn a knob or slider on/off individually, press the Q-LINK section [SEQUENCE] key to access
the Q-LINK sequence page, and use the [F3]–[F6] keys to switch the knob or slider on/off.
Even if the [Q-LINK SEQUENCE] key is on, the movements of a knob/slider will not be output if the cor-
responding [F3]–[F6] key is turned off.
8. Start the sequence/song.
The knob/slider movements specified for that sequence will be reproduced.
9. If you want to manually operate a knob or slider while the sequence/song is playing, turn on the
[ACTIVE] key of that knob or slider.
When you turn on the [ACTIVE] key, the movements specified by the Q-LINK sequence will be disabled,
and the movements of the knob or slider will take priority.
Note: A Q-LINK sequence does not record the parameter values of the event, but simply the movements of the
knob or slider. This means that when you play back, the result will depend on the output destination and event
type that are assigned to the Q-LINK knob or slider.
When STEP=1/64
When STEP=1/16