
User Guide


Chapter 1—Parts and their functions
4
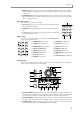
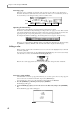
D [TAP TEMPO] key: This key is used to manually specify the tempo. Striking this key repeatedly will
automatically set the tempo to the corresponding quarter-note interval.
E [WINDOW] key: This key opens a window for making detailed settings. When you move the cursor
to a specific field in the display and press this key, a window for that field will open. Press this key once
again to close the window.
F [SHIFT] key: This key is used in conjunction with other keys as a shortcut for certain functions, or to
specify a range.
G CURSOR [
π
]/[
†
]/[
√
]/[
®
] keys: These keys are used to move the cursor up/down/left/right in the
display.
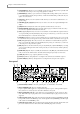
H [JOG] dial: This dial adjusts the value of the parameter at which the cursor is located.
I BLOCK CURSOR [
π
]/[
†
] keys: If the currently displayed page is divided into blocks, these keys
move the cursor upward or downward between blocks.
J STEP [
<
]/[
>
] key: These keys are used to move backward or forward within the sequence in units of
one step. By holding down the [GO TO] key and pressing one of these keys, you can move to the event
that is immediately before or after the current location.
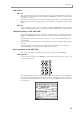
K [GO TO] key: This key is used to move the current location to a specified locate point, or to access the
Locate window where you can register a locate point. For details on the Locate window, refer to page 14.
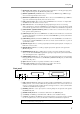
L BAR [
<<
]/[
>>
] keys: These keys are used to move backward or forward within the sequence in
units of one measure. By holding down the [GO TO] key and pressing one of these keys, you can move
to the start point or end point of the sequence.
M [REC] key: When you hold down this key and press the [PLAY] key or [PLAY START] key, recording
on the sequencer will begin. If the track contains previously-recorded events, they will be replaced by
the new events.
N [OVER DUB] key: This key has essentially the same function as the [REC] key, with the difference that
newly recorded events will be added to the track without erasing the previously-recorded events.
O [STOP] key: This key stops sequence playback or recording.
P [PLAY] key: This key starts playback or recording from the current location within the sequence.
Q [PLAY START] key: This key starts playback or recording from the start point of the sequence.
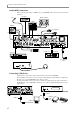
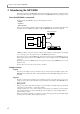
Rear panel
A [SIGNAL GND] terminal: Connect the grounding wire of your turntable to this terminal.
B REC IN [PHONO] jacks: These are turntable input jacks.
* A phono equalizer will be applied to compensate the frequency response of the signal that is input to
these jacks. Do not connect any device other than a turntable to these jacks.
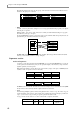
C REC IN [LINE/MIC] jacks: Mics or line level devices such as CD players can be connected to these
jacks. Either XLR or phone plug cables can be connected. Balanced phone plug connections are also
supported.
D [INPUT SELECT] switch: This switch selects the input signal. The signal from the [PHONO] jacks will
be input if this switch is in the PHONO position, and the signal from the [LINE/MIC] jacks will be input
if this switch is in the LINE/MIC position.
E [MAIN OUT] jacks (XLR): These are balanced main output jacks that output the signal from the sam-
pler section and the metronome click sound. Cables with XLR plugs can be connected.
1 43 R2 5
79
J L M N O P Q S
6
8 K