
User Guide


Realtime input
21
5. Make sure that the Type field is set to DRUM.
6. Move the cursor to the Out1 field, and turn the [JOG] dial to select one of the following output
destinations for the track.
PART...............A specific part of the sampler section
OUT A ............[MIDI OUT A] connector
OUT B ............[MIDI OUT B] connector
OUT C ............[MIDI OUT C] connector
OUT D............[MIDI OUT D] connector
INT-A..............Virtual MIDI input port A of the sampler section
INT-B..............Virtual MIDI input port B of the sampler section
You will normally choose PART if you want to play a program on the internal sampler, or OUT A–OUT D
if you want to play an external rhythm machine.
The fields at the right of the OUT1 field will change as follows, depending on the output destination you selected.
7. Move the cursor to the PART field or the Ch field, and turn the [JOG] dial to specify a part
number (if you selected PART) or a MIDI channel (if you selected OUT A–OUT D).
When you strike the pads or play back the sequencer, the MIDI events will be transmitted to the part or MIDI
channel you specified here.
8. If you selected PART as the output destination, move the cursor to the right of the PART field
and select the desired part number. Then move the cursor to the right again, select the drum
program that you will play using this part.
The program will be assigned to the part you selected. For details on how to select a program, refer to p.14.
9. Strike the pads, and make sure that you can hear the program or MIDI sound source.
If you want to switch pad banks, press the PAD BANK [A]–[F] keys. The display for the In field will change
according to the pad that you strike.
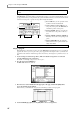
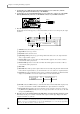
A : This will blink when a MIDI event is
received.
BBar: This will indicate the velocity value of the
note event that is received. A longer bar indi-
cates a larger velocity value.
10. Move the cursor to the TC field, and turn the [JOG] dial to select one of the following choices as
the minimum timing interval at which note events will be recorded in the track.
1/8...8th notes, 1/8(3)...8th note triplets, 1/16...16th notes, 1/16(3)...16th note triplets, 1/32...32nd notes,
1/32(3)...32nd note triplets, 1/64...64th notes, 1/64(3)...64th note triplets,
OFF(96)...10 ticks (1/96th of a quarter note), OFF...Timing Correct=off (1/960th of a quarter note)
Timing Correct is a function that aligns the timing of note events to the specified note value interval as they
are recorded in the track. If Timing Correct is turned on, the [TIMING CORRECT] key LED will light.
Hint: You can change this setting later as necessary.
Hint: If you selected a virtual MIDI port (INT-A/INT-B) of the sampler section as the output destination, specify
the MIDI channel in the same way as described above. (Set it to match the MIDI receive channel of the part you
want to play.)
You can use the same steps to set the Out2 field.
Hint: If desired, you can specify a program change number by moving the cursor to the Pgm Change field and
turning the [JOG] dial. When you play back the sequence, the program change specified by this field will be
sent to the output destination.
Hint: The Out field shows the output status of the track. The contents of the display are the same as for the In field.
Hint: You may also record note events with Timing Correct turned off, and apply timing correct later. For details,
refer to the PDF reference manual.
Use the [TIMING CORRECT] key to switch Timing Correct on/off.
1
2