
User Guide


Realtime input
23
7. Move the cursor to the Out1 field, and turn the [JOG] dial to select the output destination for
the track.
8. Move the cursor to the PART or Ch field, and turn the [JOG] dial to select the part number or
MIDI channel.
If you selected PART as the output destination, you can also select the program that will be played by that
part (→p.14).
9. Strike the pads (or play your MIDI keyboard), and make sure that you can hear the program or
MIDI sound source.
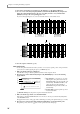
10. If you want to change the note numbers that are assigned to the pads, press the [PAD ASSIGN]
key.
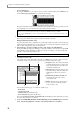
The Pad Assign page will appear, allowing you to change the note number for each pad.
A Global pad assign field: Here you can
change the note numbers that will initially be
assigned to the pads. Choose either DEFAULT
or CHROMATIC.
B Pads: This area shows the note number that is
assigned to each pad.
To change the pad assignments of this type of program, you will need to edit the program (→p.85).
11. Move the cursor to the Global pad assign field, and turn the [JOG] dial to change the setting to
CHROMATIC.
The note numbers assigned to pads 1–16 will change. The initial DEFAULT setting (a pad assignment suit-
able for drum programs) will change to CHROMATIC (a pad assignment in which note numbers are
assigned in semitone steps).
When you have finished making the setting, press the [MAIN] key to access the Main page.
12. Move the cursor to the TC field, and specify the desired timing correct setting.
13. To start recording, hold down the [REC] key and press the [PLAY] key. Then play the pads while
you listen to the metronome.
The [REC] key and [PLAY] key LEDs will light, and recording will begin on the currently selected track.
If the Loop field is set to ON/1-END, and you reach the end of the sequence, you will automatically return
to the beginning and continue recording. At this time, the [OVER DUB] key LED will light instead of the
[REC] key LED, and the newly-recorded MIDI events will be added.
14. To stop recording, press the [STOP] key.
Note: Some programs of the internal sampler are set up so that you can use the pads to play the program
in an ideal configuration. The Global pad assign field will not be displayed for a track for which such a
program is selected.
Hint: You can press the PAD BANK [A]–[F] keys to switch the pitch range of pads 1–16.
Hint: If you operate the pitch bend wheel or controllers of your MIDI keyboard while recording, these contin-
uously-variable events will be recorded along with the note events.
1
2
PAD 1 PAD 2 PAD 3 PAD 4
PAD 5 PAD 6 PAD 7 PAD 8
PAD 9 PAD 10 PAD 11 PAD 12
PAD 13 PAD 14 PA D 15 PAD 16
P LOOP PTO P FROM
PLAY
PAD 1 PAD 2 PAD 3 PAD 4
PAD 5 PAD 6 PAD 7 PAD 8
PAD 9 PAD 10 PAD 11 PAD 12
PAD 13 PAD 14 PA D 15 PAD 16
P LOOP PTO P FROM
PLAY
49/Db2 55/G2 51/Eb2 53/F2
43/F1
44/Gb1
82/Bb4
45/G1
46/Ab1
42/Gb1
47/B1
38/D1
36/C1
48/C2
40/E1
37/Db1
44/Ab1 45/A1 46/Bb1 47/B1
43/G1
39/Eb1
35/B0
42/Gb1
38/D1
34/Bb0
41/F1
37/Db1
33/A0
40/E1
36/C1
32/Ab0