
User Guide


Realtime input
25
5. In the same way, move the cursor to the Out time field, and turn the [JOG] dial to set the
punch-out point.
The punch-out point is shown as a symbol on the position bar of the main page.
6. Press the [F1] key (CLOSE) to close the popup window.
7. Make sure that the cursor is located at the A.Punch field, and turn the [JOG] dial to change the
setting to ON.
This enables the auto punch-in/out function.
8. Move the cursor to the Trk field of the track block, and select the track on which you want to
record.
9. Locate the sequence to a point earlier than the punch-in point.
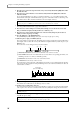
10. Hold down the [REC] key and press the [PLAY] key (or the [PLAY START] key).
The [PLAY] key LED will light, the [REC] key LED will blink, and the sequence will begin playing.
When you reach the punch-in point, the [REC] key LED will change from blinking to lit, and recording will
begin.
When you reach the punch-out point, the [REC] key LED will go dark, and playback will resume.
11. When you are finished recording, press the [STOP] key.
12. Move the cursor to the A.Punch field, and change the setting to OFF.
This disables the auto punch-in/out function.
Step recording
Step recording allows you to input note events one by one while the sequence is stopped. This method is
convenient when you want to record a phrase that would be difficult to play in realtime. Here’s how to use
the event list to step-record note events.
1. In the main page, move the cursor to the Trk field and select the track that you want to step-record.
2. Select the output destination for the track, and specify the part number and program or MIDI
channel that you want to play (→p.19).
3. Press the [STEP EDIT] key.
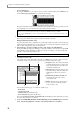
The step edit page will appear, where you can input and edit MIDI events. In the center of the display you
will see the event list that displays the MIDI events in the track.
A Track field: Selects the track into which you
step-record.
B Now field: Indicates the current location, and
lets you specify the location at which you
want to input a note event.
C Event list: Displays the type and value of
each MIDI event recorded in the track.
D View field: Here you can select the type of
MIDI events that will be displayed in the event
list.
4. Press the [F1] key (OPTION) to access the Step Edit Option popup window.
In this popup window you can set options for step-recording.
A Duration of recorded notes field: Selects
how to specify the duration of the note events
you input.
B Auto Step increment on key release field:
Selects whether the current location will be
advanced after you input a note event (YES)
or whether you will remain at the previous
location (NO).
REC PLAY
recording playingplaying
blinking blinking
REC
lit
REC
REC
+
2
3
1
4
1
2