
User Guide


Editing a track
33
4. Move the cursor to the Timing correct field, and turn the [JOG] dial to specify the resolution of
the time ruler.
5. Move the cursor to the Now field, and move the marker to the beginning of the area that you
want to edit.
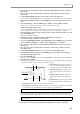
6. Use the BLOCK CURSOR [
π
]/[
†
] keys to move the cursor into the graph area.
You can use the CURSOR [
√
]/[
®
] keys to move the marker in steps of the units shown on the time ruler.
7. Hold down the [SHIFT] key and press the CURSOR [
®
] key to select the region that you want to
edit.
8. Press the [ERASE] key or [F2] key (MOVE)–[F5] key (EDIT) to select an editing command.
Refer to page 28 for the functions assigned to each key and details on operation.
Adding continuously-variable events
You can use the INSERT command to add continuously-variable events according to a curve that you spec-
ify. For example, this is a convenient way to create a fade-in/out at a specific point in a sequence.
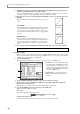
1. In the main window, select the track to which you want to add continuously-variable events, and
press the [SEQ EDIT] key.
The Sequence Edit page will appear.
2. Move the cursor to the View field, and turn the [JOG] dial to select the type of
continuously-variable events that you want to add.
3. If you selected CONTROL CHANGE or POLY PRESSURE, press the CURSOR [
®
] key to move the
cursor, and turn the [JOG] dial to select the control change number or note number.
4. Move the cursor to the Timing correct field, and turn the [JOG] dial to specify the resolution of
the time ruler.
5. Move the cursor to the Now field, and move the marker to the location at which you want to
start adding events.
6. Use the BLOCK CURSOR [
π
]/[
†
] keys to move the cursor into the graphic editor.
7. Hold down the [SHIFT] key and press the CURSOR [
®
] key to specify the region in which you
will add continuously-variable events.
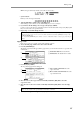
8. Press the [OVER DUB] key.
In this state, you can add MIDI events to the track. The INSERT command will be assigned to the [F6] key.
9. Press the [F6] key (INSERT).
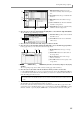
The Insert Event popup window will appear. In this popup window, you can add the currently-displayed type
of continuously-variable events according to a curve that you specify.
A Time field: Specifies the start and end loca-
tions (in measure/beat/tick units) of the con-
tinuously-variable events that will be added.
B Start value field: Specifies the value of the
continuously-variable event at the start loca-
tion.
C End value field: Specifies the value of the
continuously-variable event at the end loca-
tion.
D Interval field:
Specifies the spacing at which
the continuously-variable events will be added.
E Curve field: Specifies the curve of the events that will be added.
F Curve graph: This area displays a graph showing the curve of the continuously-variable events that will
be added. The left edge is the Start location, and the right edge is the End location.
10. Make sure that the Time field shows the start location and end location that you specified in step 7.
If you specified a region before opening the Insert Event popup window, the start and end times of that
region will automatically be input in the Time field. However, you are free to change these settings later.
11. Move the cursor to the Start value field and turn the [JOG] dial to specify the starting value.
12. Move the cursor to the End value field and turn the [JOG] dial to specify the ending value.
Hint: If the graphic editor is displaying a matrix or piano-roll, you can use this popup window to add note events.
Hint: If you want to input only a single continuously-variable event, set the start and end times to the same
position and value.
4
5 6
3
12