
User Guide


Chapter 8—Recording and editing samples
64
Recording (sampling) an external source
Here’s how you can record an external analog source connected to the REC IN [LINE/MIC] jacks or
[PHONO] jacks, and add the sample to the currently selected program.
Preparations before recording
1. Connect the audio source that you want to record (CD player, mic, turntable, etc.) to the rear
panel REC IN [LINE/MIC] jacks or the REC IN [PHONO] jacks.
Make sure that the rear panel [INPUT SELECT] switch is set to select the appropriate jacks.
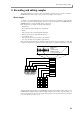
2. Press the [RECORD] key.
The Record page will appear. In this page, you can make various settings for recording an external audio
source.
A Input source field: Selects the source that
will be recorded.
B Mode field: Selects whether to record in ste-
reo or monaural.
C Bit depth field: Selects the bit depth (16 bit
or 24 bit) for recording.
D Monitor field: Selects whether to monitor
the input source during recording.
E Original field: Selects the note (note name)
that will play that sample at its original pitch.
F Auto normalize field: If this field is on, the
recorded sample will be normalized automat-
ically.
G Record start field: Selects how recording will be started. You can select THRESHOLD (start recording
when the input signal exceeds a specified level) or MANUAL (start recording manually).
H Level meters: These are level meters (with peak indicators) that show the level of the input signal. If
the input signal clips, the over level indicator at the right ( ) will be highlighted. If Record start is set
to THRESHOLD, a rectangle indicating the threshold level will be displayed.
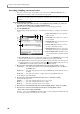
3. Move the cursor to the Input source field, and select the source that you want to record.
ANALOG IN.........Record the input signal from the rear panel REC IN [PHONO] jacks or the REC IN
[LINE/MIC] jacks.
DIGITAL IN..........Record the input signal from the rear panel [DIGTAL IN] jack. (If the ID-4D option is
installed)
MAIN OUT...........Record the same signal as is output from the rear panel [MAIN OUT] jacks.
For this example, select ANALOG IN.
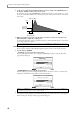
4. Move the cursor to the Mode field, and select either stereo or monaural recording.
You have the following choices.
STEREO................Record the left/right input signals as a stereo sample.
MONO L ...............Record the left input signal as a mono sample.
MONO R...............Record the right input signal as a mono sample.
5. Move the cursor to the Bit depth field, and select the bit depth (24 bit or 16 bit) for recording.
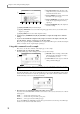
6. Move the cursor to the Record start field, and select how recording will be started.
• If you want to start recording automatically
Set the Record Start field to THRESHOLD. With this setting, recording will begin automatically when the
level of the input signal exceeds the threshold you specified.
Hint: In order to play a sample that you record, you must assign the sample to a program. In this example, we
will show how to assign the sample to the program that is created in memory when you turn on the power of the
MPC4000.
1456
2
3
7
8