
User Guide


Chapter 8—Recording and editing samples
66
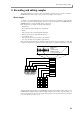
9. Set the Pre-recording time field and the Bit field as necessary, and press the [WINDOW] key or
the [F1] key (CLOSE) to return to the previous screen.
For example if you have selected THRESHOLD as the Record start method, you can set the Pre-recording
time field to several hundred milliseconds so that the attack portion of the waveform will not be omitted from
the recording.
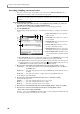
10. While you watch the level meters, play the audio source that you want to record, and use the
[REC GAIN] knob to adjust the recording level.
To obtain the best S/N ratio, set the recording level as high as possible without allowing the over-level indi-
cators to light at the loudest volume.
Actual recording
The procedure for actual recording will differ slightly depending on how you start and end recording.
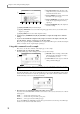
1. Press the [F6] key (RECORD).
• If MANUAL is selected as the Record start method
Recording will begin the instant you press the [F6] key (RECORD). During recording, the Recording...
popup window will appear.
• If THRESHOLD is selected as the Record start method
The Record Ready popup window will appear. Play the audio source that you want to record. Recording
will begin the instant that the input signal exceeds the threshold level.
2. To manually stop recording, press the [F6] key (STOP).
Alternatively, recording will stop automatically when the time you specified in the Time field has elapsed.
When recording ends, the Keep or Retry popup window will appear.
Note: The [REC GAIN] knob has no effect if you have selected DIGITAL IN or MAIN OUT as the input source.
Hint: Even if THRESHOLD is selected as the Record start method, you can press the [F6] key (START) in the
Record Ready popup window to begin recording manually.
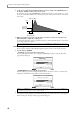
Start recording
Rec start
threshold
parameter
time
level
Pre-recording
time parameter