
User Guide


Making various settings for a sample you recorded
67
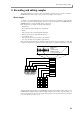
A [F1] key (RETRY): Discards the sample.
B [F3] key (PLAY): Auditions the sample.
C [F5] key (ADD PGM): Retains the sample in
memory, and adds it to the program.
D [F6] key (KEEP): Retains the sample in mem-
ory.
3. Press the [F3] key (PLAY) to audition the sample. If you want to re-try the recording, press the
[F1] key (RETRY). If you are satisfied with the sample, press the [F5] key (ADD PGM).
If you press the [F1] key (RETRY), the sample will be discarded and you will return to the Record page.
If you press the [F5] key (ADD PGM), the Add to Program popup window will appear.
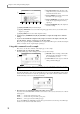
A Add to program field: From the programs
currently in memory, selects the program to
which this sample will be assigned. The fields
that are displayed will depend on the type (key
group or drum) of the selected program.
4. To assign the sample to a program, use the Add to program field to select the desired program.
When you turn on the power of the MPC4000, one program (drum type) is created automatically. Unless
you have loaded a program from a storage device or created a new program after power-on, this drum pro-
gram is the only one that will be available for selection here.
5. Set the various parameters according to the type (key group or drum) of the program you
selected in step 4.
• If you selected a key group program
A Original note field:
Specifies the note at
which the sample will sound at its original pitch.
B Key range field:
Specifies the range of the key
group to which the sample will be assigned.
C Keyboard track field: Within the key group to which the sample is assigned, specifies whether the
pitch will rise or fall according to the note range (ON), or whether all notes will sound the same pitch
(OFF).
• If you selected a drum program
A Assign to note field: Selects the note to
which the sample will be assigned. You can
turn the [JOG] dial to select a note number, or
strike a pad directly to specify it.
6. Press the [F6] key (DO IT).
The sample will be assigned to the selected program, and you will return to the Record page.
7. Repeat steps 1–6 to record other samples in the same way.
Making various settings for a sample you recorded
Here’s how you can specify the playback start/end locations, loop playback on/off, and loop start/end loca-
tions for a sample you recorded into memory.
1. Press the [SAMPLE] key, and then press the [F1] key (List).
Hint: You can press the [F4] key (NEW PGM) to create a new program, and add your newly recorded sample
to that program.
Hint: The sample you record will be assigned a default name of “Sample xxx” (xxx will be a number indicating
the number of samples you recorded). If desired, you can turn the [JOG] dial in the Keep or retry window to
assign a new name to the sample.
1 2 3 4
1
1
3
2
1