
User Guide


Making various settings for a sample you recorded
69
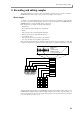
L [F1] key (LIST): Accesses the Sample List page.
M [F2] key (TRIM/LP): Accesses the Trim/Loop page from another page.
N [F3] key (REGION): Accesses the Region page.
O [F4] key (Q-FX): Accesses the Q-FX page, where you can apply effects to the currently selected sample
to create a new sample.
P [F5] key (EDIT): Accesses the Sample Edit popup window, where you can edit the sample.
Q [F6] key (P®ALL): Plays the entire sample once. The start/end points and loop start/end points will be
ignored.
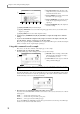
3. Move the cursor to the Sample field, and turn the [JOG] dial to select the sample that you want
to edit.
4. Move the cursor to the Monitor field, and turn the [JOG] dial to select “SAMPLE.”
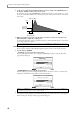
5. Move the cursor to the Play mode field, and select the playback method for the sample.
NO LOOP............. The sample will play from the start point to the end point, without looping. If you
release the pad (key) while the sample is playing, playback will stop at that point.
LOOP.................... The sample will begin playing from the start point when you press the pad (key), and
will continue repeating from the loop start to the loop end points as long as you continue
holding down the pad (key).
ONE SHOT........... When you press the pad (key), the sample will play back once from the start point to the
end point.
6. Move the cursor to the Start field, and specify the start point for the sample.
Note: If the Monitor field is set to “MULTI” or “PROGRAM,” the currently selected sample will be assigned
to a program, and you will also need to select the appropriate program and part in order to monitor the sample.
time
NO LOOP
time
LOOP
time
ONE: SHOT
time
Start End
Loop start
Loop end