
User Guide


Dividing a sample
73
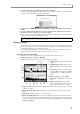
4. To execute the sample edit command, press the [F6] key (DO IT).
The Keep or Retry popup window will appear, where you can compare the results of the command with the
original data, and decide whether to keep the edited result.
5. Use the [F3] key (P
®ORIGIN) and [F4] key (P®NEW) to compare the samples before and after
editing.
6. If you are satisfied with the edited result, assign a new name to the sample as desired, and press
the [F2] key, [F5] key, or [F6] key to save the new sample.
However if you press the [F2] key (OVER WR), the new sample name will be ignored, and the edited sample
will be overwritten onto the original sample, replacing it.
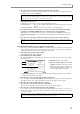
Dividing a sample
You can divide part of a sample (or the entire sample) into up to 32 regions. you can assign the divided sam-
ples to a new program, or you can reconstruct a sequence to play that program, and adjust the tempo and
use the divided sample to create a completely new phrase.
For example, this function provides a convenient way in which a drum loop recorded from a CD can be
changed to a different tempo and synchronized with the sequencer section.
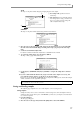
Specifying the area to be divided
Here’s how you can select a sample and specify the area that will be divided into regions.
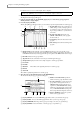
1. In Sample mode, press the [F3] key (REGION).
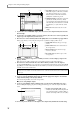
The Region page will appear, where you can edit the sample in region units.
A Sample field: Selects the sample that will be
edited.
B Sampling rate/Bit field: Indicates the sam-
pling rate and bit depth of the sample shown in
(1).
C View field: Selects the waveform that will be
displayed; LEFT (left channel only), RIGHT
(right channel only), or MIX (both channels
mixed).
D Monitor field: Selects either SAMPLE,
PROGRAM, or MULTI as the unit for moni-
toring.
E Region start field: Specifies the starting
location of the currently selected region (the
region start point) in units of one sample.
F Region end field: Specifies the ending location of the currently selected region (the region end point)
in units of one sample.
G Waveform display field (upper): Displays all regions. The currently selected region will be high-
lighted.
H Region field: Specifies the region to be edited by number.
I Waveform display field (lower): According to the field that is currently selected in the display, this
area shows the waveform before and after the region start point, or before and after the region end point.
You can zoom-in/out the display in this field by holding down the [SHIFT] key and using the BLOCK
CURSOR [
π
]/[
†
] keys.
Note: These editing commands perform “destructive editing.” If you press the [F2] key to overwrite the original
sample, you will not be able to recover the original sample.
1
624
7
8
9
JKLMNO
3
5