
User Guide


Dividing a sample
75
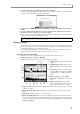
2. Move the cursor to the Region start field, and edit the region start point.
To adjust the value, you can either turn the [JOG] dial, or use the numeric keys to directly input a number
of samples and then press the [ENTER] key.
3. If you want to audition the region start point you specified, move the cursor to the Region start
field and press pad 14 or 15.
In the Region page, the function of pads 14 and 15 will change as follows.
Pad 14 (PLAY TO) ............Play once from slightly earlier than the currently selected location to the current
location.
Pad 15 (PLAY FROM) ......Play once from the current location to a point slightly later.
4. If you want to view the waveform in the area of the region start point, hold down the [SHIFT]
key and press the BLOCK CURSOR [
†
] key to zoom-in the lower waveform display.
When the cursor is located at the Region start field, you can hold down the [SHIFT] key and press the
BLOCK CURSOR[
π
]/[
†
]keys to zoom-in/out the waveform display before and after the region start
point.
5. Move the cursor to the Region end field, and specify the region end point in the same way.
6. As necessary, make adjustments for other regions in the same way.
Using the divided sample to create a sequence and program
Here’s how you can use the SLICE SAMPLE edit command to create a new sample for each region that was
divided, and register them in memory. At the same time, you can also create a new program to which these
samples will be assigned, and a sequence that will play this program.
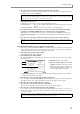
1. In the Region page, press the [F5] key (EDIT).
The Sample Edit popup window will appear.
2. In the Edit field, select SLICE SAMPLE.
The SLICE SAMPLE edit command slices the waveform into separate regions and creates a new sample
from each region.
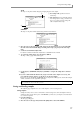
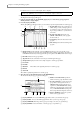
A Edit field: Selects the edit command.
B Generate sequence field: When the SLICE
SAMPLE command is executed, this specifies
whether a program and sequence will be cre-
ated at the same time (YES), or whether only
the new samples will be created (NO).
C End margin field: Specifies how much of the waveform data following the region end point will be
included when creating the new samples.
3. Move the cursor to the Generate sequence field, and select YES.
If you select YES, executing SLICE SAMPLE will automatically create a program to which the sliced sam-
ples will be assigned, and a sequence that will successively play the samples of that program.
4. Move the cursor to the Sq field, and select a sequence.
5. Move the cursor to the Tr field, and select a track number.
The new sequence data will be created in the selected track of the selected sequence.
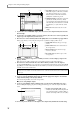
6. Move the cursor to the End margin field, and set the end margin.
If you set this to 0, the end point of the divided samples will match the region end point. As you increase
this value, the end point of the samples will move later than the region end point. (The start point of the next
region will not change.)
Hint: By holding down the [SHIFT] key and using the CURSOR[
√
]/[
®
]keys, you can change the decimal place
that is adjusted by the [JOG] dial. When you edit the region start point of the second or subsequent region, the
region end point of the preceding region will change simultaneously.
Hint: When you edit the region end point, the region start point of the following region will change simulta-
neously.
Hint: By increasing the value of the End Margin field, you can prevent unnatural-sounding silences from appear-
ing between the samples when you later slow down the tempo of the sequence.
1
2
3