
User Guide


Chapter 9—Creating and editing programs
90
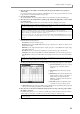
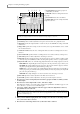
A Note/Kg field: Selects the key group/note
number that you will edit.
B Edit field: Selects the editing method for the
key group.
C Zone field: Indicates the zone numbers.
D Sample field: Selects the sample that will be
assigned to each zone.
E Level field: Specifies a relative adjustment to the level of each zone.
F Pan field: Specifies a relative adjustment to the pan of each zone when stereo playback is used.
G Out field: Specifies the output destination of each zone. If you select MULTI, the settings of the multi
will be used.
H Range field: Specifies the note range of each zone when you use a specific modulation source to switch
the zone that will sound.
I X-fade curve field: Selects the curve of change that will be used when crossfading between zones is
turned on.
J Zone X-fade field: Specifies whether crossfading between zones will occur when you change zones.
K Tune field: Specifies a relative adjustment to the tuning of each zone.
L Pitch field: Specifies whether the pitch of the sample assigned to each zone will rise or fall according
to the keyboard position (TRACK) or will be the same pitch regardless of the note you play (CONS).
M Play mode field: Selects one of the following playback methods for the sample assigned to each zone.
ONE SHOT: The sample will play from the start point to the end point when you press the key once.
NO LOOP: The sample will play from the start point to the end point without looping. If you release
the pad (key) during this time, the playback will stop at that point.
LOOP: When you press the pad (key), the sample will begin playing from the start point, and will con-
tinue looping as long as you hold down the pad (key). When you release the pad (key), the sample will
play to the end point and then stop.
NOTE OFF: The sample will play in one-shot mode when a note-off message is received.
N Filter field: Specifies a relative adjustment to the filter cutoff of each zone.
O Start field: Specifies a relative adjustment to the start point for the sample of each zone.
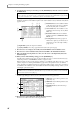
3. Move the cursor to the Note/Kg field, and select the key group/note number to which you want
to add a sample.
4. Move the cursor to the Sample field of zone 2, and select a sample.
This will assign a sample to zone 2. The settings of the Key Group Mix, Pitch, and Edit 1/2 pages are com-
mon to all zones, so you do not need to make them again.
5. If necessary, edit the other parameters in the Zone page to make fine adjustments to the level,
pan, and filter offset for each zone.
6. In the same way, assign a new sample to zone 2 of the other key groups/note numbers.
7. When you have finished assigning all the desired samples, move the cursor to the Range field of
zone 1, and set the value to 000–063.
8. Move the cursor to the Range field of zone 2, and set the value to 064–127.
Note: The sample that you select in the Key Group Mix page will always be assigned to zone 1 of the corre-
sponding key group/pad number. You must use this field to assign samples to zones 2–4.
Note: Remember that the values of the fields in the Zone page (except for Output, Range, Pitch, Play mode) are
relative adjustments. The values common to the entire key group/pad number can be edited in the Key Group
Mix, Pitch, and Edit 1/2 pages.
1
2567 8
3
4
9
KL MNO
J