SEMI-WEIGHTED USB/MIDI KEYBOARD CONTROLLER HAMMER-ACTION USB/MIDI KEYBOARD CONTROLLER OPERATOR'S MANUAL WWW.AKAIPRO.
TABLE OF CONTENTS FRONT PANEL OVERVIEW ................................................................................................................1 REAR PANEL OVERVIEW...................................................................................................................3 HOOKUP DIAGRAM ............................................................................................................................3 DISPLAYING INFORMATION ...........................................................
FRONT PANEL OVERVIEW 25 2 3 1 26 19 16 17 15 15 15 15 21 22 14 4 5 6 7 8 13 9 9 9 9 9 23 18 1. LCD – The display is used for navigating menus, displaying data, and affecting change on MPK61/MPK88’s options and parameters. 2. [VALUE] (Push to Enter) – This dial is used to increment and decrement Presets, parameter values and settings. This dial also functions as an [ENTER] button when it is pressed down. 3.
14. 16 MPC PRESSURE AND VELOCITY SENSITIVE PADS – The pads can be used to trigger drum hits or samples on your software or hardware module or can be configured to send Program Change messages. The pads are pressure and velocity sensitive, which makes them very responsive and intuitive to play. 15. PAD BANK buttons – These 4 buttons switch among pad banks A, B, C, D. Each bank can address a unique set of 16 sounds, giving you access of up to 64 different sounds you can trigger with the pads.
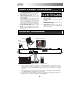
REAR PANEL OVERVIEW 1. DC POWER ADAPTER INPUT – Plug in a 6V–1A DC power adapter if you do not wish to power the MPK61/MPK88 through the USB connection. 2. POWER ADAPTER RESTRAINT – You can secure the power adapter cord to this restraint to prevent accidental unplugging. 3. 2 1 USB CONNECTION – Plug a standard USB cable into this outlet and into the USB port of your computer. The computer’s USB port will provide power to the MPK61/MPK88.
A NOTE ABOUT USING THE MPK61/MPK88 WITH SOFTWARE 1. Make sure that the MPK61/MPK88 and all external devices are connected and that the USB cable is connected to your computer before opening any software applications on your computer with which you might want to use the MPK61/MPK88. If the unit is not plugged in before, your software application might not recognize the MPK61/MPK88 as an available device. 2. In your software application, you will need to set the MPK61/MPK88 as a default MIDI input device.
DISPLAYING INFORMATION As you are working with the MPK61/MPK88, the LCD will help you keep track of what values and parameters are entered and sent to external devices. There are several kinds of information that the MPK61/MPK88 will display while in use: OCTAVE, TRANSPOSITION, NOTE, AFTERTOUCH (Channel Pressure), CONTROL CHANGE, MIDI MACHINE CONTROL (MMC), and PREVIEW MODE information.
CONTROL AFTERTOUCH MIDI PORT AND CHANNEL The knobs and faders on the MPK61/MPK88 can also be set to transmit AFTERTOUCH information. AFTERTOUCH INDICATOR AFTERTOUCH VALUE Please see ‘Editing Knobs and Faders’ (page 16) for more information on setting knobs and faders to transmit Aftertouch. VALUE IS ALSO DISPLAYED WITH BAR METER.
ABOUT MODES The MPK61/MPK88 has four different modes of operation. Each mode can be accessed by pressing the corresponding button on the MPK61/MPK88. Following is a short description of each mode: Preset Mode This mode allows you to load, save and copy Presets. A Preset is a collection of information about how different faders, knobs, and pads will behave.
PRESET MODE PRESET NAME What is a Preset? PRESET NUMBER A Preset is a collection of information about how the MPK61/MPK88’s keyboard, sliders, knobs, and pads will behave. Using Presets allows you to save different configurations so you can quickly load them when you need them, without having to reprogram the MPK61/MPK88 every time. The MPK61/MPK88 features different Preset banks that you can load and write to.
EDIT MODE Pressing the [EDIT] button calls up Edit Mode. In this mode, you can edit the settings of the currently selected Preset. The settings vary depending on the controller you are editing and are described below. Please note that the changes you make will only apply to the currently selected Preset. NAVIGATING EDIT MODE 1. Press the [EDIT] button. 2.
EDIT MODE PARAMETERS CONTROLLER SELECTED PAGE 1 OCTAVE KEYBOARD AFTERTOUCH VELOCITY NOTE PADS PROGRAM CHANGE CONTROL CHANGE KNOBS AND FADERS AFTERTOUCH CONTROL CHANGE BUTTONS PROGRAM CHANGE TYPE/RANGE/TOGGLE ARP ON/OFF GATE/SWING TOGGLE/MOMENTARY NOTE REPEAT GATE/SWING TIME DIVISION DIVISION PITCH BEND WHEEL PITCH BEND MODULATION WHEEL MODULATION WHEEL TRANSPORT TAP TEMPO TRANSPORT FUNCTION TEMPO CNTL CHANGE MIDI CHANNEL (field 1) CC NUMBER (field 2) RANGE – MINIMUM VALUE (field 3) RANGE –
EDITING THE KEYBOARD When editing the keyboard, please note that the changes will affect all the keys on the MPK61/MPK88. keyboard properties you can edit include MIDI Channel, Octave, Aftertouch, and Velocity. The MIDI CHANNEL – This is the MIDI Channel on which the keyboard will be transmitting information. OCTAVE – This is the default octave shift that will be applied to the keyboard when the current Preset is loaded.
EDITING THE PADS The pads on the MPK61/MPK88 can be set to transmit Note or Program Change information when they are hit. The default operation of the pads is set to Note, which means that when a pad is hit it will generate Note On/Off messages to trigger sounds. The pads may also be set up to transmit Program Change information, which allows you to switch to different programs (instruments or sound banks) on your DAW or external device by hitting the pads.
NOTE PARAMETERS The following list of parameters can be accessed if the pad event type is set to Note. MIDI CHANNEL FIELD This field sets the MIDI Port and Channel which the pad will use to transmit messages. You can assign pads to one of two MIDI Ports, A or B, and to one of 16 MIDI Channels on each port (i.e. B11). You may also assign the pad to the MIDI Common Channel. 1. Use the [<] button to select MIDI Port/Channel field. 2.
PROGRAM CHANGE PARAMETERS The following list of parameters can be accessed if the pad event type is set to Program Change. MIDI CHANNEL FIELD Program Change messages can be sent on one of two MIDI Ports, A or B, and one of 16 MIDI Channels on each port (i.e. A7). You may also assign Program Change to use the MIDI Common Channel. 1. Use the [<] button to select MIDI Port/Channel field. 2. While in MIDI Port/Channel field, use [VALUE] dial to select desired MIDI Port and Channel. 3.
EDITING KNOBS AND FADERS The knobs and faders on the MPK61/MPK88 are controllers which can be set to transmit Control Change or Aftertouch information. In addition, the endless knobs may also be assigned as an Increment/Decrement function. The default operation of knobs and faders is to transmit Control Change information when used. What is Control Change? What is Aftertouch? Control Change refers to the use of MIDI Continuous Controller data.
CONTROL CHANGE PARAMETERS The following list of parameters can be accessed if the pad event type is set to “Note”. MIDI CHANNEL FIELD This field sets the MIDI Port and Channel which the knob or fader will use to transmit messages. You can assign knobs and faders to one of two MIDI Ports, A or B, and to one of 16 MIDI Channels on each port (i.e. A14). You can also assign a knob or fader to use the MIDI Common Channel. 1. Use the [<] button to select MIDI Port/Channel field. 2.
AFTERTOUCH PARAMETERS For some applications, you might wish to use the faders or knobs as Aftertouch controllers. In this scenario, the knob or fader will be transmitting Aftertouch information which could be used to control, say, a vibrato of a device that the MPK61/MPK88 is controlling. The following list of parameters can be accessed if “Aftertouch” is selected as the event type for the selected knob or fader.
INCREMENT/DECREMENT PARAMETERS (knobs only) The endless knobs on the MPK61/MPK88 may also be used as an increment/decrement NRPN function. This allows you to use the knob to increment and decrement through parameters as opposed to sending an absolute value. Please note that the implementation of NRPN functions depends strictly on the software with which you will be using the MPK61/MPK88. Please consult your software’s documentation to find out how NRPN functions are supported.
EDITING BUTTONS The buttons on the MPK61/MPK88 can be used to transmit Control Change or Program Change information. 1. Press [EDIT] button to enter EDIT MODE. 2. Press the button you would like to edit. 3. On Page 1, turn the [VALUE] dial to select ‘CTRL CHANGE’ (Control Change) or ‘PROG CHANGE’ (Program Change) as the event type. 4. Press [ENTER] to view Page 2. Depending on which event type you select on Page 1, parameter options on Page 2 will be changed. SELECT BUTTON EVENT TYPE IN THIS FIELD. 5.
PROGRAM CHANGE PARAMETERS The following list of parameters can be accessed if the button event type is set to “Program Change”. MIDI CHANNEL FIELD Program Change messages can be sent on one of two MIDI Ports, A or B, and one of 16 MIDI Channels on each port (i.e. A7). You may also assign Program Change to use the MIDI Common Channel. 1. Use the [<] button to select MIDI Port/Channel field. 2. While in MIDI Port/Channel field, use [VALUE] dial to select desired MIDI Port and Channel. 3.
EDITING THE ARPEGGIATOR The built-in Arpeggiator is one of the features which sets the MPK61/MPK88 apart from other controllers. The Arpeggiator allows you to arpeggiate a sequence of notes by holding down a combination of keys. The Arpeggiator will be synced to the tempo parameter of the MPK61/MPK88. Please note that tempo can be generated internally or can be synced to an external source, such as a DAW.
ARPEGGIO PARAMETERS – TYPE, RANGE, BUTTON MODE The following parameters can be edited by selecting “TYP RNG TGL” on Page 1. ARP TYPE Select one of the following arpeggio types in this field – Up, Down, Incl, Excl, Rand, Chrd. 1. While in Arp Type field, use [VALUE] dial to select Arp Type. 2. Use the [>] button to select the next field. ARP TYPE Arp Type descriptions: ARP TYPE UP – Notes arpeggiate from the lowest note to the highest note held.
ARPEGGIO PARAMETERS – GATE, SWING The following parameters can be edited by selecting “GATE SWING” on Page 1. GATE Select the arpeggiator Gate in this field. 1. While in Gate field, use [VALUE] dial to select Gate duration. 2. Use the [>] button to select the next field. GATE DURATION SWING Select the arpeggiator Swing in this field. 1. Use the [>] button to select the Swing field. 2. While in Gate field, use [VALUE] dial to select Gate duration.
EDITING NOTE REPEAT The MPK61/MPK88 features the Note Repeat function, which can be found on our legendary Music Production Center (MPC) models. With Note Repeat enabled, you can repeatedly trigger a sound by simply holding down a pad. The sound will be retriggered at a rate equivalent to the Time Division currently selected on the MPK61/MPK88.
NOTE REPEAT BUTTON MODE The following screen will appear if you select “TOGGL-MOTRY” on Page 1. In this field, you can select whether the [NOTE REPEAT] button will behave in a momentary (MTY) fashion, where pressing the button turns on the Note Repeat function and releasing it turns it off, or in a toggle (TGL) manner, where pressing the button turns on the Note Repeat function and pressing again turns it off. 1. While in Button Mode field, use [VALUE] dial to select Button Mode (Toggle or Momentary). 2.
EDITING TIME DIVISION The Time Division feature works in conjunction with Note Repeat and the Arpeggiator. When Note Repeat or the Arpeggiator is enabled, the MPK61/MPK88 will output notes at a rate equivalent to the Time Division setting. To change to a new Time Division setting, press [TIME DIVISION] and select a new rate.
EDITING THE PITCH BEND WHEEL The Pitch Bend wheel can be assigned to transmit pitch bend information on a specific MIDI Channel. 1. Press the [EDIT] button to enter Edit Mode. 2. Now select the Pitch Bend wheel for editing by moving the wheel. 3. You will see Page 1 displayed on the screen (shown on the left). 4. Press [ENTER] to edit the Pitch Bend settings. 5. Use the [VALUE] dial to select the MIDI Channel for the Pitch Bend wheel. 6. Press [ENTER] to accept the change.
EDITING THE MODULATION WHEEL The Modulation wheel can be edited to transmit a range of values on a specific MIDI Channel and MIDI CC. 1. To edit the Modulation wheel settings, press the [EDIT] button to enter Edit Mode. 2. Now select the Modulation wheel for editing by moving the wheel. 3. You will see Page 1 displayed on the screen (shown on the left). 4. Press [ENTER] to edit the Pitch bend settings.
EDITING TRANSPORT CONTROL MAXIMUM VALUE The transport control section on the MPK61/MPK88 can be configured to send transport control information in a variety of ways: MMC (MIDI Machine Control), MMC/MIDI, MIDI, or CTRL. Some applications and devices have dedicated MMC functions and will only respond to MMC messages, while others may not have reserved MMC functions but implement transport control via MIDI SysEx or MIDI CC messages.
EDITING FOOTSWITCH PEDAL INPUTS The footswitch inputs on the rear of the MPK61/MPK88 can be used in a variety of different ways. For example, footswitches can be used as a conventional MIDI CC switches. In addition, footswitches may be used to trigger specific pads on the top panel (for example, to play out a kick drum sequence).
DRUM PAD PARAMETERS If you choose “Drum Pad” as the event type for the footswitch, page 2 allows you to select which pad will be triggered with the footswitch. 1. Turn [VALUE] dial to select the desired pad. 2. Press [ENTER] to accept the setting or [<] to cancel. DRUM PAD NUMBER OTHER FUNCTIONS As we mentioned previously, a footswitch may also be used to engage and disengage specific functions on the MPK61/MPK88.
EDITING SPLIT Split Mode allows you to divide the MPK61/88's keyboard into two sections, each controlling a different set of sounds simultaneously – a useful performance feature. To activate or deactivate Split Mode on the keyboard, press [SPLIT]. The [SPLIT] button's LED will be lit when Split Mode is active. The selected key and every key below it is considered Section "A." Every key above it is Section "B.
GLOBAL MODE KILL MIDI MIDI COMMMON CHANNEL LCD CONTRAST KEYBOARD VELOCITY CURVE PAD SENSITIVITY PAD VELOCITY CURVE PAD THRESHOLD KEYBOARD TRANSPOSITION MIDI CLOCK TAP TEMPO AVERAGE SAVE SETUP SYSEX TX VERSION In Global Mode, you can send global messages and make general changes to the way that your MPK61/MPK88 functions. Global Mode options are organized under different pages and include the list of options shown on the right: To enter Global Mode, press the [GLOBAL] button.
KEYBOARD VELOCITY CURVE – Page 4 A KEYBOARD VELOCITY CURVE describes how the keyboard on the MPK61/MPK88 outputs MIDI velocities, based on a certain ratio of the input / output velocity that characterizes the particular curve. The Keyboard Velocity Curve feature is intended to help you optimize the keys on the MPK61/MPK88 to your particular playing style and can add expressivity and control to your performance.
PAD THRESHOLD – Page 7 PAD THRESHOLD is the minimum force required to activate the pads. If you experience “ghost” triggering due to stage vibrations, you may wish to set this threshold higher. On the other hand, if you find it difficult to cause the pads to output sounds when playing them lightly, you may wish to set this value to a lower number. PAD THRESHOLD FIELD 1. While in Global Mode, use [>] button to scroll to PdThresh (page 7). 2. Turn [VALUE] dial to select Pad Threshold. 3.
SAVE GLOBAL – Page 11 SAVE GLOBAL allows you to save all of the global parameters on the MPK61/MPK88, including MIDI Common Channel, LCD Contrast, Pad Sensitivity, Pad Velocity Curve, Keyboard Transposition, MIDI Clock, Tap Tempo Average, Preset and SysEx information. 1. While in Global Mode, use [>] button to scroll to Globals (page 11). You will see “Save Setup” displayed on the screen. 2. Press [ENTER] to save all the global settings on the MPK61/MPK88.
PROGRAM CHANGE MODE A Program Change, often referred to as a Patch Change, is a MIDI message used for sending data to devices to cause them to change to a new program. This allows you to tell a hardware or software device which sound to play. For example, if your MPK61/MPK88 is controlling a piano patch on your DAW or an external device, using a Program Change command allows you to easily switch to a synth patch.
FREQUENTLY ASKED QUESTIONS Question: Answer: Can the MPK61/MPK88 be synced to external devices? Yes, the MPK61/MPK88 can receive MIDI Clock through both the USB and the MIDI IN connection. This means that you can synchronize tempo-based features, such as Note Repeat and the Arpeggiator, to an external source. To synchronize the MPK61/MPK88 to an external MIDI Clock source, please enter Global Mode, scroll to MIDI Clock and select “External”.
TROUBLESHOOTING PROBLEM The display does not light up. CAUSE SOLUTION Please make sure that the MPK61/MPK88 is connected to your computer and that the computer is powered on. If using a power adapter, please make sure that the adapter is plugged into a live power outlet. Check your computer’s USB connection to confirm that the MPK61/MPK88 is recognized. If necessary, replug the connection and restart your computer.
TECHNICAL SPECIFICATIONS GENERAL Display custom LCD w/ backlight Power ~100mA, 5V DC via USB ~1A, 6V DC via external adaptor Number of Presets 30 MIDI output channels over USB 48 (16 channels x 3 ports) MIDI output channels from 5-pin MIDI 16 Keyboard MPK61: 61 semi-weighted keys (velocity- and channel pressure- sensitive) MPK88: 88 fully weighted hammer-action keys (velocity- and channel pressure- sensitive) Drum pads 16 (velocity- and pressure-sensitive) Drum pad banks 4 Faders 8 360 deg
7-51-0296-B