
Operation Manual


9 Troubleshooting
9
ENGLISH
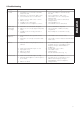
Symptom
No sound.
POWER ON/
CHARGE LED
does not light.
Mono sound on
headphones.
Loud noise.
Distorted sound.
Remedy
1. Connect AC adapter to transmitter and/or
AC outlet.
2. Connect transmitter to audio source.
3. Switch audio source on to feed signal to
transmitter input.
4.
Set audio source volume to desired level.
5. Charge batteries.
6. Switch headphones on.
7. Set VOLUME control to desired level.
1. Connect transmitter to AC power.
2. Check orientation of batteries in battery
compartment.
3. Place headphones on transmitter correctly.
1. Switch audio source to stereo mode.
2. Check cable connection between transmitter and
audio source.
1. Press AUTOTUNING switch on headphones or
use FREQ selector to select different carrier
frequency and press AUTOTUNING on
headphones.
2. Increase audio source volume.
3. Check audio source.
4. Charge batteries.
5. Relocate transmitter (refer to fig. 11).
1. Decrease audio source volume.
2. Use FREQ selector on transmitter to select
different carrier frequency and press
AUTOTUNING switch on headphones.
3. Charge batteries.
Possible Cause
1. AC adapter is not connected to transmitter
and/or AC outlet.
2. Transmitter is not connected to audio source.
3. Connected audio source is switched off.
4.
Volume control on audio source is at zero.
5. Batteries are low.
6. Headphones are switched off.
7. VOLUME control on headphones is at zero.
1. Transmitter is not connected to AC power.
2. Batteries are not correctly aligned with polarity
marks.
3. Headphones are incorrectly positioned on
transmitter.
1. Connected audio source operates in mono
mode.
2. Transmitter is not correctly connected to audio
source.
1. Transmitter and receiving frequencies are not
identical.
2. Audio level at transmitter input is too low.
3. Input signal is noisy.
4. Batteries are dead.
5. Transmitter position.
1. Audio level at transmitter input is too high.
2. Transmitter and headphones carrier frequencies
do not match.
3. Batteries are dead.