WMS400 CU wireless microphone system 400 dual-slot charger Bedienungsanleitung . . . . . . . . . . . . S. 2 Bitte vor Inbetriebnahme des Gerätes lesen! User Instructions. . . . . . . . . . . . . . . p. 6 Please read the manual before using the equipment! Mode d’emploi. . . . . . . . . . . . . . . . p. 10 Veuillez lire cette notice avant d’utiliser le système! Istruzioni per l’uso. . . . . . . . . . . . . p. 14 Prima di utilizzare l’apparecchio, leggere il manuale! Modo de empleo . . . . . . . . . .
1 Sicherheit und Umwelt 1.1 Sicherheit 1. Schütten Sie keine Flüssigkeiten auf die Ladestation. Dies kann zu Kurzschlüssen und Verschmutzung der Ladekontakte führen. 2. Sollte Flüssigkeit in die Lademulde gelangen, trennen Sie die Ladestation sofort vom Stromnetz und lassen Sie die Ladestation von unserem Kundendienst überprüfen. 3. Versuchen Sie nicht, mit der Ladestation nicht-wiederaufladbare Batterien aufzuladen.
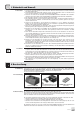
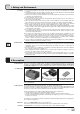
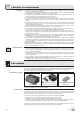
2 Beschreibung Vor jeder Lademulde befindet sich eine STATUS-LED. Diese dreifarbigen LEDs (rot/orange/grün) zeigen den momentanen Betriebszustand der Ladestation an. Anzeigeelemente Die DC 5 V-Buchse an der Rückseite dient zum Anschluss des mitgelieferten Netzgeräts. DC-Eingang 3 Anschluss 1. Kontrollieren Sie, ob die am mitgelieferten Netzgerät angegebene Netzspannung mit der Netzspannung am Einsatzort übereinstimmt.
Ladebetrieb 3. Bei Umgebungstemperaturen über +40°C kann eine Überhitzung der Ladestation zu einer erheblich verlängerten Ladezeit oder zum Abbruch des Ladzyklus (STATUS-LED blinkt rot) führen. Sinkt die Umgebungstemperatur wieder unter +40°C, wird der Ladezyklus automatisch fortgesetzt (STATUS-LED leuchtet konstant rot). 4. Erhitzt sich der Akku während des Ladezyklus auf mehr als +60°C (z.B.
6 Fehlerbehebung Fehler Alle LEDs dunkel. LEDs dunkel, obwohl Sender mit Akku in eine Lademulde eingesetzt ist. Mögliche Ursache Behebung • Kein Fehler. LEDs vor den Lademulden werden erst aktiviert, wenn Sie einen Sender mit Akku in die jeweilige Lademulde einsetzen. • (Sender mit Akku einsetzen.) 1. Netzgerät ist nicht mit dem Stromnetz verbunden. 2. DC-Kabel ist nicht an Ladestation angesteckt. 3. Sender kontaktiert nicht mit allen 3 Ladekontakten. 4. Interner Fehler. 1.
1 Safety and Environment 1.1 Safety 1. Do not spill any liquids on the charger. This may cause short circuits and contaminate the charging contacts. 2. If any liquid penetrates into the charging receptacle, disconnect the charger from power immediately and have the charger checked by AKG service personnel. 3. Never use the charger to charge dry batteries. The charger will detect dry batteries and automatically deactivate the charging function. 4. Use the charger in dry rooms only. 5.
3 Connecting to Power 1. Check that the AC mains voltage stated on the included power supply is identical to the AC mains voltage available where you will use your system. Using the power supply with a different AC voltage may damage the unit. Important! Do not use any power supply other than the AC adapter supplied with the charger. Never connect the CU 400 charger to the PSU 4000 central power supply because the output voltage of the PSU 4000 is incompatible with the CU 400. Important! 2.
4 Charging the charger will not be subjected to vibrations during the charging cycle and will rest firmly on a hard surface. 6. Items 1 and 2 above notwithstanding, if you wish to extend the useful life of rechargeable batteries be sure to • completely discharge the battery every time, i.e., not to charge the battery before the battery warning appears on the transmitter display (see also the WMS 400 manual); • charge the battery fully every time, i.e.
7 Specifications Operating voltage: Recommended batteries: AC voltage: Charging current: Charging time: Size (LxHxD): Weight: 5 VDC, 1.5 A max. NiMH or NiCd rechargeable with 1500 mAh minimum capacity refer to label on AC adapter typ. 1.4 A in single-slot mode typ. 0.7 A if both slots are used simultaneously typ. 1.5 hours in single-slot mode typ. 3 hours if both slots are used simultaneously (depending on battery type and capacity) 188 x 115 x 78 mm (7.4 x 4.5 x 3.1 in.) approx. 420 g (14.8 oz.
1 Sécurité et environnement 1.1 Sécurité 1. Attention de ne pas faire tomber de liquide sur le chargeur. Ceci pourrait provoquer des courts-circuits ou l’encrassement des contacts. 2. S’il devait néanmoins pénétrer du liquide dans les compartiments de charge, coupez immédiatement le chargeur de son alimentation et faites-le réviser par notre SAV. 3. Il est inutile d’essayer d’utiliser le chargeur pour recharger des piles non rechargeables.
2 Description Il y a une LED STATUS devant chacun des compartiments de charge. Ces LEDs tricolore (rouge/orange/vert) indiquent l’état de service momentané du chargeur. Témoins L’embase DC 5 V au dos du chargeur permet de connecter le bloc secteur fourni. Entrée c.c. 3 Raccordement 1. Vérifiez si la tension secteur utilisée est bien identique à celle indiquée sur le bloc secteur fourni. Une tension différente pourrait endommager l’appareil. Important ! Utilisez uniquement le bloc secteur fourni.
4 Processus de charge 3. Si la température ambiante est supérieure à +40°C, le chargeur risque de chauffer, ce qui prolonge la durée de charge ou provoque l’interruption du cycle (le témoin LED STATUS clignote sur rouge). Dès que la température ambiante tombe au-dessous de +40°C, le cycle de charge se poursuit normalement (le témoin LED STATUS reste au rouge sans clignoter). 4. Si l’accu s’échauffe à plus de +60°C pendant le cycle de charge (p.ex.
6 Dépannage Erreur Toutes les LED sont éteintes. Les LED sont éteintes bien qu’il y ait un émetteur avec accu dans un moulage. Cause possible Intervention • Normal. Les LED devant les moulages ne sont activées que lorsqu’on a placé un émetteur avec accu dans le moulage correspondant. • (Mettre un émetteur avec accu sur le chargeur.) 1. Le bloc secteur n’est pas branché sur le secteur. 2. Le câble c.c. n’est pas connecté au chargeur. 3. L’émetteur n’est pas en contact avec les 3 contacts de charge. 4.
1 Sicurezza ed ambiente 1.1 Sicurezza 1. Non versate liquidi sulla stazione di carica perché potrebbero causare cortocircuiti e imbrattamenti dei contatti di carica. 2. Se dovessero entrare liquidi nelle sedi di carica, staccate la stazione di carica subito dalla rete e fatela controllare dal nostro servizio assistenza clienti. 3. Non cercate di caricare batterie non ricaricabili con la stazione di carica. La stazione riconosce batterie non ricaricabili e disattiva automaticamente la funzione di carica. 4.
2 Descrizione Davanti ad ogni sede di carica si trova un LED di indicazione "STATUS". Questi LED a tre colori (rosso/arancione/verde) indicano lo stato d’esercizio attuale della stazione di carica. Elementi di indicazione La presa DC 5 V disposta sul retro dell’apparecchio serve per collegare l’alimentatore in dotazione. Ingresso DC 3 Collegamento 1. Controllate se la tensione di rete indicata sull’alimentatore in dotazione corrisponde alla tensione di rete del luogo d’impiego.
4 Esercizio di carica 4.4 Indicazioni importanti 1. Potete togliere il trasmettitore dalla stazione di carica in qualsiasi momento prima della fine del ciclo di carica. 2. Potete caricare l’accumulatore che si trova nel trasmettitore in qualsiasi momento, quindi anche prima che sia completamente scarico. 3.
6 Errori e rimedi Errore Tutti i LED sono scuri. Possibile causa • Nessun errore. I LED disposti davanti alle sedi di carica vengono attivati solo quando inserite un trasmettitore con accumulatore nella rispettiva sede di carica. Rimedio • (Inserire un trasmettitore con accumulatore.) 1. L’alimentatore non è collegato alla rete. I LED rimangono scuri benché sia stato inserito un trasmettitore con accumulatore in una sede di carica. 1. Collegare l'alimentatore ad una presa di rete adatta. 2.
1 Seguridad y medio ambiente 1.1 Seguridad 1. No verter líquidos sobre la estación de carga. Esto puede producir cortocircuitos y ensuciamiento de los contactos de carga. 2. Si llegara a penetrar líquido en la bandeja de carga, desenchufe inmediatamente la estación de carga de la red y hágala examinar por nuestro Servicio de atención al cliente. 3. No intente cargar pilas no recargables con la estación de carga. Esta reconoce las pilas no recargables y desactiva automáticamente la función de carga. 4.
2 Descripción Delante de cada bandeja de carga se encuentra un LED indicador "STATUS". Estes LEDs tricolores (rojo/naranja/verde) indican el régimen de carga momentáneo de la estación de carga. Indicadores visuales La toma DC 5 V en la parte posterior sirve de conexión para el alimentador de red suministrado. Entrada CC 3 Conexión 1. Controle si la tensión de servicio indicada en el alimentador de red suministrado corresponde a la tensión de red en el lugar de utilización.
4 Función de carga 4.4 Notas importantes 1. El transmisor se puede retirar en cualquier momento de la estación de carga antes de haber concluido el ciclo de carga. 2. El acumulador que se encuentra en el transmisor se puede recargar en cualquier momento, es decir, también antes de que esté completamente descargado. 3.
6 Reparación de desperfectos Desperfecto Causa posible Todos los LEDs están apagados. Los LEDs están apagados aun cuando el transmisor con acumulador ha sido introducido en una bandeja de carga. Remedio • No es desperfecto. Los LEDs delante de las bandejas de carga se activan sólo cuando usted introduce un transmisor con acumulador en la correspondiente bandeja de carga. • (Introducir un transmisor con acumulador.) 1. El alimentador de red no está conectado con la red eléctrica. 2.
1 Segurança e meio ambiente 1.1 Segurança 1. Não derrame líquidos sobre a estação de carga. Isto poderá levar a curtos-circuitos e contaminação dos contatos de carga . 2. Se entrar líquido no compartimento de carga, desconecte imediatamente a estação de carga da rede elétrica e mande controlar a estação de carga pelo nosso serviço técnico. 3. Não tente carregar pilhas não recarregáveis com a estação de carga.
2 Apresentação A entrada DC 5 V no lado traseiro serve para conectar o adaptador de força incluído na embalagem. Entrada DC 3 Conexão 1. Verifique se a voltagem indicada no adaptador de força incluído na embalagem está de acordo com a tensão da rede no lugar de aplicação. Se usar o adaptador de rede com uma voltagem diferente, poderá provocar prejuízos no aparelho. Importante! Utilize apenas o adaptador de força que está incluído na embalagem.
4 Processo de carga 4.4 Avisos importantes 1. Pode sempre retirar o emissor da estação de carga antes do fim do ciclo de carga. 2. Poderá sempre recarregar o acumulador no emissor, ou seja, mesmo se este ainda não estiver completamente descarregado. 3. Se as temperaturas do ambiente ultrapassarem os +40°C o sobreaquecimento da estação de carga poderá prorrogar significativamente o tempo de duração de carga ou até interromper o ciclo de carga (o LED STATUS pisca em cor vermelha).
6 Resolver problemas Problema Todos os LEDs estão escuros. Os LEDs estão escuros, embora haja um emissor com acumulador no compartimento de carga. Causa possível • Não há problema. Os LEDs diante dos compartimentos de carga serão ativados se colocar um emissor com acumulador no respectivo compartimento de carga. • ( Colocar um emissor com acumulador.) 1. O adaptador de força não está conectado à rede elétrica. 2. O cabo DC não está conectado à estação de carga 3.
Notizen • Notes • Notes • Note • Notas • Notas 26 CU 400
Notizen • Notes • Notes • Note • Notas • Notas CU 400 27
Notizen • Notes • Notes • Note • Notas • Notas 28 CU 400
CU 400 Fig. 1 PSU 4000 ! ! Fig.
Notizen • Notes • Notes • Note • Notas • Notas 30 CU 400
Notizen • Notes • Notes • Note • Notas • Notas CU 400 31
Mikrofone · Kopfhörer · Drahtlosmikrofone · Drahtloskopfhörer · Kopfsprechgarnituren · Akustische Komponenten Microphones · Headphones · Wireless Microphones · Wireless Headphones · Headsets · Electroacoustical Components Microphones · Casques HiFi · Microphones sans fil · Casques sans fil · Micros-casques · Composants acoustiques Microfoni · Cuffie HiFi · Microfoni senza filo · Cuffie senza filo · Cuffie-microfono · Componenti acustici Micrófonos · Auriculares · Micrófonos inal