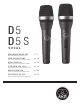
D5 D5 S VOCAL BEDIENUNGSANLEITUNG . . . . . . . . . . S. 2 Bitte vor Inbetriebnahme des Gerätes lesen! USER INSTRUCTIONS . . . . . . . . . . . . . . . p. 12 Please read the manual before using the equipment! MODE D’EMPLOI . . . . . . . . . . . . . . . . . . . . . p. 22 Veuillez lire cette notice avant d’utiliser le système! ISTRUZIONI PER L’USO . . . . . . . . . . . . . p. 32 Prima di utilizzare l’apparecchio, leggere il manuale! MODO DE EMPLEO . . . . . . . . . . . . . . . . . . . p.
Table of Contents Page 1 Precaution / Description.....................................................13 1.1 Precaution...................................................................13 1.2 Unpacking...................................................................13 1.3 Optional Accesories....................................................13 1.4 Features ......................................................................13 1.5 Brief Description ......................................................
1 Precaution / Description • Please make sure that the piece of equipment your microphone will be connected to fulfills the safety regulations in force in your country and is fitted with a ground lead. 1.1 Precaution L 1.2 Unpacking 1 D 5/D 5 S 1 SA 45 1 Carrying case • Check that the packaging contains all of the components listed above. Should anything be missing, please contact your AKG dealer. • For optional accessories, refer to the current AKG catalog or folder, or visit www.akg.com.
1 Description 1.5 Brief Description D 5: D 5 S: 14 The AKG D 5 is a supercardioid dynamic microphone. It has been designed specifically as a vocal microphone for rough onstage use. The wide frequency response of the D 5 slightly favors the midfrequency and treble regions to ensures good intelligibility of speech. The term "supercardioid polar response" means that the D 5 is most sensitive to sound arriving from in front of it, less sensitive to sound arriving from the sides and rear.
2 Interfacing The microphone provides a balanced output on a 3-pin male XLR connector: Pin 1: ground Pin 2: hot Pin 3: return You can connect the microphone either to a balanced or an unbalanced microphone input. • To connect the microphone to a balanced input (XLR connector), use a commercial XLR cable. • To connect the microphone to an unbalanced microphone input (1/4" jack), use a cable with a female XLR connector and a 1/4" TS jack plug.
3 Using Your Microphone 3.1 Introduction A handheld vocal microphone provides many ways of shaping the sound of your voice as it is heard over the sound system. The following sections contain useful hints on how to use your microphone for best results. 3.2 Working Distance and Proximity Effect Basically, your voice will sound the bigger and mellower, the closer you hold the microphone to your lips.
3 Using Your Microphone 3.4 Feedback Fig. 2: Microphone placement for maximum gain before feedback. The term “feedback” means that part of the sound projected by a speaker is picked up by a microphone, fed back to the amplifier, and projected again by the speaker. Above a specific volume or "system gain" setting the sound system will start howling and the sound engineer will desperately dive for the master fader to reduce the volume and stop the howling.
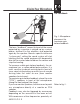
3 Using Your Microphone fect may cause feedback. In this case, it is often enough to move away from the microphone a little to stop the feedback. 3.5 Backing Vocals Fig. 3: Two vocalists sharing a microphone. 18 1. Never let more than two persons share a microphone. 2. The microphone is very insensitive to offaxis sounds.
4 Cleaning • To clean the surface of the microphone body, use a soft cloth moistened with water. 4.1 Microphone Body 1. Unscrew the front grill from the microphone CCW. 2. Remove the windscreen from the from grill and wash the windscreen in soap suds. 3. Allow the windscreen to dry overnight. 4. Replace the windscreen in the front grill and screw the front grill on the microphone CW. 4.
5 Troubleshooting Problem Possible Cause Remedy No sound. 1. Power to mixer 1. Switch power to and/or amplifier is mixer or amplifier off. on. 2. Channel or master 2. Set channel or fader on mixer, or master fader on volume control on mixer or volume amplifier is at zero. control on amplifier to desired level. 3. Microphone is not 3. Connect microphone to mixer or connected to amplifier. mixer or amplifier. 4. Cable connectors 4. Check cable connectors for secure are seated loosely. seat. 5.
6 Specifications Polar pattern: Frequency range: Sensitivity: Max. SPL for 1% / 3% THD: Equivalent noise level: Impedance: Re commended load impedance: Connector: Finish: Size: supercardioid 70 Hz to 20 kHz 2.6 mV/Pa (-52 dBV re 1 V/Pa) 147 / 156 dB SPL 18 dB(A) to DIN 45412 ≤ 600 ohms ≥ 2000 ohms 3-pin XLR matte gray-blue length: 185.2 mm (7.3 in.); diameter: 51 mm (2 in.) Net weight: 340 g (12 oz.) Shipping weight: 655 g (1.45 lbs.
Mikrofone · Kopfhörer · Drahtlosmikrofone · Drahtloskopfhörer · Kopfsprechgarnituren · Akustische Komponenten Microphones · Headphones · Wireless Microphones · Wireless Headphones · Headsets · Electroacoustical Components Microphones · Casques HiFi · Microphones sans fil · Casques sans fil · Micros-casques · Composants acoustiques Microfoni · Cuffie HiFi · Microfoni senza filo · Cuffie senza filo · Cuffie-microfono · Componenti acustici Micrófonos · Auriculares · Micrófonos inalámbricos · Auriculares inalám
D5 Service Manual 3138Z00.. AKG Service Department, Lemböckgasse 21-25, A-1230 Wien, Austria.Tel.: (431)86654-0, FAX: (431)86654-1514, e-mail: service@akg.com 07/07 D5 … 3138Z00/01/02/06/07 D5-S ... 3138Z00/03/04/08/09 4 3 5 1 2 10 11 6 Description Handle assy Dinah Handle assy Dinah-S Grid cap with foam insert Foam insert Capsule with suspension Capsule with suspension (MPL) Switch Slider button Slider label Screw for switch XLR-Connector Screw M2,5x8 Stand adapter H15-A 9 Pos.
D5 Service Manual 3138Z00.. AKG Service Department, Lemböckgasse 21-25, A-1230 Wien, Austria.Tel.: (431)86654-0, FAX: (431)86654-1514, e-mail: service@akg.com 07/07 Reparaturhinweise: Bitte beachten Sie daß die Litzen der Kapsel wie im Bild 1 verlegt sein müssen. Bitte entfernen Sie den Schaumstoffteil wenn eine neue Kapsel in ein älteres D5 Gehäuse eingesetzt werden soll. (Bild 2) Repair – Hints: Please take care that the litz wires are routed as in the picture 1.