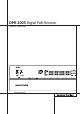
DPR 2005 Digital Path Receiver OWNER’S MANUAL Power for the Digital Revolution®
Table of Contents 3 4 4 5 7 10 14 15 15 15 16 18 19 19 20 20 20 20 20 22 22 25 27 27 27 28 28 29 31 31 33 33 33 33 34 34 35 35 35 35 35 36 36 37 37 38 38 38 39 39 40 40 40 40 41 41 41 42 43 43 43 Introduction Safety Information Unpacking Front Panel Controls Rear Panel Connections Main Remote Control Functions Zone II Remote Control Functions Installation and Connections Audio Connections Video Connections SCART A/V Connections System and Power Connections Speaker Selection Speaker Placement System Configu
Introduction Thank you for choosing Harman Kardon! With the purchase of a Harman Kardon DPR 2005 you are about to begin many years of listening enjoyment. Thanks to its completely digital path system, the DPR 2005 is truly a multichannel receiver for the new millennium. In addition to the traditional 5.1 digital decoding modes such as Dolby Digital and DTS, it offers the latest advancements in surround technology such as Dolby Pro Logic IIx, the full suite of DTSES 6.1 modes, DTS Neo:6 and the latest 7.
Introduction / Safety Information ■ Extensive bass management options, and full digital bass management on the 6/8-channel direct inputs for use with DVD-Audio or SACD players, including Quadruple Crossover and individual settings for each input ■ A/V Sync delay adjustable for each input delivers perfect lip sync with digital programs or video displays ■ Main Backlit Remote with Internal Codes and Learning Capability ■ HDCD Decoding for Superb CD Playback Important Safety Information Verify Line Voltage Be
Front Panel Controls 21 L 4 M 8 9 7 5 A P O C N E G R 6 D F 3 Q B HIJ I K 1 Main Power Switch 2 System Power Control 3 Power Indicator 4 Headphone Jack 5 Surround Mode Group Selector 6 Speaker Selector 7 ¤ Button 8 Tone Mode 9 Surround Mode Selector ) Tuning Selector ! Tuner Band Selector @ Set Button # Preset Station Selector $ ⁄ Button % Input Source Selector ^ RDS Selector & Delay Adjust Selector * Digital Optical 3 Input ( Input/Output Status Indicators Ó Digital Coax 3 Jack Ô
Front Panel Controls 9 Surround Mode Selector: Press this button to cycle through the individual surround modes available after the Surround Mode Group Selector 5 was pressed (see item 5 above). Note that depending on the type of input, some modes are not always available. (See page 34 for more information about surround modes). ) Tuning Selector: Press the left side of the button to tune lower frequency stations and the right side of the button to tune higher frequency stations.
Rear Panel Connections AC OUTLETS ~230V/50Hz UNSWITCHED / 100W MAX SWITCHED / 50W MAX ! " #$ % & ' ( ) * + AM Antenna FM Antenna % Tape Inputs $ Tape Outputs & Subwoofer Output ! DVD Audio Inputs # CD Inputs " Multiroom Outputs A-BUS Connector ' 8-Channel Direct Inputs * Digital Audio Outputs Video Monitor Outputs DVD Video Inputs Front Speaker Outputs Center Speaker Outputs Surround Speaker Outputs Switched AC Accessory Outlet U
Rear Panel Connections Video Monitor Outputs: Connect this jack to the composite and/or S-Video input of a TV monitor or video projector to view the on-screen menus and the output of any standard Video or S-Video source selected by the receiver’s video switcher. DVD Video Inputs: Connect these jacks to the composite or S-Video output jacks on a DVD player or other video source. Front Speaker Outputs: Connect these outputs to the matching + or – terminals on your left and right speakers.
Rear Panel Connections Preamp Outputs: Connect these jacks to an optional, external power amplifier for applications where higher power is desired. Surround Back/Multiroom Speaker Outputs: These speaker terminals are normally used to power the surround back left/surround back right speakers in a 7.1 channel system. However, they may also be used to power the speakers in a second zone, which will receive the output selected for a multiroom system.
Main Remote Control Functions 0 1 2 3 4 5 6 7 8 9 A B C D E F G H I J K L M N O P Q ! " # $ % & ' ( ) * + , .
Main Remote Control Functions IMPORTANT NOTE: The DPR 2005’s remote may be programmed to control up to nine devices, including the DPR. Before using the remote, it is important to remember to press the Input Selector button 4 that corresponds to the unit you wish to operate. In addition, the DPR’s remote is shipped from the factory to operate the DPR and most Harman Kardon CD or DVD players and cassette decks.
Main Remote Control Functions K Tuning Up/Down: When the tuner is in use, these buttons will tune up or down through the selected frequency band. If the Tuner Mode button I has been pressed or the Band button ! on the front panel was held pressed so that AUTO appears in the Main Information Display ˜, pressing either of the buttons will cause the tuner to seek the next station with acceptable signal strength for quality reception.
Main Remote Control Functions * SPL Select Button: This button activates the EzSet function to quickly and accurately calibrate the DPR 2005’s output levels. When the button is pressed you will then need to select between automatic EzSet operation or using the remote as a manual SPL meter by pressing the ⁄/¤ Navigation Button E until your choice appears in the remote’s LCD display. Press the Set Button F to enter the setting, and then follow the instructions as displayed in the LCD display.
Zone II Remote Control Functions POWER A MUTE K OFF AVR VID1 VID2 AM//FM VID3 VID4 DVD CD TAPE DN TUNING UP DN PRESET UP The Zone II remote may be used in either the same room where the DPR is located, or it may be used in a separate room with an optional infrared sensor that is connected to the DPR’s Multi IR input jack . B C D E F G å Power Off: When used in the room where the DPR is located, press this button to place the unit in Standby.
Installation and Connections After unpacking the unit, and placing it on a solid surface capable of supporting its weight, you will need to make the connections to your audio and video equipment. Audio Equipment Connections We recommend that you use high-quality interconnect cables when making connections to source equipment and recorders to preserve the integrity of the signals.
Installation and Connections 4. Connect the digital audio outputs of a CD, MD or DVD player, satellite receiver, cable box or HDTV converter to the appropriate Optical or Coaxial Digital Inputs ) ( *Ó. NOTE: When connecting a device such as a digital cable box or other set-top tuner product with a digital audio output, we recommend that you connect both the digital and analog outputs of the product to your DPR.
Installation and Connections Black Black Figure 1: SCART/Cinch-Adapter for playback; signal flow: SCART → Cinch Yellow Yellow Red Red Black Black Red Red Blue 1 Blue Yellow Yellow Figure 2: SCART/Cinch-Adapter for record and playback; signal flow: SCART ↔ Cinch Green 1 Green White White Black Black Figure 3: Cinch/SCART-Adapter for playback; signal flow: Cinch → SCART Yellow Yellow Red Red Rot Red Figure 4: SCART/S-Video Adapter for playback; signal flow: SCART → Cinch Schwarz Black S-Video InIn S
Installation and Connections System and Power Connections The DPR 2005 is designed for flexible use with multiroom systems, external control components and power amplifiers. Main Room Remote Control Extension If the receiver is placed behind a solid or smoked glass cabinet door, the obstruction may prevent the remote sensor from receiving commands. In this event, the remote sensor of any Harman Kardon or other compatible device, not covered by the door, or an optional remote sensor may be used.
Installation and Connections The DPR draws significantly more current than other household devices such as computers that use removable power cords. For that reason, it is important that only the cord supplied with the unit (or a direct replacement of identical capacity) be used.
System Configuration Once the speakers have been placed in the room and connected, the remaining steps are to program the system configuration memories. First Turn On You are now ready to power up the DPR to begin these final adjustments. 1. Make certain that the AC power cord is firmly inserted in to the AC Power cord Recepticle and plug the cord into an unswitched AC outlet. To maintian the unit's safety rating, DO NOT substitute the power cord for one with lower current capacity. 2.
System Configuration Surround Mode will ”attach” themselves to that input and be stored in a non-volatile memory. This means that once made, the selection of an input will automatically recall those settings. For that reason, the procedures described below must be repeated for each input source so that you have the opportunity to custom tailor each source to your specific listening requirements. However, once made they need not be changed again unless you need to alter a setting.
System Configuration indicating that the analog Video 5 jacks Ô are now record outputs. Note: A signal will be sent to this jack only when the input selected for use by the DPR is digital. Digital signals will be passed through regardless of their format, and which digital input (optical or coax) they are fed from. However, analog signals are not converted to digital, and the format of the signal (e.g., PCM, Dolby Digital or DTS) may not be changed.
System Configuration At last, this menu also makes you chose if the speaker setting will be the same for each input source (GLOBAL), or will be set differently for each input (INDEPENDENT). Notes: • When "Independent" is selected for the speaker settings (see below), they need to be made for each input individually and you can determine which speaker should be used depending on the input source selected. So it´s possible e.g.
System Configuration When SMALL is selected, with all digital surround modes low-frequency surround channel sounds will be sent to the Fronts when Sub is turned off or to the subwoofer output when Sub is on. With any analog surround mode the rear bass feed depends on the mode selected and the setting of the Sub and front speakers.
System Configuration Since the crossover point commonly used in the creation of the LFE channel is 120Hz, we recommend that you select the speaker group whose crossover point is closest to 120Hz. To do this, press the ⁄/¤ Navigation Button E until the cursor is next to the LFE line, and then press the ‹/› Navigation Button E until the name of the speaker group with the desired crossover frequency appears.
System Configuration When the SURR BACK line of the SPEAKER SETUP menu (Figure 5) is set to SMALL or LARGE the DPR will be configured for 6.1/7.1-channel operation, and additional modes such as Dolby Digital EX, Dolby Pro Logix IIx and 7 STEREO or Logic 7 7.1 will appear, as they are only available when seven main speakers are present. In addition, the modes DTS ES (Discrete) and DTS+NEO:6 (DTS ES Matrix) available in the DPR will not appear unless a digital source is playing the correct bitstream.
System Configuration On the STEREO menu, the selection choices made with the ‹ / › Buttons E on the remote may either turn the surround processing off for a traditional two-channel stereo presentation, or select 5 Stereo or 7 Stereo depending on whether the 5.1 or 6.1/7.1 output is in use.
System Configuration ** → DOLBY MODE: C D P N E I A I N M N G T E O H BACK E N R T SURROUND DOLBY R WIDTH SION: AMA: -: OFF M TO SURR ** DIGITAL : ---ID MAX SELECT Figure 7a To adjust the Night mode setting, make certain that the › cursor is on the NIGHT line of the DOLBY menu. Next, press ‹/ › Buttons E to choose between the following settings. OFF: When OFF is highlighted, the Night mode will not function. MID: When MID is in the highlighted video, a mild compression will be applied.
System Configuration Manual Output Level Adjustment Output levels may also be adjusted manually, either to set them to a specific level with an SPL meter, or to make fine tuning adjustments to the levels obtained using the EzSet remote. Manual output level adjustment is most easily done through the CHANNEL ADJUST menu (Figure 8). If you are already at the main menu, press the ¤ Button E until the onscreen › cursor is next to the CHANNEL ADJUST line.
System Configuration may be different with each surround mode, or to increase or decrease the level of certain speakers intentionally, depending on the surround mode selected. Note: Output level adjustment is not available for the VMAx or Surround Off mode, as no surround speakers are used (so level differences between the speakers in the room cannot occur).
Operation Surround Mode Chart MODE FEATURES DELAY TIME RANGE DOLBY DIGITAL Available only with digital input sources encoded with Dolby Digital data. It provides up to five separate main audio channels and a special dedicated Low Frequency Effects channel. Center: 0 - 30ft / 9m Initial Setting: 12ft / 3.6m Surround: 0 - 30ft / 9m Initial Setting: 10ft / 3m DOLBY DIGITAL EX Available when the receiver is configured for 6.1/7.1 channel operation, Dolby Digital EX is the latest version of Dolby Digital.
Operation Surround Mode Chart MODE FEATURES DELAY TIME RANGE DTS Neo:6 Cinema DTS Neo:6 Music These two modes are available when any analog source is playing to create a six-channel surround presentation from conventional Matrix-encoded and traditional Stereo sources. Select the Cinema version of Neo:6 when a program with any type of analog Matrix surround encoding is present. Select the Music version of Neo:6 for optimal processing when a nonencoded, two-channel stereo program is being played.
Operation Basic Operation Once you have completed the setup and configuration of the DPR, it is simple to operate and enjoy. The following instructions should be followed for you to maximize your enjoyment of your new receiver: Turning the DPR On or Off • When using the DPR for the first time, you must press the Main Power Switch 1 on the front panel to turn the unit on. This places the unit in a Standby mode, as indicated by the amber color of the Power Indicator 3.
Operation Display ˜. To return the tone controls to an active condition, press the Tone Mode 8 button once or twice so that the words Tone I n momentarily appear in the Main Information Display ˜. • When the tone controls are active, the amount of bass and treble boost/cut may be adjusted by first pressing the Tone Mode Button on the front panel 8 or the remote . two or three times until the desired setting (BASS MODE or TREBLE MODE) appears in the on-screen display and the Lower Display Line ˜.
Operation Dolby Digital Dolby Digital (originally known as AC-3®) is a standard part of DVD, and is available on specially encoded LD discs and satellite broadcasts and it is a part of the new highdefinition television (HDTV) system. Note that an optional, external RF demodulator is required to use the DPR to listen to the Dolby Digital sound tracks available on laser discs.
Operation Selecting a Digital Source To utilize either digital mode you must have properly connected a digital source to the DPR. Connect the digital outputs from DVD players, HDTV receivers, satellite systems or CD players to the Optical or Coaxial inputs on the rear or front panel )(*Ó. In order to provide a backup signal and a source for analog stereo recording, the analog outputs provided on digital source equipment should also be connected to their appropriate inputs on the DPR rear panel (e.g.
Operation Speaker/Channel Indicators In addition to the Bitstream Indicators, the DPR features a set of unique channel-input indicators that tell you how many channels of digital information are being received and/or whether the digital signal is interrupted. (See Figure 9). Figure 9 These indicators are the L/C/R/LFE/SL/SR/SBL/SBR letters that are inside the center boxes of the Speaker/Channel Input Indicators Ú in the front panel Main Information Display ˜.
Operation Tape Recording In normal operation, the audio or video source selected for listening through the DPR is sent to the record outputs. This means that any program you are watching or listening to may be recorded simply by placing machines connected to the outputs for Tape Outputs $ or Video 1 or 2 Outputs in the record mode.
Operation other adjustments to make, press the OSD Button L to exit the menu system. NOTE: The output levels may be separately trimmed for each digital and analog surround mode. If you wish to have different trim levels for a specific mode, select that mode and then follow the instructions in the steps shown above. With Stereo and VMAx modes the adjustment procedure described above is the only way to trim the output level, e.g. to match the Stereo or VMAx level with other modes.
Advanced Features The DPR is equipped with a number of advanced features that add extra flexibility to the unit’s operation. While it is not necessary to use these features to operate the unit, they provide additional options that you may wish to use. Surround Amplifier Channel Assignment The DPR is equipped with seven full-power amplifier channels to allow for complete 7.1channel operation without the need for additional external amplifiers.
Advanced Features Turn On Volume Level Semi-OSD Settings Full-OSD Time Out Adjustment As is the case with most audio/video receivers, when the DPR is turned on, it will always return to the volume setting in effect when the unit was turned off. However, you may prefer to always have the DPR turn on at a specific setting, regardless of what was last in use when the unit was turned off.
Multiroom Operation Multiroom Operation The DPR is fully equipped to operate as the control center for a complete multiroom system that is capable of sending one source to a second zone in the house while separate source is listened to in the main room. In addition to providing for control over the selection of the remote source and its volume, the DPR offers a comprehensive range of options for powering the speakers in the second zone.
Multiroom Operation changes the station, the change will also impact the remote room. To activate the feed to the remote room, press the Multiroom button ( on the remote. Next, press the Set button F. Press the ⁄ / ¤ buttons E to turn the multiroom feed on or off. When the multiroom system is on, the Main Information Display ˜ or OSD will display MULTI O N. Press the Set button F twice to enter the setting.
Multiroom Operation 4. Stations may also be tuned directly by pressing the Direct button J, and then pressing the Numeric Keys H that correspond to the station’s frequency. Note that for entering numbers higher than 100 you need to enter only the "1" rather than "10", the first "0" will be added automatically. The desired station will automatically be tuned after the latest number is entered. If you press an incorrect button while entering a direct frequency, press the Clear button # to start over.
Tuner Operation RDS Operation The DPR is equipped with RDS (Radio Data System), which brings a wide range of information to FM radio. Now in use in many countries, RDS is a system for transmitting station call signs or network information, a description of station program type, text messages about the station or specifics of a musical selection, and the correct time. As more FM stations become equipped with RDS capabilities, the DPR will serve as an easy-to-use center for both information and entertainment.
Programming the Remote Configuring the Remote The DPR 2005 remote is factory-programmed for all functions needed to operate the unit. In addition, it is also preprogrammed to operate most recent Harman Kardon DVD players and changers, CD players and changers, CD recorders and cassette decks. The codes for other brand devices may be programmed into the DPR 2005 remote using its extensive library of remote codes or a head-to-head learning process for codes not in the internal library.
Programming the Remote Although the DPR remote is preprogrammed with an extensive library of codes for many major brands, it is also possible that you may have attempted to program a product that is too new or too old, and thus not all of its commands will be in the code library. You may fill in the codes for any button that does not operate properly by using the learning technique shown on page 47.
Programming the Remote of the LCD screen, as shown in Figure 26. Press the Set Button F to begin the process of learning commands from another device’s remote into the DPR remote. MAIN MENU LEARN Figure 26 3. The SELECT A DEVICE message will appear in the LCD display (Figure 17). Press the ⁄¤ Navigation Buttons E to scroll through the list of device categories and press the Set Button F when the device for which you wish to set the codes appears.
Programming the Remote OLD DEVICE TYPE TV Figure 35 4. Once the “old” device type has been selected, you need to tell the remote which set of remote codes to use as a replacement for the device just selected. When the instructions shown in Figure 36 appear, press the ⁄¤ Navigation Buttons E to scroll through the list of device categories to find the name of the device that you wish to use.
Programming the Remote 7. The next display (Figure 42) and the subsequent screens are where the actual macro programming take place. The words at the left side of the top line of the display show the button that is being programmed (e.g., the Power On Button 3 or one of the Macro ) and the indication at the right Buttons side of the top line shows the number of macro steps available of 20 possible steps.
Programming the Remote Volume Punch-Through Follow these steps to enable the Volume Up/Down and Mute controls from one device to be used when the remote is otherwise programmed for a different device. Note for Volume Punch-Through: The remote’s default settings are for the DPR’s volume controls to be used when any input or device is selected with the exception of the VID 2/TV button. There is no need to program the remote for volume punch-through for the DPR’s controls with other sources, such as DVD.
Programming the Remote the DEVICE IN USE on the left side of the bottom line and the PUNCH-THROUGH device. In the example used, the display to return the remote to default settings will appear as shown in Figure 58. PUNCH-THROUGH VCR<-VCR Figure 58 Transport Punch-Through Transport punch-through allows the Play P, Stop P, Fast Forward/Reverse P, Pause P, Record P and Skip Up/Down buttons to send commands to a different device than the one that has been selected for other commands.
Programming the Remote Renaming While the names given to the buttons and inputs on the DPR represent recognizable categories of audio/ video products, system operation may be easier if the displays shown in the remote’s LCD screen are customized to reflect the specific characteristics of a playback source’s brand name or the new function given to a specific button when one remote’s controls are programmed into the DPR remote.
Programming the Remote lower line of the LCD. When the desired device name appears, press the Set Button F. SELECT A DEVICE DVD Figure 70 5. At the next menu screen you will select the first button within the device to be renamed, as instructed in the display shown in Figure 71. Select the button by simply pressing it on the remote. SELECT A KEY Figure 71 6. Depending on whether or not the button pressed already has a named function within the device selected, one of two things will happen. 8.
Programming the Remote Additional Notes on Configuring and Operating the Remote: • When the remote is being programmed, it will automatically time-out if no button is pressed within a thirty-second period. The message shown in Figure 77 will appear briefly, and the remote will then exit the feature being programmed and any data entered will be lost.
Troubleshooting Guide SYMPTOM CAUSE SOLUTION Unit does not function when Main Power Switch 1 is pushed • No AC Power • Make certain AC power cord is plugged into a live outlet • Check to see if outlet is switch controlled Display lights, but no sound or picture • Intermittent input connections • Make certain that all input and speaker connections are secure • Press Mute button , • Turn up volume control • Mute is on • Volume control is down Units turns on, but Front-Panel Display does not light •
Technical Specifications Audio Section Stereo Mode Continuous Average Power (FTC) 120 Watts per channel, 20Hz–20kHz, @ < 0.15% THD, both channels driven into 8 ohms 5/7 Channel Surround Modes Power Per Individual Channel Front L&R channels: 120 Watts per channel, @ < 0.15% THD, 20Hz–20kHz into 8 ohms Center channel: 120 Watts, @ < 0.15% THD, 20Hz–20kHz into 8 ohms Surround (L & R Side, L & R Back) channels: 120 Watts per channel, @ < 0.
250 Crossways Park Drive, Woodbury, New York 11797 www.harmankardon.com Harman Consumer Group International: 2, route de Tours, 72500 Château-du-Loir, France © 2004 Harman Kardon, Incorporated Part No.