
Specifications


3 Setting Up
Important!
3.4 Powering Up
Important!
3.4.1 Powering Up
in SILENT Mode
Refer to fig. 1.
3.4.2 Powering Up
in LOCK Mode
Refer to fig. 1.
Note:
3.5 Switching OFF
Refer to fig. 1.
3.5.1 LOCK Mode
3.5.2 SETUP and SILENT
Modes
3.6 Checking/Setting the
Carrier Frequency
Important!
We recommend setting the carrier frequency in SILENT mode only. This is the only way to make
sure you won't "go on air" on a frequency that is not allocated or coordinated and risk "jamming"
some other radio service or active radio mic.
Depending on the way you switch power to the transmitter ON, the transmitter will be in either LOCK
mode or SILENT mode on powering up.
If you are not sure as to what carrier frequency the transmitter is tuned to, switch the transmitter
to SILENT mode (refer to section 3.4.1 below) and check that the current carrier frequency is legal
and identical to the frequency selected on the receiver.
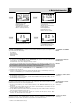
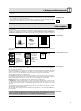
1. Push and hold the jog switch (6) until the backlighting of the display (2) comes on and the status LED
(1) extinguishes.
The display (2) will first show the firmware version (”F..”) and the Preset version (”P..”), followed by
the currently selected carrier frequency in MHz.
As the backlighting goes out, the display (2) changes as follows:
The transmitter is now in SILENT mode.
2. If the carrier frequency is not an allocated or coordinated one and/or different from the receiver fre-
quency, set the transmitter to a suitable, legal frequency referring to section 3.6.
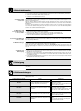
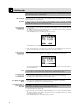
1. Press the ON/OFF button (3) for approx. 1.5 seconds.
2. As soon as the below screen appears on the display (2), the transmitter is in LOCK mode.
The "LOCK" label indicates that all controls except for the MUTE switch are electronically locked to
prevent misadjustment.
If the microphone is muted, the "MUTE" label appears on the display and the status LED is lit red. If
the microphone is active, "MUTE" will not appear and the status LED will be lit green.
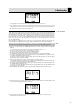
1. Push and hold the jog switch (6) until any one or more labels on the display (2) start flashing.
2. Push and hold the ON/OFF button (3) until the message "oFF" appears on the display (2).
The display (2) goes dark and power to the transmitter is OFF.
1. Push and hold the ON/OFF button (3) until the message "oFF" appears on the display.
The display goes dark and power to the transmitter is OFF.
If you are not sure as to what carrier frequency the transmitter is tuned to, place the transmitter
into SILENT mode following steps 1 and 2 below. In SILENT mode, you can check and adjust the
carrier frequency and input gain without transmitting a radio signal.
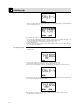
1. If the transmitter is ON, switch it OFF.
2. Push and hold the jog switch until the display backlighting comes on and the status LED extinguish-
es.
The display will first show the battery capacityin hours and as a bargraph and then the currently
selected carrier frequency in MHz.
As the backlighting goes out, the display changes as follows:
18