
Installation Guide

Installation
22
STEP 5 (Continued)
Gas Conversion
Changing Oven Nozzles (ranges only)
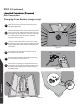
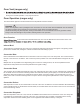
Open the oven door and remove the bottom drip
pan and sliding racks.
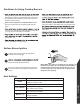
Remove the upper burner screw. Remove the burner
from its connection against the back wall of the oven
(see Figure 16). Be careful not to scratch or damage
the connection wire that will remain connected
throughout this procedure.
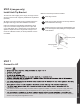
Using a 10 mm socket wrench, remove the nozzle.
Set the natural gas nozzle aside and replace with the
liquid propane gas nozzle. Screw in and tighten the
new nozzle.
Place the burner vent back into position over the
new nozzle in the AR3 slot.
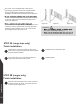
Secure the burner back in place with the mounting
screw that was removed in step 10.
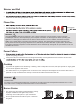
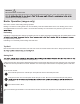
Follow steps 10 through 13 with the bottom burner
(see Figure 18). Ensure the nozzles and burners are
secured properly. When finished, replace drip pan
and sliding racks.
Figure 16
Figure 17
AR3
Nozzle
Burner vent
Figure 18
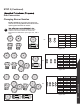
Débit d'entrée du bruleur (BTU/h) / Burner input rating
9
10
11
12
13
14