~AKICON® USE AND CARE GUIDE AK13110N4-W AK13110N4-B AK13110N4-S Ventilation Fan with Light READ AND SAVE THESE INSTRUCTIONS Questions, problems, missing parts? Before resuming to the store, call ICONIC Customer Service 8 a.m.
Safety Information READ AND SAVE THESE INSTRUCTIONS 1. WARNING — TO REDUCE THE RISK OF FIRE ELECTRIC SHOCK OR INJURY TO PERSONS, OBSERVE THE FOLLOWING: a. Use this unit only in the manner intended by the manufacturer. If you have questions, contact the manufacturer. b. Before servicing or cleaning unit, switch power off at service panel and lock the service disconnecting means to prevent power from being switched on accidentally.
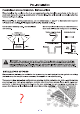
Pr-Installation PLANNING FOR SUCCESSFUL INSTALLATION When installing the ventilation fan in a new construction site, install the main body of the fan and duct work during the rough-in construction of the building. The grille should be installed after the finished ceiling is in place. When installing in existing construction, use the dimensions on page 7 to determine the required hole size for the ceiling. Grille edges should overlap finished ceiling.
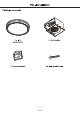
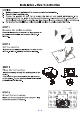
Pr-Installation Package contents 1 x light 1 x fan housing components (pon 1 x duct connector 6 x long wood screws
Installation New Construction CAUTION: 1. Make sure power is switched off at service panel before installation. 2. Do not install in cooking area. 3. Choose the location of your fan to ensure the best air and sound performance. It is recommended that the length of ducting and the number of elbows be kept to a minimum, and that insulated hard ducting be used. Larger duct sizes will reduce noise and airflow restrictions. 4.
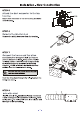
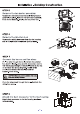
Installation New Construction STEPS Attach the duct connector to the fan housing Attach duct connector to the fan housing as shown in the drawing. STEP 6 Remove the junction box Remove the wiring box cover from the housing. STEP 7 Connect the house and fan wires Connect the wire through the hole and into the junction box(not included). Using a wire nut(Not included), secure 120VAC house wiring from the wall switch to the fan as shown in the wiring diagram.
Installation New Construction STEP 9 Plug fan and light in the power Plug the motor assembly back into the power unit. Plug the main LED light and Night light into the proper power units respectively as the label indicated. LIGHT a1) STEP 10 Install the light panel Attach LED panel by pinching the mounting springs and inserting them into the narrow rectangular slots in the fan housing. Test the unit.
Installation Existing Construction CAUTION: 1. Make sure power is switched off at service panel before installation. 2. Do not install in cooking area. 3. Choose the location of your fan to ensure the best air and sound performance. It is recommended that the length of ducting and the number of elbows be kept to a minimum, and that insulated hard ducting be used. Larger duct sizes will reduce noise and airflow restrictions. 4.
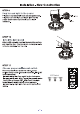
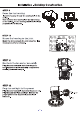
Installation Existing Construction STEP 5 Remove the fan motor assembly Remove the two screws (1) that hold the fan motor assembly in place. Remove the fan motor assembly from the fan housing. Unplug the fan power unit. STEP 6 Remove the junction box Remove the wiring box cover from the fan housing with a Phillips head screwdriver (not included). STEP 7 Connect the house and fan wires IN aE Pull the wire through the hole and into the junction Zt box (not included).
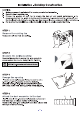
Installation Existing Construction STEP 9 Place the fan housing Insert the housing through the existing hole in the ceiling. Then bend the four ears to place the fan housing on the ceiling. The fan housing should be level and perpendicular to the joist. STEP 10 Mount the housing to the joist Mount the fan housing to the joist using four long wood screws where indicated. STEP 11 Reattach the fan motor assembly Plug the motor assembly back into the power unit.
Installation Existing Construction STEP 13 Install the light panel Attach LED panel by pinching the mounting springs and inserting them into the narrow rectangular slots in the fan housing. Test the unit. STEP 14 Choose proper wall-mount switch Connect properly the wires with Three-rocker wall-mounting switch.
Care and maintenance WARNING: Disconnect power supply before servicing. See SAFETY INFORMATION before proceeding. Routine maintenance should be done at least once a year. + Wipe grille with a dry cloth. + Remove excess dirt and dust from the fan housing with a vacuum cleaner. + Do not use solvents, thinner or harsh chemicals for cleaning the fan. + Do not allow water to enter the motor. + Do not immerse resin parts in water over 140° F.