Hydra Super-S LCM 4-Bay RAID Storage Enclosure for four 3.5-inch Serial ATA Hard Drives User Manual August 18, 2011 - v1.0 www.akitio.
Hydra Super-S LCM Table of Contents Table of Contents 1 Introduction ........................................................................................................................... 1 1.1 System Requirements ..................................................................................................... 1 1.1.1 PC Requirements ........................................................................................................ 1 1.1.2 Mac Requirements...................................
Hydra Super-S LCM Introduction 1 Introduction 1.1 System Requirements 1.1.1 PC Requirements • Minimum Intel Pentium III CPU 500MHz, 128MB RAM • eSATA equipped PC; Windows XP/Vista/7 • FireWire 400/800 equipped PC; Windows XP/Vista/7 • USB 2.0 equipped PC; Windows XP/Vista/7 • Your hardware device must have the correct corresponding port (e.g. USB 2.0 host controller) • Plug & Play support for eSATA host controller 1.1.
Hydra Super-S LCM Introduction 1.5 Detailed View 1.5.
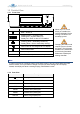
Hydra Super-S LCM Introduction 1.6 RAID Mode Hard drives of identical capacities are recommended. If the capacities are different, the total amount of the space that can be used will depend on the drive with the smallest capacity. The difference in performance is only visible for fast interfaces like eSATA. Note Changing the RAID mode requires you to re-format the drives. This will erase all data on the hard drives that are being formatted. Make sure to backup all existing data first! 1.6.
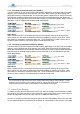
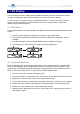
Hydra Super-S LCM Introduction 1.6.5 Disk Striping with dedicated parity (RAID 3) The drives show up as one volume but the total capacity, depending on the drive with the smallest capacity, is the combined size minus the size of one drive. RAID 3 uses byte-level striping with parity data stored on a dedicated disk. The single parity disk is a bottle-neck for writing since every write requires updating the parity data.
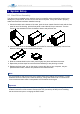
Hydra Super-S LCM System Setup 2 System Setup 2.1 Hard Drive Assembly The drives can be installed at any position, there is no specific order required. Be careful not to damage any components, and do not force the drives into place. If they don’t slide in properly, make sure the drives have been installed correctly. 1. Unlock the switch at the bottom of the case, push the inner chassis from the back until the front panel is out of the housing, pull the front panel out and then lift it up to remove it.
Hydra Super-S LCM System Setup 2.2 Replacing Hard Drives When one of the drives fails, the Rebuild LED will light up yellow and the corresponding HDD LED will light up red. If only one drive is defective and the RAID mode is set to RAID 1, RAID 3, RAID 5 or RAID 10, the data can still be accessed but we strongly recommend replacing the faulty drive immediately to assure continued backup and data safety.
Hydra Super-S LCM LCD Display 3 LCD Display The LCD display shows the system status, detailed information about the hard drives as well as the system configuration and provides the option to modify certain device settings. To select a menu or change an option, use the [Select] button. To enter a menu and confirm a change, use the [OK] button. For further details, follow the on-screen wizard or refer to the following step by step descriptions. 3.
Hydra Super-S LCM LCD Display 3.3 HDD Information Press the [Select] button until the HDD information menu is selected and then press the [OK] button to start displaying further details about the installed hard drives. It will automatically cycle through the different information displaying each screen for about 8 seconds and then return to the main screen. To fast forward, press the [Select] button. 1. The main screen of the HDD information menu. 2.
Hydra Super-S LCM LCD Display 3.4 Settings Press the [Select] button until the settings menu is selected and then press the [OK] button to enter the configuration menu. You can now use the [Select] button to cycle through the different settings and the [OK] button to further configure the device settings. 1. Option to enable or disable the support for large volumes in excess of 2TB. 2. Setup menu for the RAID settings. 3. Option to enable or disable the general alarm sound. 4.
Hydra Super-S LCM LCD Display 3.4.2 RAID Mode Setup In order to set the RAID mode via LCD display, make sure the RAID SET switch behind the front panel is not in the locked position. • [SPAN] Disk spanning. • [RAID 0] Disk striping. • [RAID 1/10] Disk mirroring (2xHDD RAID 1, 4xHDD RAID 10). • [RAID 3] Disk striping with dedicated parity. To use a spare drive, install 3 drives, turn on the device, set it to RAID 3, let it restart and then install the fourth drive.
Hydra Super-S LCM LCD Display 3.4.3 Alarm Setup The general alarm sound is the short beep you hear when starting up the system and it will sound when something is wrong. To enable or disable the alarm, do one of the following. • [ON] Beeper and alarm is enabled. • [OFF] Beeper and alarm is disabled. Press the [OK] button to enter the setup menu and press the [Select] button to cycle through the different options.
Hydra Super-S LCM LCD Display 3.4.5 Fan Speed Setup The smart-fan can automatically regulate the fan speed according to the internal case temperature, it can be set at a certain speed or it can be deactivated. • [Automatic] Regulates the fan speed according to the HDD temperature (below 45˚C = low speed, 45-60˚C = speed increases in 5 steps, above 61˚C = high speed). • [HighSpeed] Fan speed is set to high speed. • [LowSpeed] Fan speed is set to low speed. • [OFF] The fan is turned off.
Hydra Super-S LCM LCD Display 3.4.6 Backlight Setup The backlight for the LCD display can be enabled, disabled or set so that it turns off automatically, when the screen has been idle for a certain amount of time. • [ON] Always ON. • [OFF] Always OFF. • [1min] Backlight turns off when the screen has been idle for more than one minute. • [3min] Backlight turns off when the screen has been idle for more than three minutes.
Hydra Super-S LCM LCD Display 3.5 Event Information In addition to the details about the hardware and device configuration, the LCD display will also show certain event information. Following is a list of possible messages and their meanings. • [HDD Error / Remaining 3xHDD] When using RAID 0 or SPAN and one of the drives fails, the alarm will go off and the display indicates the amount of the remaining drives that are still working OK. Refer to the HDD LED’s in order to locate the defective drive.
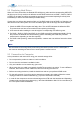
Hydra Super-S LCM Appendix 4 Appendix 4.1 Safety Information 4.1.1 6-pin FireWire cable When using a 6-pin FireWire cable, make sure NOT to insert the connector the wrong way (upside down), or you will damage the device! 4.1.2 Location and placing precautions Do not cover the device and do not place the unit on other heat-sensitive equipment.