
User manual


Taurus Super-S3 LCM
Page 9
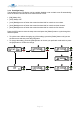
3.3 HDD Information
Press the [Select] button until the HDD information menu is selected and then press the [OK]
button to start displaying further details about the installed hard drives. It will automatically cycle
through the different information displaying each screen for about 8 seconds and then return to the
main screen. To fast forward, press the [Select] button.
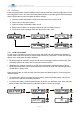
1. The main screen of the HDD information menu.
2. Displays the model number and serial number of the drive installed at HDD1.
3. Displays the total storage capacity and the temperature of the drive installed at HDD1.
4. Displays the model number and serial number of the drive installed at HDD2.
5. Displays the total storage capacity and the temperature of the drive installed at HDD2.
Note
To determine which is HDD1 and which is HDD2, check the serial number of the drive or
check the label on the circuit board beside the SATA connector. HDD1 is labeled J1 and
HDD2 is labeled J2.
Note
If a drive in a RAID array fails because it is defective, the HDD information is no longer
displayed. Instead, it will show "HDD 1: no disk" and the rest of the information is 0 or blank.