Taurus Super-S3 LCM Dual-Bay RAID Storage Enclosure for two 3.5-inch Serial ATA Hard Drives User Manual March 31, 2014 – v1.2 www.akitio.
Taurus Super-S3 LCM Table of Contents Table of Contents 1 Introduction ................................................................................................................................ 1 1.1 Technical Specifications ...................................................................................................... 1 1.1.1 Supported Hard Drives .................................................................................................... 1 1.1.2 Power Supply .......................
Taurus Super-S3 LCM Introduction 1 Introduction 1.1 Technical Specifications 1.1.1 Supported Hard Drives • Two 3.5" SATA-I, SATA-II or SATA-III hard drives • 80GB - 4TB per HDD • Hard drives of identical capacities are recommended • Supports large volumes in excess of 2TB Note Two hard drives are required. This device is not designed for one drive alone. 1.1.2 Power Supply • External power supply (UL, cUL, CE, TUV approved) • Input: AC 100-240V • Output: DC +12V/4A 1.1.
Taurus Super-S3 LCM Introduction 1.4 Detailed View 1.4.1 Front View Power ON/OFF To turn on the power, press and hold the power button for 1 sec. and then release it. To turn off the power, press and hold the power button for 3 sec. and then release it. Wait at least 5 seconds after turning off the power, before turning it back on.
Taurus Super-S3 LCM Introduction 1.5 RAID Modes Hard drives of identical capacities are recommended. If the capacities are different, the total amount of the space that can be used will depend on the drive with the smallest capacity. The difference in performance is only visible for fast interfaces like USB 3.0 and eSATA. 1.5.1 RAID 0 - Disk Striping The drives are shown as one large single volume but the total size will depend on the drive with the smallest capacity.
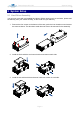
Taurus Super-S3 LCM System Setup 2 System Setup 2.1 Hard Drive Assembly Your unit may come with pre-installed hard drives. Before opening such an enclosure, please read the warranty from your vendor carefully, as this could void your warranty. 1. Remove the four screws on the bottom of the case, push the inner chassis out and remove the outer enclosure. The aluminum stand does not have to be removed for the assembly. 2. Install the first hard drive and mount it with two screws on each side. 3.
Taurus Super-S3 LCM System Setup 4. Connect the SATA and power cables to your hard drives. Be careful not to damage any components and confirm that the cables are connected firmly. The connector labeled J1 is HDD1 and the connector labeled J2 is HDD2. 5. Slide the inner chassis back into the outer enclosure and fasten the four screws to finish the assembly. 6. Connect the device to the computer and turn on the power. 7. Enter the setup menu and set the RAID mode. For details, see RAID Mode Setup. 8.
Taurus Super-S3 LCM System Setup 2.2 Replacing Hard Drives When a drive fails, the warning [RAID Warning / Degraded Array] is displayed. When the RAID mode is set to RAID 1, the data can still be accessed but we strongly recommend replacing the faulty drive as soon as possible to assure continued proper backup and data safety. If more than one drive fails at the same time or when the RAID mode is set to RAID 0, the data is lost and the system cannot be accessed again until the drive(s) have been replaced.
Taurus Super-S3 LCM 3 LCD Display The LCD display shows the system status, detailed information about the hard drives as well as the system configuration and provides the option to modify certain device settings. To select a menu or change an option, use the [Select] button. To enter a menu and confirm a change, use the [OK] button. For further details, follow the on-screen wizard or refer to the following step by step descriptions. 3.
Taurus Super-S3 LCM 3.2 System Information Press the [Select] button until the system information menu is selected and then press the [OK] button to start displaying further details about the device configuration and the hardware. It will automatically cycle through the different information displaying each screen for about 8 seconds and then return to the main screen. To fast forward, press the [Select] button. 1. The main screen of the system information menu. 2.
Taurus Super-S3 LCM 3.3 HDD Information Press the [Select] button until the HDD information menu is selected and then press the [OK] button to start displaying further details about the installed hard drives. It will automatically cycle through the different information displaying each screen for about 8 seconds and then return to the main screen. To fast forward, press the [Select] button. 1. The main screen of the HDD information menu. 2.
Taurus Super-S3 LCM 3.4 Settings Press the [Select] button until the settings menu is selected and then press the [OK] button to enter the configuration menu. You can now use the [Select] button to cycle through the different settings and the [OK] button to further configure the device settings. 1. Option to enable or disable the support for large volumes in excess of 2TB. 2. Setup menu for the RAID settings. 3. Option to enable or disable the alarm sound. 4.
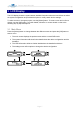
Taurus Super-S3 LCM 3.4.2 RAID Mode Setup The RAID mode should be set after installing the hard drives and starting up the system for the first time. • [RAID 1] Confirm RAID 1 mirroring mode. • [RAID 0->1] Change the mode from RAID 0 striping to RAID 1 mirroring. • [RAID 0] Confirm RAID 0 striping mode. • [RAID 1->0] Change the mode from RAID 1 mirroring to RAID 0 striping. Press the [OK] button to enter the setup menu and press the [Select] button to cycle through the different options.
Taurus Super-S3 LCM 3.4.3 Alarm Setup The alarm is the short beep you hear when starting up the system and it will sound when something is wrong. To enable or disable the alarm, do one of the following. • [ON] Beeper and alarm is enabled. • [OFF] Beeper and alarm is disabled. Press the [OK] button to enter the setup menu and press the [Select] button to cycle through the different options.
Taurus Super-S3 LCM 3.4.4 Backlight Setup The backlight for the LCD display can be enabled, disabled or set so that it turns off automatically, when the screen has been idle for a certain amount of time. • [ON] Always ON. • [OFF] Always OFF. • [1min] Backlight turns off when the screen has been idle for more than one minute. • [3min] Backlight turns off when the screen has been idle for more than three minutes. • [5min] Backlight turns off when the screen has been idle for more than five minutes.
Taurus Super-S3 LCM 3.5 Event Information In addition to the details about the hardware and device configuration, the LCD display will also show certain event information. Following is a list of possible messages and their meanings. • [HDD Error or No Interface] The alarm goes off and this message shows when (A) only one drive (or none) is installed and (B) when the power is turned on before the interface cable is connected to the computer and before the computer is turned on.
Taurus Super-S3 LCM Appendix 4 Appendix 4.1 Precautions 4.1.1 Power on/off precautions It is highly recommended to switch the unit off when not in use. When re-locating the device or when not in use for an extended period of time, we strongly recommend unplugging the unit. 4.1.2 Location and placing precautions Avoid positioning your device in the following places: • • • • Locations with direct sunlight, next to radiators, other sources of heat.