
Operation Manual


3
dx turntables
dx turntables
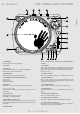
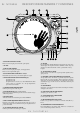
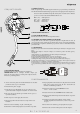
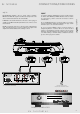
PART NAMES AND FUNCTIONS
english
1) START/STOP Use this to change the speed of the platter when the PITCH indicator
Press this button to start or stop the platter. is NOT lit.
2) PLATTER 11) TONE ARM
This is a fully manual tone arm. To start playback, gently place the
3) MOTOR OFF stylus on the record using the headshell finger support. Do not drop
Press the button to enable motor off, and the led will be flash the stylus onto the record as it may cause damage to the diamond
Press the button again to disable function. tip and to the record.
4) TARGET LIGHT 12) 45 RPM ADAPTOR
Insert target light to the deck and it will light up. Place on centre spindle fo ecords with large centre holes.
5) PLATTER REVOLUTION SPEED BUTTONS 13) ANTI SKATE KNOB
33 rpm press 33 When a record is playing, a force is generated drawing the stylus
45 rpm press 45 towards the centre of the record. Set this knob to the same value as the
78 rpm press 33 and 45 stylus pressure to offset this force.
6) REVERSE 14) COUNTER WEIGHT
This button is used to reverse the direction of the platter rotation. Use this to balance the tone arm and to adjust the stylus pressure.
7) +/-8%,+/-12%,+/-20% 15) POWER SWITCH
Press the button to switch to 8%, press again to switch to 12%, and This switch turns the power on or off, including the motor and audio
again to 20%. signal.
8) QUARTZ LOCK 16) POWER CORD CONNECTOR
On will hold the revolution speed to 0%. Used to connect the included power cord.
Off will allow use of the pitch adjust.
17) OUTPUT SIGNAL SELECTOR
9) HEADSHELL LOCKING NUT Two forms of output audio signal are available: Phono and Line.
Attach the headshell by inserting into the front end of the tone arm,
then turn the locking nut clockwise with the head shell firmly held 18) AUDIO OUTPUT CONNECTOR
horizontally. This is the audio output connector (RCA). Must be connected as
explained at Connections part of this manual.
10) PITCH SLIDER
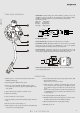
r playing 7” r
1
1
4
5
76 8
14
13
12
11
10
9
2
3
18
1716
15