
Operation Manual


4
dx turntables
english
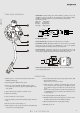
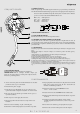
19.Headshell - Install cartridge here. When installing a cartridge, refer to the
installation instructions supplied by the manufacturer of that cartridge. During
installation, attach the stylus protector to guard the stylus tip from damage.
Attach wires as follows:
White (L+) Left channel+
Blue (L-) Left channel -
Red (R+) Right channel+
Green (R-) Right channel-
TONE ARM ASSEMBLY
1. Push the power to on and the speed indicator and the strobe- 10. Set the desired pitch adjusts range by depressing the buttons until
illuminator will light up. the desired pitch is reached.
Options are +/-8% or +/-12% or +/-20%.
2. Insert target light for illumination the stylus.
11. Adjust the pitch to a desirable speed. During play, observe the
3. Place a record on the turntable mat. When playing a 45rpm
strobe dots. If the strobe dots appear to the right, the pitch is
record with a large center hole; place the 45-rpm adapter on the
slower than the rated speed. If they flow to the left, the rated
centre spindle.
speed.
If the strobe dots appear stationary, which means the platter is in
4. Set the rotation speed (33/45/78) to match the record.
normal turntable speed, move the pitch control slider up or down
to adjust the speed.
5. Release the arm clamp.
12. To suspend play, lift tone arm with cueing lever.
6. Set the cueing lever to the up position.
13. When play is finished, raise the cueing lever, move the tone arm to
7. Press the Start/Stop button and the turntable platter will start to the armrest and secure the tone arm with the arm clamp.
rotate.
14. Press the Start/Stop button to stop the platter rotating.
8. Move the tone arm over the desired groove.
15. Push the power to off.
9. Set the cueing lever to the down position, the tone arm will descend
slowly onto the record and play begins.
OPERATION
22
21
20
24
23
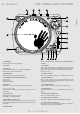
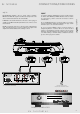
19
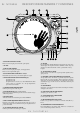
20.S-Shaped Tone Arm
21.Tone Arm Lift - This elevates the tone arm above the record surface.
22.Anti-Skate Control - This applies inward force to the tone arm so it doesn't skip
outward across the record due to the centrifugal force of the record spinning.
Cartridge manufacturers usually specify the proper setting of this.
23.Counterweight - Adjustment creates the proper downward pressure of the
stylus to the record. Attach now by sliding the counterweight onto the rear of the
tone arm. Twist it lightly and it will screw onto the rear shaft of the tone arm.
24.Tone Arm Clamp and Rest - Use this rest for the tone arm and clamp it in
position during transportation.