DVB-T USER’S MANUAL DIGITAL TERRESTRIAL RECEIVER
Index 1. 2. 3. 4. 5. 6. INTRODUCTION.............................................................................2 1.1. Features..................................................................................2 1.2. Safety Information...................................................................2 DEVICE OVERVIEW.......................................................................4 2.1. Main Unit.................................................................................4 2.2.
6.2.3. 6.3. 6.4. Automatic Search........................................................14 Configuration.........................................................................14 6.3.1. OSD............................................................................15 6.3.2. TV...............................................................................15 6.3.3. System etup................................................................15 6.3.4. Time.............................................
1. INTRODUCTION Tune in the Digital Terrestrial Television connecting your T.12 to your TV and record your favourite programs in a easy and fast way. 1.1. Features Handy and intuitive user interface that supports the display of multilingual characters. Electronic Program Guide (EPG), Teletext and Parental Lock. Compatible with PAL, NTSC and SECAM TV systems. Channel manager mode to add, memorize favourites, sort and delete channels.
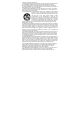
instructions should be adhered to. (4) FOLLOW INSTRUCTIONS: All operating and use instructions should be followed. (5) CLEANING: Unplug this product from the wall outlet before cleaning. Do not use liquid cleaners or aerosol cleaners. Use a damp cloth for cleaning. (6) ATTACHMENTS: Do not use attachments not recommended by the product manufacturer as they may cause hazards.
If replacement of the plug is required, be sure the technician service has used a replacement plug specified by the manufacturer that has the same overload protection as the original plug. (14) OUTDOOR ANTENNA GROUNDING: If an outside antenna or cable system is connected to the product, be sure the antenna or cable system is grounded so as to provide some protection against voltage surges and built-up static charges.
(20) DAMAGE REQUIRING SERVICE: Unplug this product from the wall outlet and refer servicing to qualified service personnel under the following conditions: When the power-supply cord or plug is damaged. If liquid has been spilled, or objects have fallen into the product. If the product has been exposed to rain or water. If the product does not operate normally by following the operating instructions.
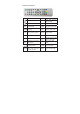
2.2. Remote Control Unit key 0~9 TV/RADIO oPR MENU function key function Turn ON/OFF the receiver EPG Display EPG (Electronic Program Guide) Mute audio output INFO Display channel info Numerical pad Switch TV or Radio channels Go to previous program Display Main Menu AUDIO TXT Changing the audio mode Switch to teletext mode SUBTITLE Display subtitles FAV Display Favourite list Enter the mode of sample images on the screen .
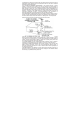
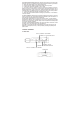
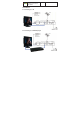
Function buttons, Selection of function in the teletext. 3. SETTING UP 3.1. Connecting to a TV 3.2.
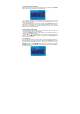
3.3 Channels Initial Installation If this is the first time for you to use the DVB-T receiver, after pressing POWER button at the screen will appear the Init Install menu. In the OSD Language item, you could set up the language of the on screen menus. At the Area item you can choose your current area, where you are going to search channels. Once the OSD language and area are selected, press OK/LIST button and select YES on the popup window to start channels installation.
Press INFO to enter the operation guide while the channels list is displayed. 4.2. Favourite List You can set your own favourite channels lists too (see chapter 6.1. Channel Manager). Press FAV to display the favourite list, press PR+ or PR- to select a channel and press OK/LIST to display it. Use TV/RADIO to switch between TV and radio channels. Press EXIT to close the favourite list. Press INFO to enter the operation guide while the favourite list is displayed. 4.3.
buttonsor to choose the audio modes between STEREO, LEFT MONO and RIGHT MONO. In the same way, if a program is broadcast with one or more subtitles languages, you can display them by pressing SUBTITLE in the remote control unit and usingor “ ” to “ ” show the available options. 4.5. Displaying Program Information You can read the current program information by pressing INFO in the remote control unit.
Press EXIT to close the Teletext window. 4.7. DVB-T recording Your AKDVB30 allows you to record your favourite programs and store them in a USB device you must connect to the receiver. See chapter 9. Recording to make a recording of the program you wish. 5. MAIN MENU From the Main Menu you can activate several functions and adjust many settings as you wish.
6.1.1. Channel Organizer The Channel Organizer submenu could manage the searched DVB-T channels. Press PR+ or PR- to select the channels. Once a channel is selected, press the RED button to set up the channel as the Favourite channel. Press the GREEN buton to delete the channel. Press the YELLOW button to move the channel to another place in the list (select the new position you wish and press OK/LIST ).
number button from 1 to 8 to classify the channels as None, News, Science, Sports, Movies, Kids, Music or Fashion. Once the setting has been finished, press continuously EXIT until close the TV Digital Menu and the device will save the settings automatically. 6.1.4. Edit Channels In the Edit Channel submenu, pressing the RED button in the remote control unit to add channels or press the YELLOW button to edit the channels. 6.1.5. Delete All In Delete All submenu you could delete the whole channels list.
6.2.1. Area Search Select the Area Search and press OK/LIST to enter the area search submenu. Select the zone and press OK/LIST to start to search channels according to the area setup. 6.2.2. Manual Search Select Manual Search and press OK/LIST to enter the manual search submenu. Select a frequency and press OK/LIST to start to search channels in the selected frequency. 6.2.3. Automatic Search Select Automatic Search and press OK/LIST to enter the automatic search submenu.
OSD: Pressing or you can set up the colour of the menu. Hora en OSD: Pressing or you can activate or deactivate the Time Display function (if it is active, the time will be displayed on the upper right corner of the screen). OSD Timeout: You can set the staying time of the OSD texts on the screen. OSD Trans: You can set the transparency of the menu. OSD Language: Youcan set the language of the menu. 1st Audio Language: Set the language you wish for the audio.
LCN: Once the search has been finished, active the LCN function to arrange the channels according to the LCN (Logical Channel Number). Area: Select the zone to search the channels. 6.3.4. Time Select Time and press OK/LIST to enter the system’s time settings submenu. Timer Mode: Select Auto to use the DVB-T program time (you can set up the GMT Offset and the summer time). Choose Manual to set up manually time and date. Date: Use the numerical pad to enter manually the current date.
In this submenu you can set up your own password for channels locking. The password of the Parental Lock is 0000 by default. Input the correct old password twice before trying to set up a new password. 6.4. Software Upgrade Contact our customer’s attention service, or visit our website www. *******.com to check if there are software updates available for this product. 6.5.
consumes from the system. The range of compatible video formats is limitated, please use a video player to play specific video files. 8. GAMES Select in the Main Menu the Games option to access the availables classic games. Select the one you wish and press OK/LIST to enter. 9. RECORDER You can do recordings of the DVB-T programs you wish. The recordings will be stored in the USB devise you have connected to your AKDVB30 previously.
Duration: Is the duration of being waken up according to the channel mode (00:05 means to wake up to the reserved channel and broadcast for 5 minutes, and then switch back to the previous channel). Once you have finished the setup, press OK/LIST and exit the Digital TV menu to confirm the changes. 9.2. Recording Files Playing Press FILELIST to play the files you have recorded with your AKDVB30 and the recordings list will be displayed showing the source channel as well as the recording date.
12. Appoint for Record function Can make the appointment record of certain programs via EPG or UI. Supports up to 8 kinds of appointments for recording. Supports seasonal appointment of recording (dayly, weekly, yearly) and oneoff appointment. Pops out the warning message when appointments clash. In standby mode, can via EPG or UI to set the appointment recording to autoRecord when power-on and auto-power off after finishing recording. 13.
Standby power Standby power 0.5~0.